Permissions Dialog Box
To set online (regular) permissions for a device type, highlight it (use Ctrl and/or Shift to select several types simultaneously) and select Set Permissions from the shortcut menu available by a right mouse click. Alternatively, you can click the appropriate button on the toolbar.
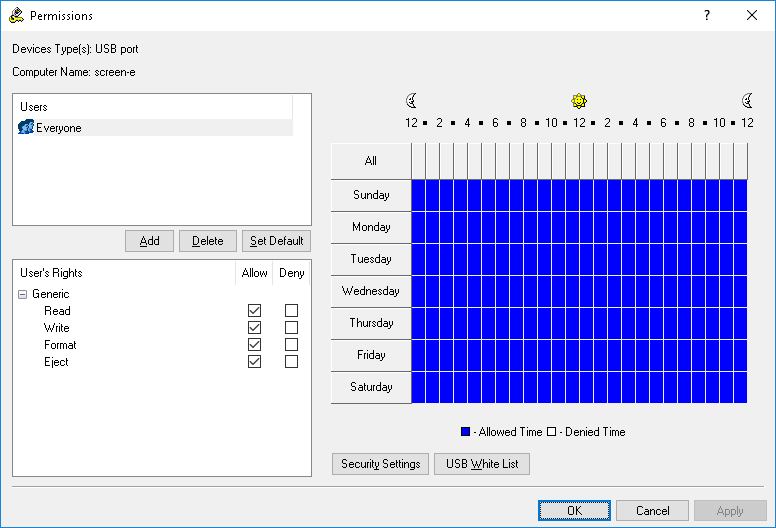
The names of the users and user groups assigned to a device type are shown in the list of accounts on the top left-hand side of the Permissions dialog box.
To add a new user or user group to the list of accounts, click Add. You can add several accounts simultaneously.
To delete a record from the list of accounts, use the Delete button. Using CTRL and/or SHIFT you can select and remove several records simultaneously.
Use the
Set Default button to set default permissions for the device. For a list of permissions set by default, see
Default Permissions.
Using special time control, you can define a time when the selected user or user group will or will not have access to devices. Time control appears at the top-right side of the Permissions dialog box. Use the left mouse button and select the allowed time. To select a denied time use the right mouse button. Also, you can use the keyboard to set times - arrow keys for navigation and the spacebar to toggle allowed/denied time.
To specify the user actions to be allowed or denied, set the appropriate access rights. There are three categories of access rights:
If all Allow rights are enabled for the user account it means that this account has “full access” rights. If all Deny rights are enabled for the user account it means that this account has “no access” rights. If neither Allow nor Deny rights are enabled for the user account it means that this account inherits access rights from its user group (if there is no group to inherit rights from then this account has “no access” rights).
Note: The “no access” right has a priority over all other rights. It means that if the group to which some user belongs has the “no access” right but this user has “full access”, the user still cannot access a device. If you want to deny access for some user or group, you can just remove it from the account’s list, it is not necessary to add it with “no access”. |
Also, the Everyone user has a priority over all other accounts. It means that if Everyone has the “no access” right, no one can access a device. The following message will appear: “You have denied everyone access to Device Type(s): <device type list>. No one will be able to access Device Type(s): <device type list>. Do you wish to continue?”
Even if you deny access to hard disks, users with local administrative privileges (the SYSTEM user and members of the local Administrators group) still can access the partition where Windows is installed and running.
We recommend that you add only those accounts (users and/or groups) to the list which should be able to access a device. If the account’s list is empty (contains no records at all) then no one can access a device. Also, it is recommended to add the SYSTEM user with “full access” to hard disks and optical drives.
On some systems, users may receive the following message when they log in: “Failed to configure a(n) CDROM Drive device. Check event log for details.” It means that the SYSTEM user cannot access DVD/CD/BD-ROM. To avoid this message, set the “full access” right for SYSTEM on Optical Drive.