All MassTransit actions can be configured locally and remotely to the server through the MassTransit Administrator interface. To create or configure an action, connect to your MassTransit Server through the MassTransit Administrator. The configuration settings of the MassTransit actions are in the Actions tab of the Setup window of the MassTransit Administrator.
Options of the Actions Tab
Open the Setup window of the MassTransit Administrator by clicking on the Setup button from the Navigation Bar or by selecting the Setup... option from the Window main menu.
Open the Actions tab of the window.
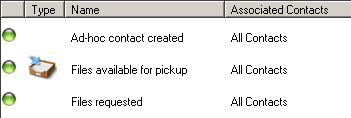
In MassTransit 7.6 and later, you will also see the contacts associated with each action.
Add a New Action
To add a new action to the list:
In the Actions tab of the Setup window, click on the Add... button.
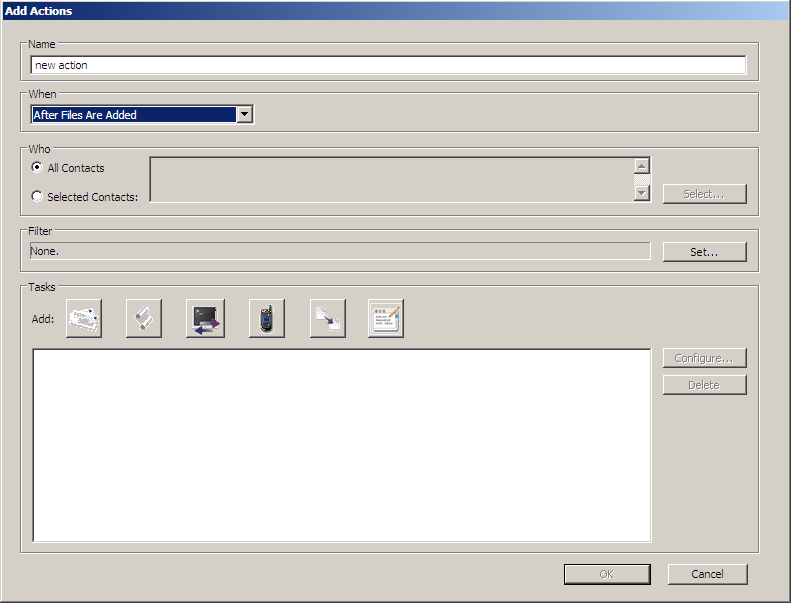
In the Add Actions window that appears, enter a name for the action in the Name field.
From the When drop-down menu, select a condition which will trigger the action.
for MassTransit HP:
Connection Completes
Connection Fails
File Transfer Fails
After Files Are Added
After Files Are Sent
Files Are Received
Before A File is Processed
After A File is Processed
Output Processing Fails
All Errors
Contact Added
Contact Deleted
Before Log Entries Are Auto-Purged
Before File Entries Are Auto-Purged
After Each File is Sent
After Each File is Received
Before Files Are Transmitted
Database Disk Space Low
Mailbox Disk Space Low
Periodic Event
License Expiring Soon
Files Requested
After Ad-Hoc Contact Is Created
Note: The After Ad-Hoc Contact Is Created action trigger is available in MassTransit 7.2 and later. This action fires when new contacts are created as a result of files being sent to or requested from arbitrary email addresses.
In the Who section of the window, you can filter the contacts the action will apply for:
when the All Contacts radio button is selected, the action will apply for all contacts;
if you select the Selected Contacts radio button, a list with all registered contacts and available contact groups will appear – highlight the contacts and/or groups you want to apply the action for (you can select multiple contacts and groups by holding the Ctrl key and highlighting the desired contacts; if you hold the Shift key and click on contacts, sequential records can be selected); after you have configured the desired contacts, click on the OK button. The selected contacts will appear in the field next to Selected contacts radio button.
The available groups are:
Note: These groups are available in MassTransit 7.3 and later.
All Application Clients – Triggers the action for all Application type contacts.
All Servers – Triggers the action for all Server type contacts(not including Satellite servers).
All Web Clients – Triggers the action for all Web Client type contacts.
All Satellite Servers – Triggers the action for all Satellite Server type contacts.
Note:If you have selected a type of group (e.g. All Servers), when adding new contacts of that type, the configured Action will get triggered for the new contacts as well.
The Who filter can be set for the following trigger conditions only:
Connection Completes
Connection Fails
File Transfer Fails
After Files Are Added
After Files Are Sent
Files Are Received
Before A File is Processed
After A File is Processed
Output Processing Fails
All Errors
After Each File is Sent
After Each File is Received
Before Files Are Transmitted
Files Requested
After Ad-Hoc Contact Is Created (This action trigger is available in MassTransit 7.2 and later.)
For some of the trigger conditions you can set filters in the Filter area of the window:
Filters can be set only for the following trigger conditions:
Connection Fails
File Transfer Fails
After File Are Added
After Files Are Sent
Files Are Received
After A Files Is Processed
Output Processing Fails
All Errors
After Each Files Is Sent
After Each Files Is Received
Before Files Are Transmitted
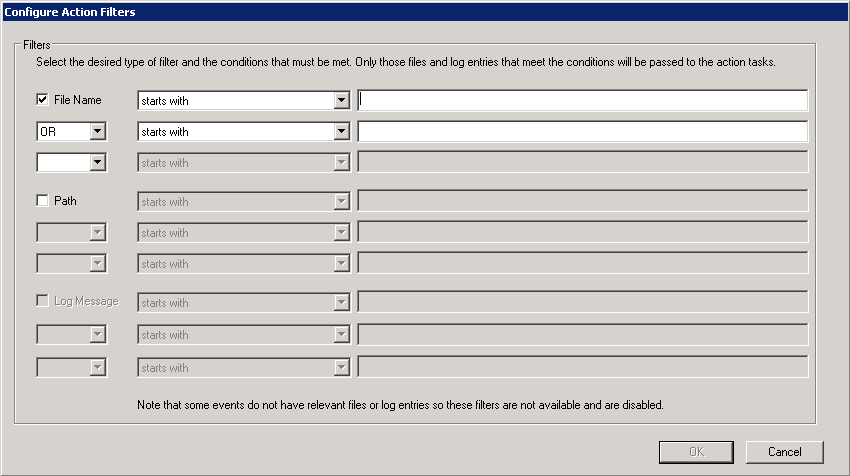
If you click on the Set... button, the Configure Action Filters window appears. In it, you can choose the type of filter you want to set by checking the corresponding check box:
File name – can be used along with the Path name filter;
Path name – can be used along with the File name filter;
Log message – cannot be combined with the other filters from this window.
After you have selected a filter type, select the conditions that must be met from the drop-down menu next to the chosen filter. Only those files and log entries that meet the conditions will be passed to the action tasks. The following options are available in the drop-down menu:
Note: As of MassTransit 7.3, you can configure multiple conditions for all three filters types using AND/OR logic.
starts with – filters files/paths/log messages that start with a defined word or phrase; the phrase must be specified in the field next to the drop-down menu;
does not start with – filters files/paths/log messages that do not start with a defined word or phrase; the phrase must be specified in the field next to the drop-down menu;
contains – filters files/paths/log messages that contains a defined word or phrase; the phrase must be specified in the field next to the drop-down menu;
does not contain – filters files/paths/log messages that do not contain a defined word or phrase; the phrase must be specified in the field next to the drop-down menu;
ends with – filters files/paths/log messages that end with a defined word or phrase; the phrase must be specified in the field next to the drop-down menu;
does not end with – filters files/paths/log messages that do not with a defined word or phrase; the phrase must be specified in the field next to the drop-down menu;
When you are ready with the filter configuration, click on the OK button and the set filter(s) will be displayed in the Filter area.
In the Tasks area of the Add Action window, click on a button in order to select a task that will be executed when the trigger condition is fulfilled. As mentioned above, the available tasks are the following depending on the MassTransit flavor you have:
for MassTransit HP:
Email notification;
Script;
Launch process;
SMS notification;
Write to log;
Copy/Move file;
The task configuration is specific for each type of task. Detailed information on how to configure each task is shown below. You can add more than one Action Task for each action.
When you have configured the action, click on the OK button in the Add Actions window. The action should appear in the list of the Setup window.
Click on the OK button in the Setup window in order to save the changes. If you click Cancel, the action(s) changes will not be saved.
Edit an Existing Action
To edit an existing action from the list:
In the Actions tab of the Setup window, click on the Configure... button.
In the Add Actions window that appears, edit the desired properties. Follow the steps from 3 to 8 from the Add a New Action section to configure the action.
Duplicate an Existing Action
MassTransit allows you to duplicate configured actions. The duplicate actions will have the same names as the original ones but with a postfix appended. They will have exactly the same configurations and status as the action they have been duplicated from.
To duplicate an action:
In the Actions tab of the Setup window, click on the Duplicate button.
The duplicated action should appear in the list. Click on the OK button in the Setup window in order to save the changes.
Enable/Disable an Action
If you currently do not want to use a configured action, you can just disable it instead of deleting it. This way, you will be able to enable and use it whenever you decide to without having to reconfigure it.
In the first column of the actions list in the Setup window, there is an indicator showing whether the action is enabled or not.
If the indicator is green, the action is enabled.
If the indicator is red, the action is disabled.
To enable a disabled listen, highlight it and click on the Enable button of the "Actions" tab.
To disable an enabled listen, highlight it and click on the Disable button of the "Actions" tab.
Delete an Action
In order to delete an action:
In the Actions tab of the Setup window, highlight an action.
Click on the Delete... button.
In the window for deletion confirmation that appears, click Delete if you want to delete the action. Otherwise, click Cancel.