Open the Setup window by clicking on the Setup button from the Navigation Bar or by selecting the Setup... option from the Window main menu.
Open the Services tab of the Setup window.
Click on the Add... button in order to add a new service.
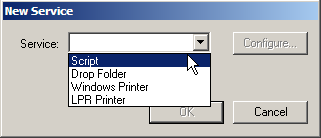
The New Service window appears.
Select the Script option from the Service drop-down menu.
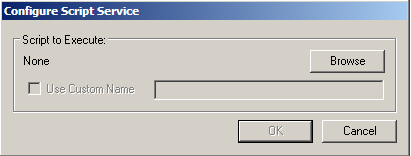
The Configure Script Service window appears next. Click on the Browse button and select a .vbs file or a .js file for a VBScript (Visual Basic Script) or a JavaScript respectively.
After selecting the desired script file, click Open and its name will be displayed in the Script to Execute area of the Configure Script Service window.
By default, the service name will be the name of the script file. If you want to, you can set a custom name for the service. To do that, check the Use Custom Name check box and enter a custom name in the field next to it.
When you configure the service settings, click on the OK button in the Configure Script Service window. The newly configured service should appear in the Services tab.
Click on the OK button in the Setup window to save the changes. If you click Cancel, the service will not be saved.
Edit a Script service
To edit a configured service in the Services tab:
Highlight the desired service in the list with services.
Click on the Configure... button – the Configure Script Service window should appear.
Click on the Browse button and select a .vbs file or a .js file for a VBScript (Visual Basic Script) or a JavaScript respectively.
After selecting the desired script file, click Open and its name will be displayed in the Script to Execute area of the Configure Script Service window.
By default, the service name will be the name of the script file. If you want to, you can set a custom name for the service. To do that, check the Use Custom Name check box and enter a custom name in the field next to it.
When you configure the service settings, click on the OK button in the Configure Script Service window. The newly configured service should appear in the Services tab.
Click on the OK button in the Setup window to save the changes. If you click Cancel, the service will not be saved.
Enabling and disabling a service
In the first column of the Services list, there is an indicator showing whether the service is enabled or not.
If the indicator is green, the service is enabled.
If the indicator is red, the service is disabled.
To enable a disabled service, highlight it and click on the Enable button of the "Services" tab.
To disable an enabled service, highlight it and click on the Disable button of the "Services" tab.
Delete a service
To delete a service:
Highlight it from the list with services.
Click on the Delete... button.
In the dialog box for deletion confirmation, click Delete if you are sure you want to delete the service. Then, the service will disappear from the list with services.
To save the changes, click on the OK button in the Setup window. If you click Cancel, the changes will not be saved.