The Acronis Extended Capacity Manager (ECM) allows your operating system (OS) to support large capacity disks that have the MBR partition style. You are able to use the disk space beyond 2 TB. This free space will be recognized as a separate disk, and will be usable by your operating system and applications as if it was a regular physical hard disk.
When it is needed
If you have hard disks larger than 2 TB and your OS does not see the entire disk space, you can resolve this issue through one of the following options:
Use Extended Capacity Manager. You can use this tool for all cases, because it doesn't delete any data on a large disk. Therefore, we recommend that you use this tool if your large disk contains an operating system or useful data. See details below.
Convert the MBR disk to GPT disk. The easiest way to do this is by using Windows built-in Disk Management utility. Note that this utility erases all data on the disk while converting it to GPT.
The following table helps you to find out which option to choose. It relates only to disks larger than 2 TB.
MBR disk containing OS or data
Clear MBR disk without OS and data
Windows XP (x32)
Use ECM
Use ECM
Windows XP (x64)
Use ECM
Convert to GPT
Windows Vista
Use ECM
Convert to GPT
Windows 7
Use ECM
Convert to GPT
Windows 8
Use ECM
Convert to GPT
How it works
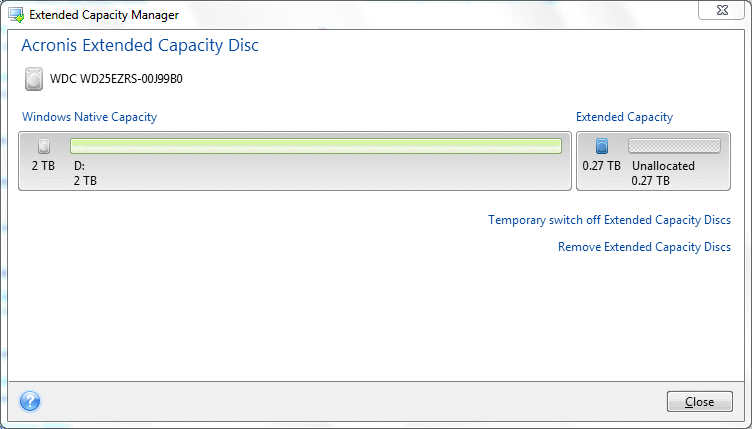
Acronis Extended Capacity Manager wizard displays all hard disks larger than 2 TB (unallocated or with MBR partition style). You can see the disk space which Windows recognizes and allocates. This space is called Windows Native Capacity in the wizard.
The space beyond 2 TB is displayed as Extended Capacity. You can enable Extended Capacity Disks, and once it is done, this space becomes visible to the operating system and ready for disk management operations.
How to use it
To start Acronis Extended Capacity Manager, select the Tools and utilities tab and then click Acronis Extended Capacity Manager.
If the program does not find any MBR disks with a capacity of more than 2 TB, it displays a message that the entire disk space is accessible and you do not need to use Acronis Extended Capacity Manager.
Acronis Extended Capacity Manager shows the Extended Capacity available for allocation.
Click Allocate space to see the possible disk space allocation in the next step.
After clicking the Apply button, an Extended Capacity Disk will be emulated on your physical disk. If your physical disk's capacity is more than 4 TB and your operating system does not support the GPT partition style, the program creates several MBR Extended Capacity Disks.
Note that Extended Capacity Disks are not bootable, though most of their properties are the same as that of physical disks.
Click Close to exit the Acronis Extended Capacity Manager.
What else you can do
After allocating the space, you can temporarily switch off the Extended Capacity Disks by clicking Temporary switch off Extended Capacity Disks. This makes the Extended Capacity Disks invisible for disk management tools, though the disk space will remain allocated and you will be able to make these partitions visible again later. To do this, start the Acronis Extended Capacity Manager and then click Allocate space.
To remove the Extended Capacity Disks, click Remove Extended Capacity Disks and then click the Apply button in the next step. These disks will be removed from your system, and the disk space beyond 2 TB will become inaccessible. To allocate this space later, you need to start the Extended Capacity Manager again and then repeat the wizard's steps.
You will be able to continue using the Extended Capacity Disks even after uninstalling Acronis True Image 2013. During uninstallation, you will be asked whether you want to remove the Extended Capacity Disk. If you choose not to remove the disk, it will remain usable.