The Files Advanced installer comes with a configuration utility, which allows you to quickly and easily set up the access to your Files Advanced Gateway server, File Repository and Files Advanced Web Server.
Note: See the Network Requirements section for more information on best practices for the IP address configurations of Files Advanced.
Note: For information on adding your certificate to the Microsoft Windows Certificate Store, visit the Using Certificates article.
Configuration Utility Overview
The settings in the Configuration Utility can be modified at any time by running the utility and making the necessary changes. It will automatically adjust the necessary configuration files and restart the services for you.
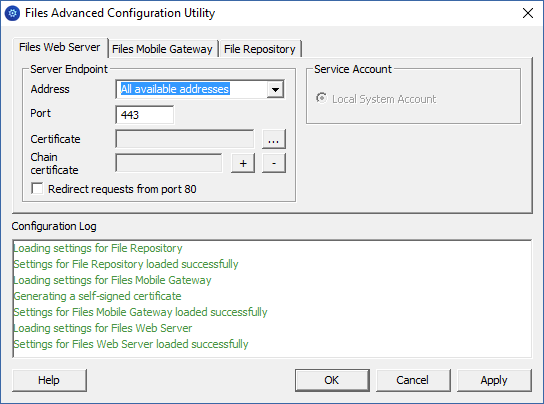
Web Server tab
The Files Advanced Web Server provides the web user interface for Files Advanced clients, and is also the administration console for both Mobile Access and Sync & Share.
Address - The IP address of your Web Interface or pick All Addresses to listen on all available interfaces.
Port - The port of your Web Interface.
Certificate - Path to the certificate for your Web Interface. You can choose a certificate from the Microsoft Windows Certificate Store.
Chain Certificate - Path to the Intermediate certificate for your Web Interface. You can choose one from the Microsoft Windows Certificate Store. This certificate is only required if your Certificate Authority has also issued you an Intermediate certificate.
Redirect requests from port 80 - When selected, Tomcat will listen for incoming traffic on the unsecure port 80 and redirect it to the HTTPS port you have specified above. If you have another program listening on port 80, do not check this box.
Service Account - This allows the Files Advanced Web Server service to run in the context of another account. This is normally not required in typical installations.
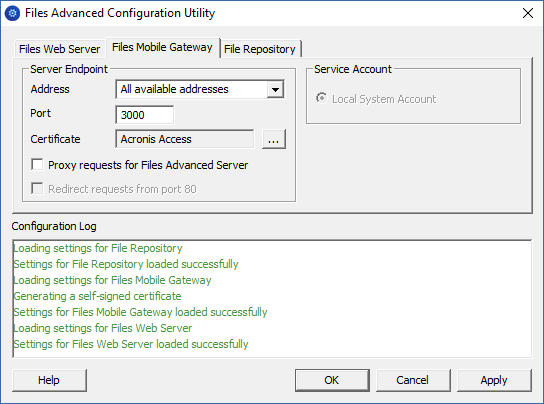
Mobile Gateway tab
The Gateway Server is used by mobile clients to access both files and shares.
Address - The IP address of your Gateway Server or pick All Addresses to listen on all interfaces.
Port -The port of your Gateway Server.
Certificate -Path to the certificate for your Gateway Server. You can choose a certificate from the Microsoft Windows Certificate Store.
Service Account -This allows the Gateway Server service to run in the context of another account. This is normally not required in typical installations.
Proxy requests for Files Advanced Server - When checked, users will connect to the Gateway Server which will then proxy them to the Files Advanced Server. This is available on when you have an Files Advanced Server and Gateway server installed on the same machine.
Redirect requests from port 80 - When selected, Tomcat will listen for incoming traffic on the unsecure port 80 and redirect it to the HTTPS port you have specified above. If you have another program listening on port 80, do not check this box.
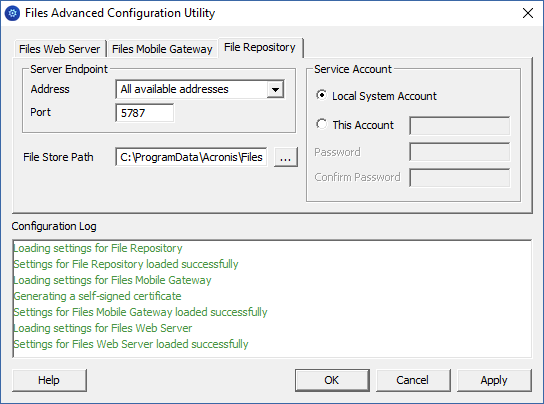
File Repository tab
The File Repository is used by Sync & Share functionality. If you haven't enabled Sync & Share, you can accept the standard values. If you are using Sync & Share, the file store path should specify the disk location to be used for storage. If you plan to use Amazon S3 for storage, then the default values are ok.
Address - The IP address of your File Repository or pick All Addresses to listen on all interfaces. If you specify an IP or DNS address, the same address should also be specified in the File Repository section of the web interface. For more information on it, visit the File Repository article.
Port -The port of your File Repository. The same port should also be specified in the File Repository section of the web interface. For more information on it, visit the File Repository article.
File Store Path - UNC path to your File Store. If you change the File Store path, you MUST manually copy any files that are already in the original File Store location to your new location.
Note: If you move the File Store to another location, you should upload a new file to make sure it is going into the correct new location. Another thing is downloading a file that was already in the file store to make sure all of the files that were in the original location can be accessed at the new location.
Service Account - If the file storage for the repository is on a remote network share, then the service account should be configured to be one that has permissions to that network share. This account must also have read and write access to the Repository folder (e.g. C:\Program Files (x86)\Acronis\Files Advanced\File Repository\Repository) to write the log file.
Note: If you use a specific account for the service instead of the Local System Account, you will have to open the Services control panel, open the properties for the Files Advanced File Repository service and edit the Log On tab. You need to manually enter the account and its password in the appropriate fields.
Proceeding to the Setup Wizard
After you have filled in all the necessary fields, pressing Apply or OK will restart the services you have made changes to.
Note: It will take 30-45 seconds after the services have started before the Files Advanced Web Server is available.
Once you are done with the initial setup of the Configuration Utility, a web browser will automatically open the Files Advanced web interface.
On the login page you will be prompted to set the administrator password and then the Setup Wizard will guide you through the setup process.
Write down the administrator password, as it cannot be recovered if forgotten!