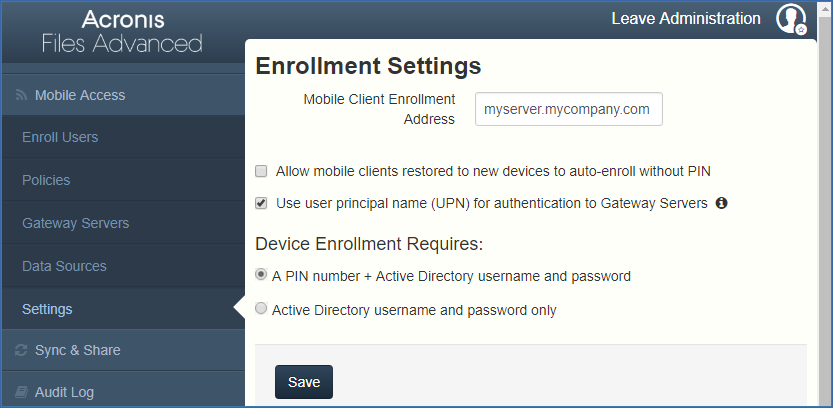
Enrollment Settings
Allow mobile clients restored to new devices to auto-enroll without PIN -
Use user principal name (UPN) for authentication to Gateway Servers - will use username@domain.com for authentication when enabled instead of domain/username.
Device Enrollment Mode
Files Advanced includes two device enrollment mode options. This mode is used for all client enrollments. You will need to select the option that fits your requirements:
Inviting a user to enroll
Users are typically invited to enroll with the Files Advanced Server with an email that is sent from an Files Advanced Administrator. If required by the server, this email contains a one-time use PIN number that is valid for a configurable number of days. The PIN number can be used to enroll the Mobile app on one device only. If a user has multiple devices, they will need to be sent one invitation email for each device that needs access. This email includes a link to the Mobile app in the App Store, in the case the app first needs to be installed. It also includes a second link that, when tapped while on the device, will open the Files Advanced mobile and auto-complete the client enrollment form with the Files Advanced Server's name, the unique enrollment PIN number, and the user's username. By using this link, a user simply enters their account password to complete client enrollment.
Using basic URL enrollment links when PIN numbers are not required
If your server is configured to not require PIN numbers for client enrollment, you can give your users a standard URL that will automatically start the enrollment process when tapped from the mobile device.
To determine the enrollment URL for your management server, open the Mobile Access tab and open the Enroll Users tab. The URL is displayed on this page.
Note: For more information on the two modes, visit the Settings section.
To generate a Files Advanced enrollment invitation:
Note: If you prefer to manually communicate enrollment PIN numbers to the users, you can uncheck the Send an enrollment invitation email to each user with a specified address option. Each PIN number will be visible on the Enrollment Invitations page.
Note: Files Advanced licensing allows each licensed user to activate up to 3 devices, each additional device beyond 3 is counted as a new user for licensing purposes.
Note: If you get an error message when sending, confirm that the SMTP settings in the SMTP tab under General Settings are correct. Also, if you're using Secure connection, verify that the certificate you are using matches the host name of your SMTP server.
Inviting users previously enrolled by mobilEcho 4.5 or earlier
mobilEcho 2.X did not require a PIN number to enroll a client in the Client Management system. There are two options for migrating mobilEcho 2.X clients to the Files Advanced management system. By default, mobilEcho servers that are upgraded from 2.X allow clients previously managed by the 2.X server to auto-enroll and appear in the Files Advanced Devices list without having to enter a PIN number. If you would like to ensure that all devices accessing the system have enrolled with a PIN number, you can disable this setting. In that case, if the user doesn't have User can remove Mobile Client from management privileges, the user will need to delete Files Advanced from their device and reinstall a new copy from the App Store before they can enroll using a PIN number.
Also note that when this auto-enroll setting is enabled, it will be possible to do an iTunes backup of a device running a managed version of mobilEcho 2.X or 3.0, restore that backup to a new device, and as long as the user has the active directory username and password for the associated account, that new device can be automatically enrolled in client management without a PIN number.
It is recommended that you disable the auto-enroll setting after your previously managed clients have all accessed the management server for the first time. They will appear in the Devices list when this happens.
To allow mobilEcho clients that were already enrolled in mobilEcho 2.X Client Management to automatically enroll after your mobilEcho Client Management server is upgraded to the Files Advanced Server, enable the Allow mobilEcho clients previously managed by 2.X servers and managed mobilEcho clients restored to new devices to auto-enroll without PIN setting.