Apple enthusiasts love the sleek design and easy user interface of the company's devices. Yet setting up a backup of your Mac can be frustrating since most external hard drives must be formatted before being used. As you'll see, however, knowing how to back up a Mac to an external hard drive doesn't have to be intimidating.
Why should you backup mac to an external drive?
Backing up your Mac is just as crucial as backing up any computer or mobile device. After all, your Mac contains all your important files, photos, documents, and cherished memories. If something were to happen to your Mac, you could face the loss of all your data, and for sure, you don't want to get into such a situation.
In order to prevent such a scenario, the best backup destination for Mac backups is an external hard drive. It is one of the most secure methods to backup in case of emergency, it is a reliable, efficient, fast, and not expensive method. Everybody wants to have a secure copy of their information because unexpected scenarios tend to happen very often.
There is no such thing as this that can't happen to me, so why would I need a backup option? As per one of the latest research studies made by the MTA University, every person will be in a situation where something unexpected happens and they risk losing all the data stored over the years.
The best thing you can do to have a life-saving option in such a scenario is to have a backup option to help you pass through this unpleasant experience without losing a single file. One of the best decisions you can make is to buy an external hard drive and store there your information.
Thus, you will have a full copy of the important data stored for many years, and it won't be a expensive option for you. On the other hand, it is one of the most reliable methods, because you will always know where this hard drive is when needed, so you will always have the life-saving option next to you in case of emergency. The knowledge that your precious files are safely stored off-site brings a sense of comfort and reassurance.
What are the benefits of Backing Up your Mac to an External Drive?
There are a lot of benefits to using an external hard drive to backup your Mac device. One of the most important advantages is the added security it provides in case of a computer crash or unforeseen disaster. Even if your internal hard drive fails, you'll still have a copy of all your files stored on the external drive, and this is a great way to save your precious information no matter what happens.
Another fundamental advantage of backing up Mac data to a drive is that it helps free up space on your internal storage. As we accumulate files, photos, and other data, our internal hard drives can quickly fill up, no matter how much storage space the hard drive has. By offloading some data onto a external drive, you can prevent overwhelming our internal storage capacity and open enough space for new files.
One more benefit is that you can restore all your information quickly with the backup process using an external hard drive. There won't be hard and time-consuming processes, you just will need to transfer the information from the external drive to your Mac.
You can also complete the backup on a different computer, not just one particular one. The benefit here is that you can take with you the external hard drive and use it when needed.
Last, but not least, backing up your Mac on a hard drive grants you peace of mind. The knowledge that your precious files are safely stored off-site brings a sense of comfort and reassurance.
Choosing an External Drive: Solid-State Drive (SSD) or Hard Disk Drive (HDD)
The first step in creating a backup for your Mac is choosing an external drive that enables the best data recovery option. Choosing between an SSD or HDD means taking a look at the pros and cons of each.
Hard Disk Drives (HDD)
Pros: Storage capacity, price point
Cons: Physical damage, physical size, speed
If you're looking to store a lot of data, then a traditional HDD might be the best option because larger capacities drives are more reasonably priced. HDDs use spinning disks to write data, however, which creates two different problems. First, the spinning disks are more likely to break down if dropped or handled roughly. Second, if you choose to fragment the information to protect your data recovery, the backup takes time.
Solid State Drives (SSD)
Pros: Speed, size, malfunction rates, lifespan
Cons: Price point, storage size
If you're looking to store 2 TB of data or less, an SSD offers tremendous value, boasting high speed, small size, and long lifespan. SSDs use flash memory which writes data to memory chips rather than spinning disks. While this technology makes them less likely to suffer physical damage, it also makes storing large amounts of data expensive. Additionally, although they are expected to have longer lifespans than HDDs, they are relatively new which means projections of their lifespan potential remains conjecture.
How to formatan External Drive?
Copying the files from your Mac to an external drive allows you to save data on your own terms. Since most external hard drives are formatted for PCs, before the backup of your Mac begins you need to format the hard drive for macOS.
- Connect the hard drive to your Mac.
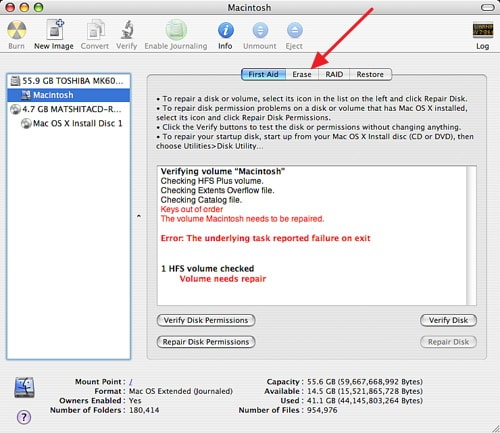
- Open Applications > Utilities > Disk Utility
- Find your external hard drive in the list of drives.
- Click "Erase" from the Disk Utility options. Confirm the action.
- A Format pop-up window will give you the opportunity to choose one of the following: Mac OS Extended (Journaled) uses Mac formatting to protect data integrity Mac OS Extended (Journaled, Encrypted) adds a password and partition encryption to the Mac format. Mac OS Extended (Case-sensitive, Journaled) makes case-sensitive folders and Mac format. ("Backup" and "backup" will be two different files.) Mac OS Extended (Case-sensitive, Journaled, Encrypted) adds password and encryption protection to the partition while also including Mac formatting with case sensitive folder names. MS-DOS (FAT) allows you to use Windows volumes of 32 GB or less. ExFAT allows you to use Windows volumes over 32 GB
- Rename the new drive
- Under "Security Options" make sure to set the drive to write over past data three times or more.
- Erase and Confirm
How To Back Up Mac To External Hard Drive?
Your Mac comes with Time Machine, Apple's built-in backup feature. Learning how to use Time Machine's features can help you create a backup for data recovery.
Different Methods of Backing up MAC to an external hard drive:
Using an External Drive with Time Machine
To set up Time Machine, you need to start by buying an external storage solution such as:
- An external hard drive that connects using the USB, FireWire, or Thunderbolt port on your Mac.
- Connecting the external hard drive to the USB port on an AirPort Extreme Base Station on your network
- An AirPort Time Capsule, Apple's wireless router with network-attached storage, which you set up on your network
Time Machine will automatically suggest that you encrypt your backup when you connect the external drive. The first backup might take longer than you expect, but this is normal, just wait for it to complete.
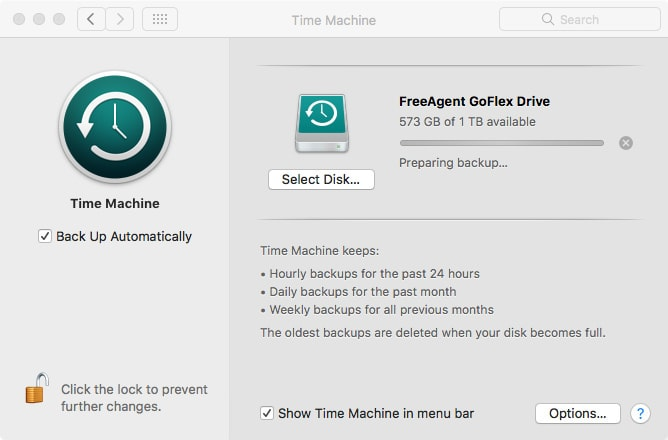
How to Choose a Backup Disk?
Time Machine should suggest a backup disk when you connect the drive to your Mac. However, if it does not do this automatically you can easily choose the disk.
- Go to the Time Machine menu
- Open Time Machine preferences or choose Apple menu > System Preferences > Time Machine
Once you have opened System Preferences, you can click "Select Backup Disk", "Select Disk," or "Add or Remove Backup Disk."
Select a backup disk from the list and then click "Use Disk."
If you want to choose multiple disks for security or convenience, you can keep repeating these steps to add more disks such as one for home, work, or any other location necessary.
How to Back Up Mac Using Time Machine?
After setting up Time Machine, the program automatically makes backups for you. These include continuous hourly time machine backups over a 24-hour period. The program saves daily backups for a month and weekly backups for previous months. Once the disk is full, Time Machine automatically deletes the oldest backups.
Time Machine offers several ways for you to personalize your backups. Follow this step by step guide to make it easy and fast.
- To backup immediately, click Time Machine and go to menu, then click "Back Up Now."
- To disable the automatic Time machine backup, open Time Machine preferences. For macOS Sierra or later, you can deselect Back Up Automatically. In OS X El Capitan or earlier, you need to turn off Time Machine. If you choose to turn off automatic backups, you can still manually back up your Mac using "Back Up Now."
- To terminate an in-progress backup, go to the Time Machine menu and choose "Skip This Backup" or "Stop Backing Up."
- To review the status of a backup, go to the Time Machine menu. The icons will tell you one of three statuses: Time Machine is backing up, idle until next automatic backup, or unable to complete the backup.
- To customize your backup, open Time Machine preferences from the Time Machine menu, click "Options," then click + and select items you want to exclude.It is good to know that Time machine backup frequency can be scheduled, normally automatically it makes hourly backups for the past 24 hours, daily backups for the past month, and weekly backups for all previous months. But you have to option to schedule them as it fits best for you and to keep your data safe.
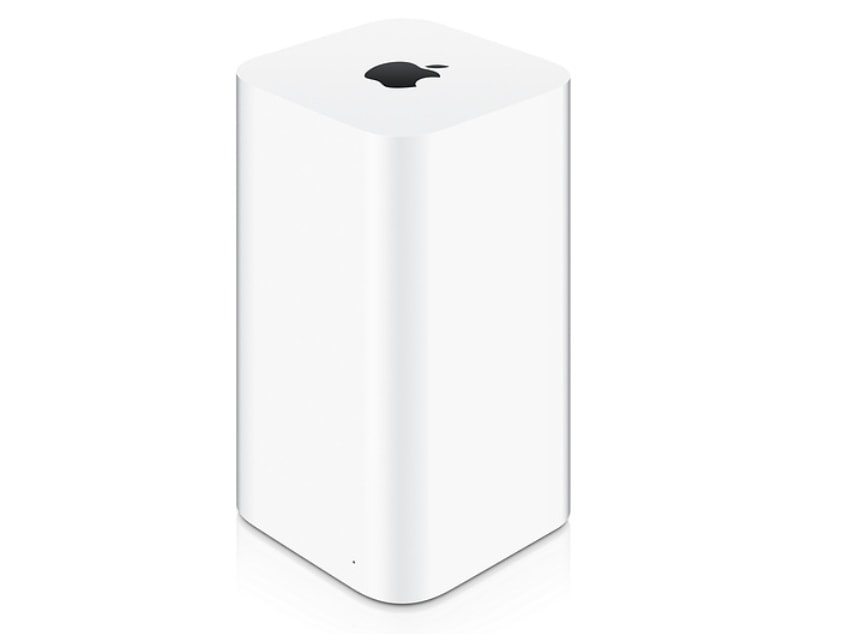
AirPort Time Capsule Backup Method
AirPort Time Capsule allows you to create automatic wireless backups without attaching an external backup drive. The setup assistant is built into iOS and the AirPort Utility for OS X, and once you set up Time Capsule, the backup disk will show up automatically in your Time Machine preferences.
- Open Time Machine
- Click Preferences
- Highlight "Data on AirPort Time Capsule" disk
- Click "Use Disk."
Important: Apple announced in 2018 that it was discontinuing the AirPort series but would continue to support them for the next five years. With Apple's cancellation of the AirPort router/NAS product line, finding a long-term data backup cloud solution is at the front of most Mac owners' minds – and Acronis has the best alternative backup for Macs.
Manual Backup to an External Drive: Copying Files
Manual backups involve using your system's copy and paste commands to transfer folders and files to an external drive. This method is very easy to execute, but because it's manual, you have to remember to do it on a regular schedule while ensuring that all the appropriate folders and files are copied.
That's typically quite challenging for the people using this method. On the other hand, manual backup is a very simple process, and very easy to complete. It can be executed in just four simple steps:
For Mac devices:
Step 1. Connect your external drive to your Mac.
Step 2. Launch "Finder" and find your external hard drive.
Step 3. Right-click on the external drive and choose "Archive".
Step 4. Select the files and folders you want to back up and press the Ctrl + C and Ctrl + V keys to back them up to the destination drive.
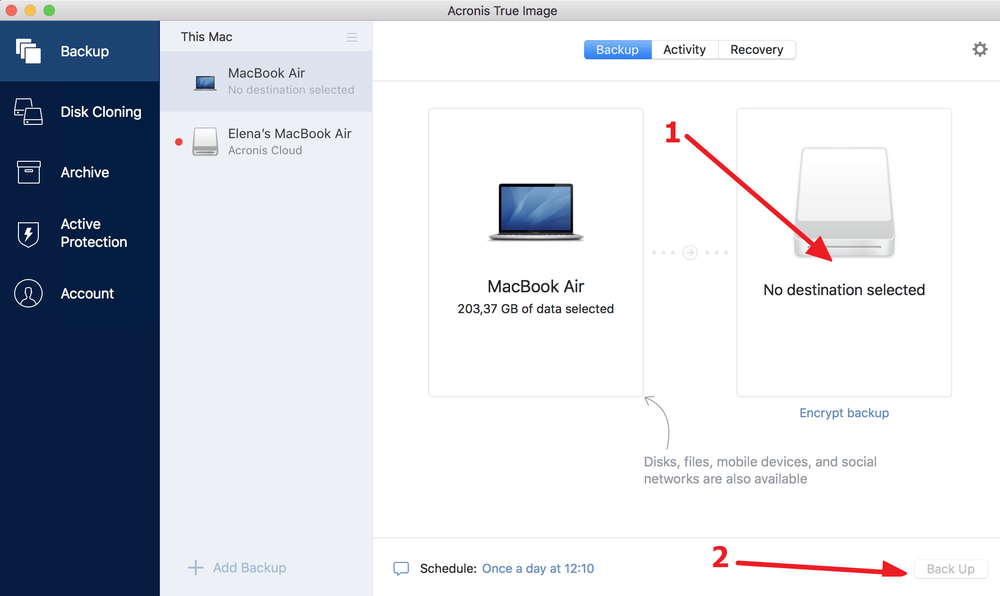
How To Back Up a Macbook To an External Hard Drive Using Acronis True Image?
Acronis True Image enables a full Mac backup in just a few quick clicks.
- Open the Acronis True Image and click “Back Up.”
- Your whole Mac will be pre-selected as the source. (If you want, you can specify a name for your backup.)
- Click on Backup destination and select the external hard drive. (You can also customize the scheduling, backup scheme, version controls and other options simply by clicking the gear icon.)
- Once you've set the destination, click Backup and you're done!
Regular Backup Maintenance
Building a habit of regular backups can be a very helpful thing to learn when using an external hard drive as a backup option. When you don't want to pay for expensive third-party software, you can use external hard drive backing as an option. The important thing is to make a schedule for renewing your backup information, because, as we know, on a daily basis, we add a lot of information to our computers and smart devices. Here, the need to renew your backup data is very important because it is not made automatically.
For that reason, you have to follow a schedule for regular renewal of the information stored on the external hard drive. By doing so, you will always have the complete information you have stored, and in case of emergency, the whole data will be available to be restored.
On the other hand, when you make a schedule and follow it strictly, this will lead to fulfilling the storage space of the external hard drive, so you have to monitor the available space after every backup update. Because sometimes we think that a current size of GB will be enough, but at some point it can be insufficient and you will need to take a new one with more GB of storage space.
Another important process for maintaining backups is testing. Testing could comprise making sure backup files are accessible, not corrupt, and can be restored to the correct systems and in a healthy condition. Testing the recovery process is crucial, particularly when it comes to external hard drives and other physical backup media. This is because when the media is stored offsite, which is often suggested as a precaution against attacks, there is a risk of physical damage or deterioration.
If you follow and complete the advice we mentioned, this will ensure that whatever unexpected scenario happens, whether it is a natural disaster, a cyberattack, or a hardware malfunction, you will be provided with the option to restore your entire information.
Mac Backup Software - Acronis True Image
Acronis True Image, formerly known as Acronis True Image, makes it easy to back up your entire Mac — allowing you to create a full-image backup in just two clicks while delivering several powerful tools that Time Machine doesn’t.
- Device flexibility. Many Mac users are fully integrated into the Apple environment, using Apple’s mobile devices like iPhones and iPads in addition to their MacBooks and Mac desktops. Finding a single solution with the ability to back up all your devices is increasingly important, which is why Acronis True Image is a great choice. In addition to backing up macOS, a single license of Acronis True Image supports an unlimited number of iOS mobile devices. It’s also worth noting that Acronis supports Windows and Android devices as well, making it a better solution for today’s multi-device, mixed-OS households. Time Machine only works with Macs, so if someone in your family swaps to an Android, their data won’t be protected like it can be with Acronis.
- Active disk cloning. Acronis True Image also allows you to clone an active Mac system disk without having to stop and reboot. That means you can connect a USB-c cable for a super-fast transfer of all your data to a new Mac machine or make an exact bit-for-bit copy of your Mac on an external hard drive.
- All-in-one recovery tool. You can also use it to create an Acronis Survival Kit, an all-in-one recovery tool that puts everything you need to restore your system on one external hard drive, including boot media and all your backups.
- Cloud storage and features. A subscription to Acronis True Image also includes cloud storage, several powerful cloud-based features, and “anywhere access” to the data in your backup. Anywhere access allows you to retrieve individual photos and files wherever you have an internet connection. Time Machine does not support cloud backups, which leaves your data at risk if a disaster damages both your original copy and local backup.
- AI-based anti-ransomware. Finally, while MacOS machines have historically been immune from ransomware attacks, cybercriminals are increasingly targeting Macs. Acronis True Image is the only personal backup that includes an integrated defense against ransomware that uses artificial intelligence (AI)-based technology to detect and stop attacks in real time.
When it comes to Mac backup, clearly Acronis True Image beats Time Machine. You can also perform a full-image Windows backup on your PC or Laptop.
Backup Your Mac And Get Your Complete Cybersecurity Today!
About Acronis
A Swiss company founded in Singapore in 2003, Acronis has 15 offices worldwide and employees in 60+ countries. Acronis Cyber Platform is available in 26 languages in 150 countries and is used by over 21,000 service providers to protect over 750,000 businesses.