Creating the deployment task
When the deployment is about to start, OS Deploy Server wakes up the turned-off target machines in the list you specify. The machines turn on, boot into Agent from the PXE server, and connect to the deployment server.
When all (or some, depending on your choice) target machines connect, the deployment server starts deployment. Deployment is usually performed by multicasting.
The following picture illustrates deployment to specific machines within a single subnet. If the target machines are located in another subnet, you may need to perform additional steps before creating the deployment task.
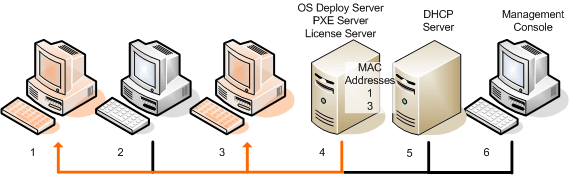
Deployment to specific machines within one subnet
To create a deployment task for specific machines
- Make sure that you have completed the preparation steps.
- Start the Management Console.
- In the welcome screen, click Deploy image. If prompted, specify the machine where OS Deploy server is installed.
- In Deploy to, select The machines listed below.
-
Select Add machines -> From file, and then specify the file with the MAC addresses you created.
You can also specify the MAC addresses manually (select Add machines -> By MAC address) or select machines that are currently listed in the Machines view (select Add machines -> From machine list).
-
Tune the PXE server as follows:
- Select the Use PXE server for booting into agent check box, and then click Specify.
- Specify the name or the IP address of the machine with the PXE server, and the user name and password of an administrator on that machine.
Tuning the PXE server ensures that the machines in your list boot into Agent when the task starts (even though you selected Start operating system as the default boot menu option), and boot to the operating system after the task finishes.
Machines that are not in your list are not affected: they boot according to the default boot menu option.
The PXE server remains tuned until the task finishes. It becomes tuned again the next time the task starts.
Tuning the PXE server is not effective if you uploaded the bootable components to the PXE server directly (using the Acronis PXE Server setting) when creating a WinPE-based bootable media. This is because choosing a default boot menu option is not available in this case. You need to create a PE image first (using the WIM image setting), and then upload the PE image to the PXE server.
-
If the machines are located in a different subnet than the deployment server, specify the Wake-on-LAN proxy installed in that subnet, as follows:
- Expand Show Wake-on-LAN Proxy settings, and then click Specify.
- Specify the name or the IP address of the machine with Acronis Wake-on-LAN Proxy, and the user name and password of an administrator on that machine.
- Click Next.
- Create a deployment template or select an existing one.
-
Specify when to run the task (set up the deployment schedule):
- Now: The task will run immediately after you create it.
- Once later: The task will run once at the specified date and time.
- Daily: The task will run at the selected times every day or every few days.
- Weekly: The task will run on the selected days every week or every few weeks.
- Monthly: The task will run on the selected day every month.
- Manually: The task will run only when you start it manually.
If prompted, specify the credentials for running the task.
When the scheduled time comes, the target machines must be turned off or booted into Agent.
With any deployment schedule, you will be able to start the task manually by selecting it in the Deployment tasks view and clicking Run on the toolbar.
-
Specify a time-out for waiting for all listed machines to become ready, and the action after the time-out.
In practical situations, some of the listed machines might not connect to the deployment server at the scheduled time. For example, they may be in use at that time. The task waits for listed machines to become ready for the time you specified. As soon as all machines are ready, the task starts deployment.
If not all machines are ready after the time-out, the task can:
- Perform deployment to the machines that are currently ready.
- Stop without performing deployment to any machine. The task will start at its next scheduled time and will again begin waiting for the readiness of all machines.
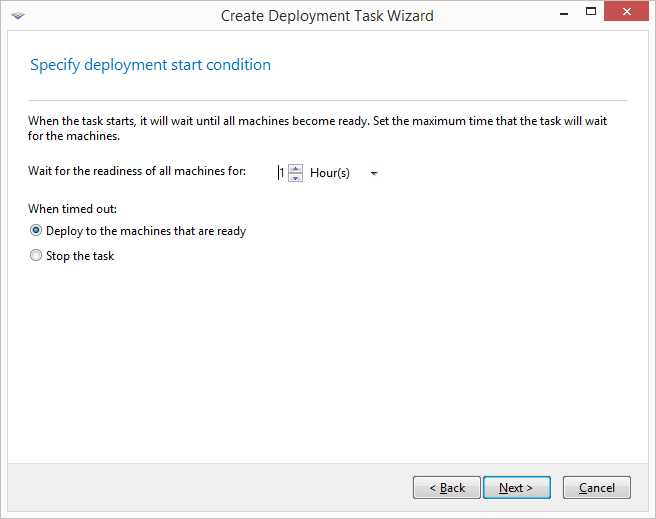
Start condition for deployment
- Review the task summary, and then click Create to create and save the task.
The task appears in the Deployment tasks view. When the task is started, the connected machines’ IP addresses and the task progress are displayed in that view.
When the task is finished, its log entries will be available in the log of the deployment server.