Recovering your system with the help of Acronis Universal Restore under rescue media
This utility is available only for users of Acronis True Image 2014 Premium.
Before you start, please ensure you have all required hardware drivers and a bootable rescue media containing Acronis Universal Restore add-on. See details in Preparing for recovery to different hardware.
Click the My Disks link below Recover on the Welcome screen to start the Recovery Wizard. Then, choose the backup of the system disk for recovery. Because drive letters in the standalone Acronis True Image 2014 may differ from the way Windows identifies drives, you may need to specify the path to the backup file. In such a case click Browse and select the disk and folder that stores the backup.
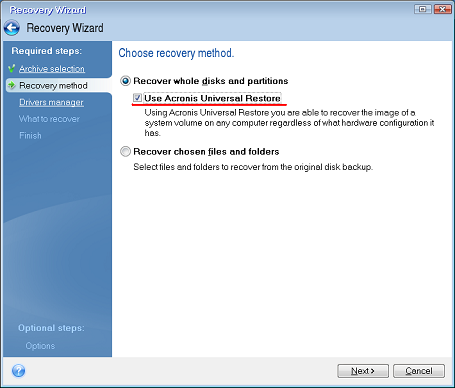
Choose Recover whole disks and partitions and select the Use Acronis Universal Restore check box.
If the target hardware has a specific mass storage controller (such as an SCSI, RAID, or Fibre Channel adapter) for the hard disks, specify where to find the driver or drivers for the specific hardware at the Drivers manager step. If the driver is stored on a diskette or CD, select the Search removable media for device drivers box. If some drivers are stored on a local hard disk or a network share, select the Search for device drivers in the following locations box (when it is not selected by default). Specify the path to the driver or drivers after clicking Add Search Path.
When both boxes are selected at this step, Acronis Universal Restore will use three sources for drivers:
- the removable media;
- the drivers storage folder or folders specified at this step; and
- the Windows default driver storage folders (in the image being recovered).
The program will find the most suitable of all available drivers and install them into the recovered system.
Select the system disk at the What to recover step. Then, specify the destination of the disk being recovered (new system disk). At this point the program checks whether the destination disk is free. If not, you will be prompted by the Confirmation window stating that the destination disk contains partitions, perhaps with useful data. To confirm deletion of the partitions, click OK.
Carefully read the summary of operations at the Finish step and then click Proceed.
If the capacities of the source (backed up) disk and the destination disk are different, the new disk space will be proportionally distributed between the recovered partitions.
After successfully recovering the system partition, exit Acronis True Image 2014. Enter the BIOS, make the system hard disk the first boot device, and boot to the recovered Windows.