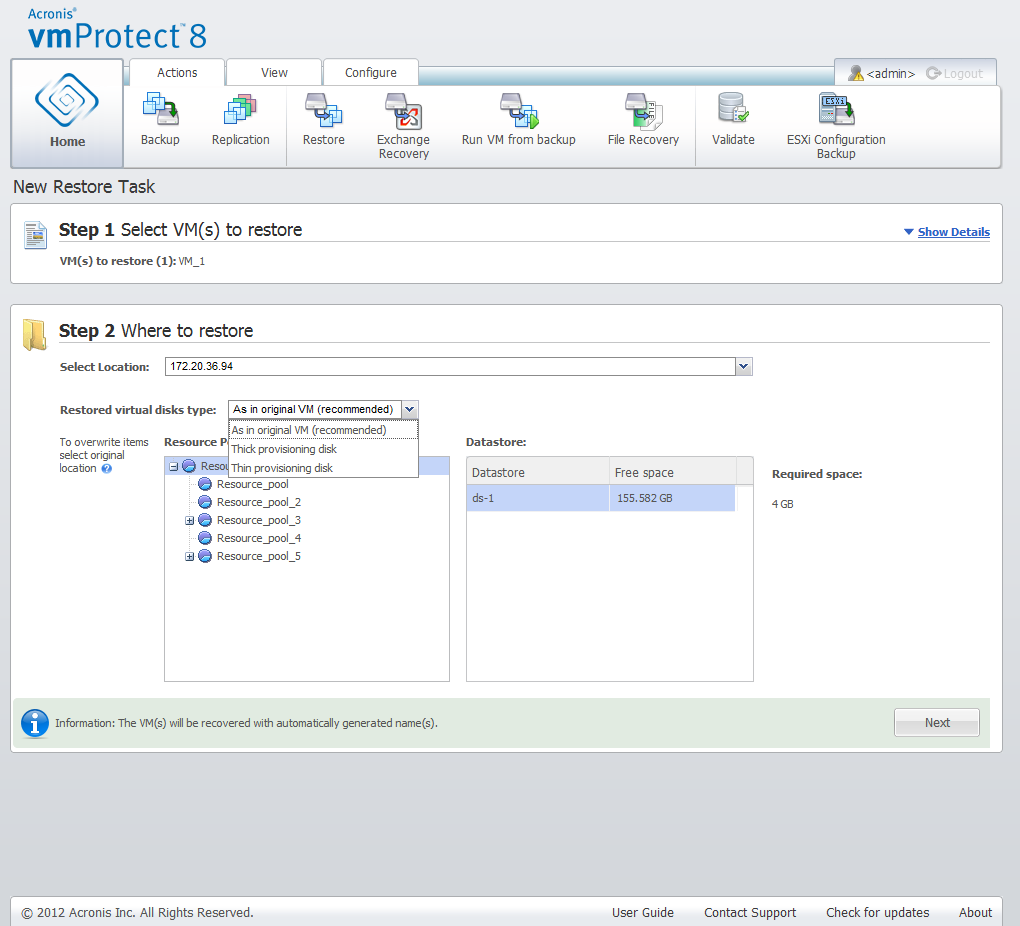
New Restore Task wizard, Step 2 “Where to restore”
In the second step of the restore backup task wizard, you should define where to restore the selected virtual machine(s) to.
New Restore Task wizard, Step 2 “Where to restore”
First of all, with the Select location drop-down list you should define the desired destination for your restore task. Please choose if you want to restore the selected virtual machine(s) to their original location or to a different ESX(i) host or datastore. The list shows only those ESX(i) hosts which are managed by Acronis vmProtect 8 Agent. If the ESX(i) host you need is not in this list, then make sure it is added in the Configure->ESX(i) hosts view.
When the Original Location is selected for restoring VM(s), you can implement the incremental restore mode by selecting the Use Incremental restore check box. Incremental restore checks and restores only the blocks that have been changed on the original VM instead of restoring all the data over the virtual machine. This mode can help to increase the speed of recovering from the slow backup locations like Acronis Online Storage or other slow connections and help to minimize the traffic during recovering.
Note that the incremental restore mode can be used only if the recovery is performed over the original VM that has been used to create a backup. In case the recovery is performed to a new location or the original VM is missed, a full recovery is performed.
When restoring to Original Location the restored VM may not appear in the same location (automatically overwriting the existing VM) as it was at the moment of creating the recovery point. This will be the case if the selected VM (defined by the recovery point) has been migrated to a host and/or datastore, ESX(i) host, resource pool or vApp. Since VMs are preserving their UUIDs during migration, the recovery will go to the current location of the virtual machine. For example, at the moment of creating the recovery point the VM was in vApp1, but later it has migrated to vApp2. Then this VM will be restored to vApp2 overwriting the existing VM.
Once the ESX(i) host is defined, the list of available resource pools and datastores is build up automatically where you can define the exact location for the restored virtual machine(s).
You should also define the format of the restored virtual drives, As in original VM (recommended), Thick provisioning disk or Thin provisioning disk with the respective drop-down list. Thin provisioning increases the VM storage utilization by enabling dynamic allocation and intelligent provisioning of the physical storage capacity.
Based on this selection, a hint will appear indicating how much space is required on the datastore for the successful recovery operation. You cannot proceed to the next step of the restore backup task wizard until the valid datastore with enough free space is selected.
Note that when restoring multiple virtual machines all of them will be placed to the destination defined at this step of the restore wizard, each to unique new VM on the selected datastore.
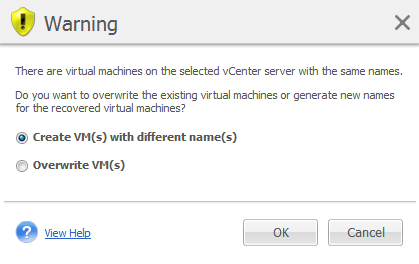
New Restore Task wizard, Step 2 “Where to restore”, overwrite the existing VM confirmation dialog
If there are virtual machines on the selected ESX(i) host or datastore with the same names, you will be asked to confirm overwriting the existing VMs. This choice defines the restored virtual machines naming. If you choose to “Overwrite VMs”, then the existing virtual machines will be replaced with the restored ones.
Note that in this case the datastore selection will be unavailable (since it is already defined by the target VM being overwritten), however, you can change the resource pool location for this VM by choosing corresponding item in the Resource Pool selection.
Note that if the existing machines are running, then for the successful recovery operation you should either stop them manually or select the Power off target VMs when starting recovery option in the recovery options dialogue (see "VM power management" section).
When choosing the Create VMs with different names option the restored VMs will be named according to the following convention:
“[Original_VM_name]_DATE”.
Where “Original_VM_name” is the initial name of the restored virtual machine, and DATE is the current date. For example if the restored VM was called “VM_original” then after recovery it will be named “VM_original_05/25/2011”.
After you completed the selection of “Where to restore”, click Next to finish the second step and proceed to the last one.