Folders can be assigned to Files Advanced user and group policies, allowing them to automatically appear in a user's Files Advanced app. Folders can be configured to point to any folder residing on a Gateway Server, a remote share, a CMIS volume or even a SharePoint Library. This allows you to give a user direct access to any folders that might be important to them without users having to navigate to the folder or even knowing the exact server, shared volume name, and path to the folder.
Folders can point to any type of content that Files Advanced is providing access to. They simply refer to locations in Gateway Servers that have already been configured within the Files Advanced management. This can be a local file share volume, a "network reshare" volume providing access to files on another file server or NAS, a DFS share, a CMIS volume or a SharePoint volume.
Note: When creating a DFS Data Source you need to add the full path to the DFS like so:
\\company.com\namespace\share
Note: On a clean installation of Files Advanced, if you have enabled Sync & Share and you have a Gateway Server present, you will have a Sync & Share Data Source created automatically. It points to the URL you set in the Server section of the initial configuration. This folder allows your mobile users to access your Sync & Share files and folders.
Syncing Folders
Folders can optionally be configured to sync to the client device. The Files Advanced folder sync options include:
Note: This setting does not affect the desktop client.
None - The folder will appear as a network-based resource in the Files Advanced app and can be accessed and worked with just like a Gateway server.
1-Way - The folder will appear as a local folder in the Files Advanced app. Its complete contents will be synced from the server to the device and it will be kept up to date if files on the server are added, modified, or deleted. This folder is intended to give local/offline access to a set of server-based files and appears as read-only to the user.
2-Way - The folder will appear as a local folder in the Files Advanced app. Its complete contents will initially be synced from the server to the device. If files in this folder are added, modified, or deleted, either on the device or on the server, these changes will be synced back to the server or device.
Creating and editing a Data Source
Creating a Data Source
Open the Files Advanced Web Interface.
Open the Mobile Access tab.
Open the Data Sources tab.
Go to Folders.
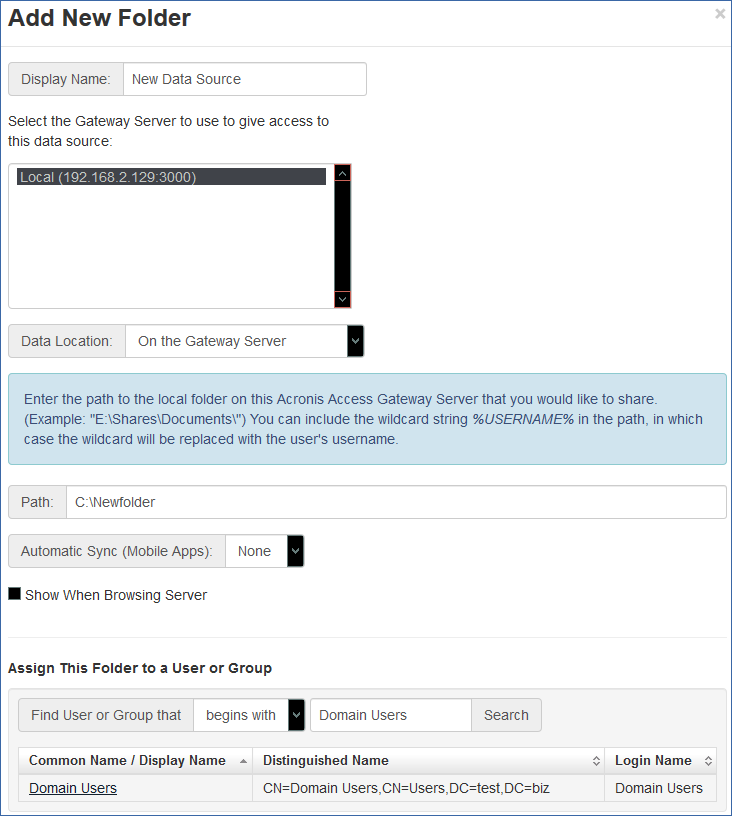
Press the Add New Folder button.
Enter a display name for the folder.
Select the Gateway Server which will give access to this folder.
Select the location of the data. This can be on the actual Gateway Server, on another SMB server, on a SharePoint Site or Library or on a Sync & Share server.
Note: When selecting Sync & Share, make sure to enter the full path to the server with the port number. e.g.: https://mycompany.com:3000
Based on your choice of location, enter the path to that folder, server, site or library.
Select the Sync type of this folder.
Enable Show When Browsing Server if you want this Data Source to be visible when Files Advanced mobile clients browse the Gateway Server.
Note: When creating SharePoint Data Sources, you will have the option to enable the displaying of SharePoint followed sites.
Press the Save button.
Editing a Data Source
Open the Data Sources section and find the Data Source you want to edit.
Click on the Pencil icon for your Data Source at the right side of the table.