This guide will help you create a scheduled task that will run and vacuum the PostgreSQL database. Vacuuming is an important process especially if your deployment has a big database (several gigabytes).
Note: PostgreSQL is set to auto-vacuum in its configuration file. For deployments under high load, though, the auto vacuum may never run, as it is designed not to run when the server is under high load. For these cases, it is best to set up a scheduled task to run the Vacuum at least once a month.
Configuring PostgreSQL and creating the script
Making sure the task will be able to run
You must make sure that you have the postgres user's password saved into the pgpass file, otherwise the script won't be able to run. The easiest way to do this is from the Files Advanced PostgreSQL Administrator tool:
Open the Files Advanced PostgreSQL Administrator. You can find it in the Windows Start Menu, under the folder Files Advanced.
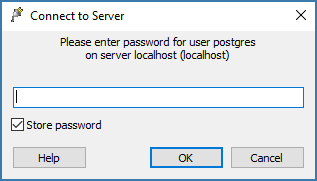
Connect to the database and on the dialog that opens to enter the password, enable the Store Password checkbox and click OK. This will save the postgres user's password to the pgpass file. This file will be created in C:\Users\<currentUser>\AppData\Roaming\postgresql.
Note: You may see a dialog with information on Saving passwords, this is expected. Press OK.
Alternatively, you can manually create a file called pgpass.conf and enter the following text into it: localhost:5432:*:postgres:yourpassword
Be sure to enter your actual postgres user password and correct port. Save the file.
For our example, we will copy the pgpass.conf file and place the copy in the D:\Backup\ folder. The user running the scheduled task, must have read access to the file.
Creating the script
In the example below, the PostgreSQL bin directory path is set to C:\Program Files (x86)\Acronis\Files Advanced\Common\PostgreSQL\<VERSION>\bin\.
Note: You will need to edit the path to point to your PostgreSQL bin folder if you use an older or a custom installation (e.g. C:\Program Files (x86)\Acronis\Access\Common\PostgreSQL\9.4\bin\).
Create a folder where the log files will be stored and give the user running the task read, write and execute permissions to the folder. We recommend you use the machine's administrator as the user. In our example the log folder is D:\Backup\.
Open the text editor of your choice (e.g. Notepad) and paste the following example script:
Change the path to the psql.exe file with your path to the file.
Change the --port setting to the correct port number if you have changed the default.
If you are using a different PostgreSQL user, change --username= by replacing postgres with your desired user.
Change the D:\Backup\ part of the path for the logs to your desired log folder.
Change the D:\Backup\ part of the path for the pgpass.conf file to your path to the file.
Save the file as vacuum.bat. Make sure that you have selected All types under Save as file type.
NOTE: Depending on your date format, this .log file creation may fail. To find the date format you can open a command prompt and run: echo %date%. If there are any illegal characters in the date, like forward slashes, they have to be converted. In the above example the extra :/=. is the conversion part. If you encounter issues, please contact Acronis support.
Configuring the Task Scheduler
Open the Task Scheduler from Control Panel -> Administrative Tools -> Task Scheduler.
Right-click on Task Scheduler (local) and select Create Task.
In the General tab:
Set the Name and Description.
Choose Run whether user is logged on or not.
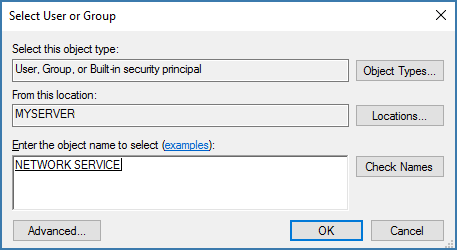
Set the User account as the user that will run this task. We recommend using the machine NETWORK SERVICE account.
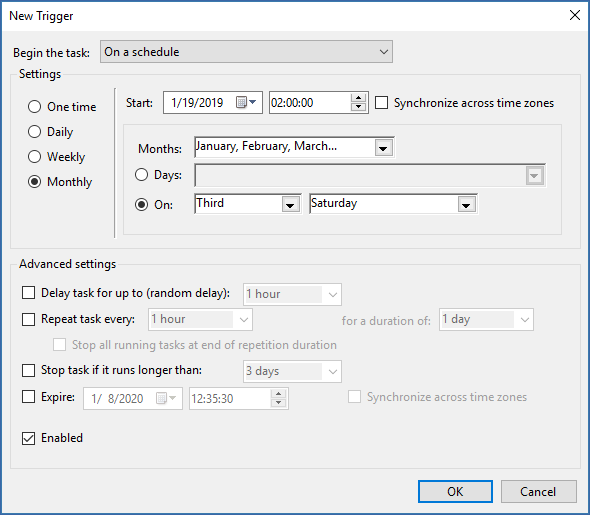
In the Triggers tab:
Click New and set the schedule you want the vacuum to run on. This should be a time of low load on the server. We recommend running the vacuum at least once a month.
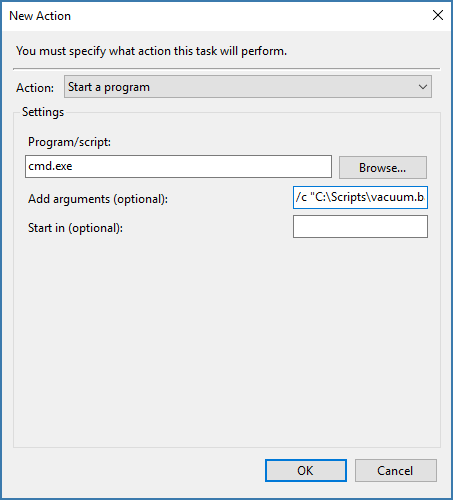
In the Action tab:
Click New and for the Action select Start a program.
For the Program/script enter cmd.exe
In the Add arguments enter: /c "C:\Scripts\vacuum.bat"
Note: Make sure to edit the path in this command to reflect the actual path to your vacuum.bat file.
Leave all the defaults for the Conditions and Settings tabs.
Click OK to save the new task. It may prompt you to enter an administrator password.
Verify that the task works as expected
From the Task Scheduler, run the vacuum task manually to test it out and make sure it is writing the log file into the proper folder.
Check that the scheduled task runs at the time it is set for.