Defining Protocols White List
To define the Protocols White List
1. If using DeviceLock Management Console, do the following:
a) Open DeviceLock Management Console and connect it to the computer running DeviceLock Service.
b) In the console tree, expand DeviceLock Service.
If using DeviceLock Service Settings Editor, do the following:
a) Open DeviceLock Service Settings Editor.
b) In the console tree, expand DeviceLock Service.
If using DeviceLock Group Policy Manager, do the following:
a) Open Group Policy Object Editor.
b) In the console tree, expand Computer Configuration, and then expand DeviceLock.
2. Expand Protocols.
3. Under Protocols, do one of the following:
•Right-click White List, and then click Manage.
- OR -
•Select
White List, and then click
Manage 
on the toolbar.
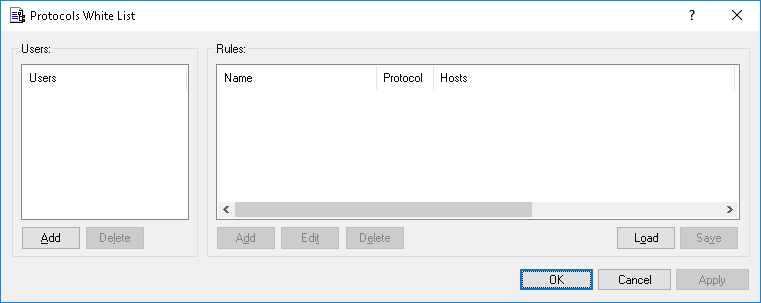
The Protocols White List dialog box appears.
4. In the left pane of the Protocols White List dialog box, under Users, click Add.
The Select Users or Groups dialog box appears.
5. In the Select Users or Groups dialog box, in the Enter the object names to select box, type the names of the users or groups for which you want to define the Protocols White List, and then click OK.
The users and groups that you added are displayed under Users in the left pane of the Protocols White List dialog box.
To delete a user or group, in the left pane of the Protocols White List dialog box, under Users, select the user or group, and then click Delete.
6. In the left pane of the Protocols White List dialog box, under Users, select the user or group.
You can select multiple users or groups by holding down the SHIFT key or the CTRL key while clicking them.
7. In the right pane of the Protocols White List dialog box, under Rules, click Add.
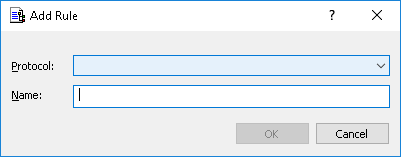
The Add Rule dialog box appears.
8. In the Add Rule dialog box, specify general and protocol-specific parameters for this rule. To specify general parameters, do the following:
•To specify the protocol, in the Protocol list, click the protocol of your choice.
•To specify the rule name, in the Name box, type a name.
To specify protocol-specific parameters, do the following:
•To enable content inspection, click
Content Inspection. For more information, see the
Content Inspection parameter description.
•To specify additional actions to be performed when this rule triggers, click
If this rule triggers. For more information, see
If this rule triggers parameter description.
•To specify the hosts, in the
Hosts box, type host names or IP addresses separated by a comma or semicolon. For more information on how to specify hosts, see the
Hosts parameter description.
•To specify the ports, in the
Ports box, type port numbers separated by a comma or semicolon. For more information on how to specify ports, see the
Ports parameter description.
•To specify the Web-based file storage, sharing and synchronization services, under
File Sharing Services, select the appropriate check boxes. For more information, see the
File Sharing Services parameter description.
•To configure the SSL options, under SSL, click any of the following: Allowed (allows SSL connections), Denied (disallows SSL connections), or Required (requires that all connections use SSL).
•To specify the IM local sender ID(s), in the
Local sender ID(s) box, type user identifiers separated by a comma or semicolon. For more information on how to specify user identifiers, see the
Local sender ID(s) parameter description.
•To specify the IM remote recipient ID(s), in the
Remote recipient ID(s) box, type user identifiers separated by a comma or semicolon. For more information on how to specify user identifiers, see the
Remote recipient ID(s) parameter description.
•To specify the e-mail senders, in the
Local sender Email(s) box, type sender addresses separated by a comma or semicolon. For more information on how to specify sender addresses, see the
Local sender Email(s) parameter description.
•To specify the e-mail recipients, in the
Remote recipient Email(s) box, type recipient addresses separated by a comma or semicolon. For more information on how to specify recipient addresses, see the
Remote recipient Email(s) parameter description.
•To specify the social networking sites, under
Social Networks, select the appropriate check boxes. For more information, see the
Social Networks parameter description.
•To specify the Web-based e-mail services, under
Web Mail Services, select the appropriate check boxes. For more information, see the
Web Mail Services parameter description.
•To specify the Web search providers, under
Web Search Services, select the appropriate check boxes. For more information, see the
Web Search Services parameter description.
•To specify the Web-based job search providers, under
Career Search Services, select the appropriate check boxes. For more information, see the
Career Search Services parameter description.
9. Click OK.
The rule you created is displayed under Rules in the right pane of the Protocols White List dialog box.
10. Click OK or Apply.
The users or groups to which the white list rule applies are displayed under White List in the console tree.
When you select a user or group to which a white list rule applies in the console tree, in the details pane you can view detailed information regarding this rule (see
White List Rules for details).