Creating a Custom Policy Object
To create a custom policy object
1. Open DeviceLock Management Console and connect it to the computer running DeviceLock Enterprise Server.
2. In the console tree, expand DeviceLock Enterprise Server.
3. Under DeviceLock Enterprise Server, right-click Policies, and then click Create Policy Object.
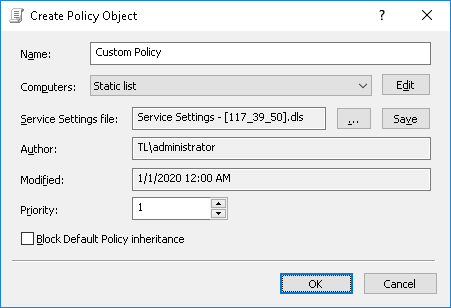
The Create Policy Object dialog box appears.
4. In the Create Policy Object dialog box, do the following:
•Name - Specify the name of the policy object.
•Computers - Assign the computers to the policy object. To do so, select either the Static list or Dynamic list option, and then configure the computer list as appropriate to your requirements.
•Static list - This option lets you specify a static list of computers assigned to the policy object. If you choose this option:
a) Click Edit to open the Edit static list dialog box.
b) In the Edit static list dialog box, select computers using one of the following options: Active Directory, Computers, LDAP, From File, Manual.
•Active Directory lets you browse Active Directory OUs and select computers.
•Computers lets you browse the network tree and select computers.
•LDAP lets you browse the LDAP tree and select computers from the directory.
•From File lets you import a list of computers from a text file and then select computers.
To open such a file, click the

button. A text file must contain each computer’s name or IP address on a separate line and can be either Unicode or non-Unicode.
•Manual lets you type computer names manually to select computers. Each computer’s name or IP address must be typed on a separate line.
All selected computers are displayed in the right pane of the dialog box.
To remove single computers from the list of selected computers, use the left single-arrow button  . To add or remove all available computers to or from the list of selected computers at the same time, use the right double-arrow button
  or left double-arrow button
  .
. •Dynamic list - This option lets you specify a dynamic list of computers that will update automatically as new computers are added or removed from a certain container in the directory. If you choose this option:
a) Click Edit to open the Edit dynamic list dialog box.
b) In the Edit dynamic list dialog box, browse the AD or LDAP tree to find the required container, and then click Select. You can select one or more containers.
To include computers located in lower-level containers within the one you selected, select the Traverse subcontainers when enumerating computers check box.
To perform Active Directory synchronization, select the Synchronization check box.
Сlick the
button to open either the
Credentials or
LDAP Settings dialog box. The
Credentials dialog box opens if you selected the
Active Directory option, while the
LDAP Settings dialog box opens if you selected the
LDAP option. Use the
Credentials dialog box to specify the user account with administrative access rights to AD. Use the
LDAP Settings dialog box to configure a connection to the LDAP server.
•Service Settings file - Assign a policy to the policy object by loading a DeviceLock Service settings file (.dls). To do so, click the
button to load the settings (.dls) file with the preferred DeviceLock Service settings. All unconfigured settings are ignored when multiple policies are merged. When being applied to DeviceLock Service, all unconfigured settings reset the corresponding parameters to their default values. To export the currently assigned policy to an external file, click
Save.
•Priority - Specify a priority value ranging from 0 through 100, where 0 is the lowest priority and 100 is the highest priority. The policy’s priority is used to resolve conflicting policy settings among different policy objects. If there are policy setting conflicts between two or more policy objects, the policy object with a higher priority wins, and its settings are applied.
•Block Default Policy inheritance - Disable the Default Policy for all computers assigned to the policy object. Select the Block Default Policy inheritance check box to disable the Default Policy. Clear the Block Default Policy inheritance check box to enable the Default Policy.
Note: If a client computer is assigned to two or more policy objects and at least one of these policy objects has the Block Default Policy inheritance option selected, the Default Policy will not be applied to the computer. |
5. Click OK to close the Create Policy Object dialog box.
The new policy object you created is added after the Default Policy object in the console tree.