Secure Zone is a secure partition on a disk of the backed-up machine. It can store backups of disks or files of this machine.
Should the disk experience a physical failure, the backups located in the Secure Zone may be lost. That's why Secure Zone should not be the only location where a backup is stored. In enterprise environments, Secure Zone can be thought of as an intermediate location used for backup when an ordinary location is temporarily unavailable or connected through a slow or busy channel.
Why use Secure Zone?
Secure Zone:
Enables recovery of a disk to the same disk where the disk's backup resides.
Offers a cost-effective and handy method for protecting data from software malfunction, virus attack, human error.
Eliminates the need for a separate media or network connection to back up or recover the data. This is especially useful for roaming users.
Can serve as a primary destination when using replication of backups.
Limitations
Secure Zone cannot be organized on a Mac.
Secure Zone is a partition on a basic disk. It cannot be organized on a dynamic disk or created as a logical volume (managed by LVM).
Secure Zone is formatted with the FAT32 file system. Because FAT32 has a 4-GB file size limit, larger backups are split when saved to Secure Zone. This does not affect the recovery procedure and speed.
Secure Zone does not support the single-file backup format. When you change the destination to Secure Zone in a backup plan that has the Always incremental (Single-file) backup scheme, the scheme is changed to Weekly full, daily incremental.
How creating Secure Zone transforms the disk
Secure Zone is always created at the end of the hard disk.
If there is no or not enough unallocated space at the end of the disk, but there is unallocated space between volumes, the volumes will be moved to add more unallocated space to the end of the disk.
When all unallocated space is collected but it is still not enough, the software will take free space from the volumes you select, proportionally reducing the volumes' size.
However, there should be free space on a volume, so that the operating system and applications can operate; for example, create temporary files. The software will not decrease a volume where free space is or becomes less than 25 percent of the total volume size. Only when all volumes on the disk have 25 percent or less free space, will the software continue decreasing the volumes proportionally.
As is apparent from the above, specifying the maximum possible Secure Zone size is not advisable. You will end up with no free space on any volume, which might cause the operating system or applications to work unstably and even fail to start.
Important Moving or resizing the volume from which the system is booted requires a reboot.
How to create Secure Zone
Select the machine that you want to create Secure Zone on.
Click Details > Create Secure Zone.
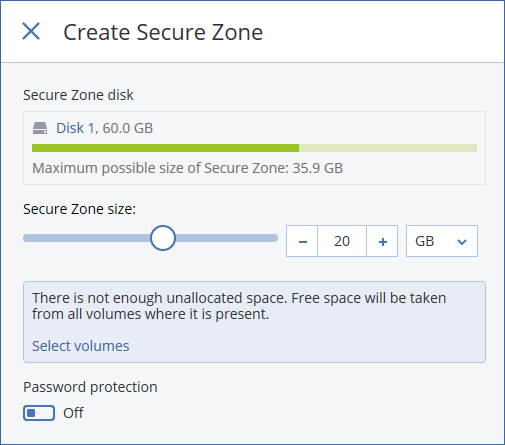
Under Secure Zone disk, click Select, and then select a hard disk (if several) on which to create the zone.
The software calculates the maximum possible size of Secure Zone.
Enter the Secure Zone size or drag the slider to select any size between the minimum and the maximum ones.
The minimum size is approximately 50 MB, depending on the geometry of the hard disk. The maximum size is equal to the disk's unallocated space plus the total free space on all of the disk's volumes.
If all unallocated space is not enough for the size you specified, the software will take free space from the existing volumes. By default, all volumes are selected. If you want to exclude some volumes, click Select volumes. Otherwise, skip this step.
[Optional] Enable the Password protection switch and specify a password.
The password will be required to access the backups located in Secure Zone. Backing up to Secure Zone does not require a password, unless the backup if performed under bootable media.
Click Create.
The software displays the expected partition layout. Click OK.
Wait while the software creates Secure Zone.
You can now choose Secure Zone in Where to back up when creating a backup plan.
How to delete Secure Zone
Select a machine with Secure Zone.
Click Details.
Click the gear icon next to Secure Zone, and then click Delete.
[Optional] Specify the volumes to which the space freed from the zone will be added. By default, all volumes are selected.
The space will be distributed equally among the selected volumes. If you do not select any volumes, the freed space will become unallocated.
Resizing the volume from which the system is booted requires a reboot.
Click Delete.
As a result, Secure Zone will be deleted along with all backups stored in it.