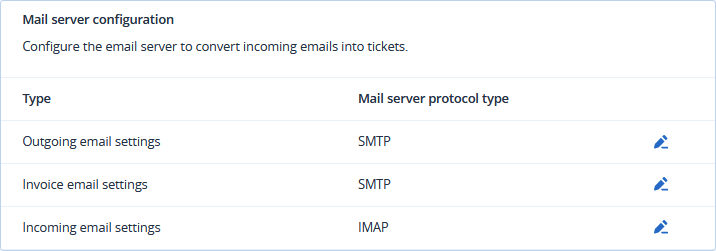
Configuring PSA email servers
Before configuring the PSA email servers, contact your email administrator for your email server details.
To configure PSA email servers
-
Go to Settings > Service desk.
-
Select Mail server configuration.
The Mail server configuration window opens.
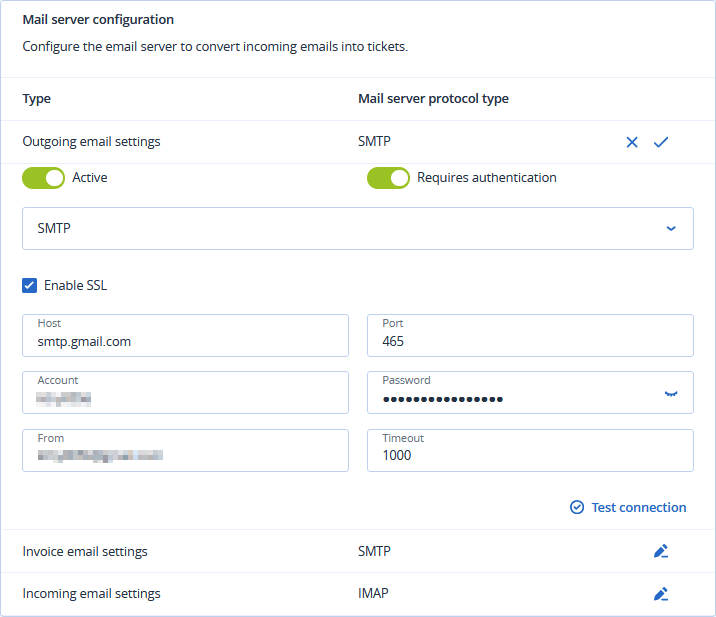
Outgoing email server
-
In the Outgoing email settings row, click the pencil icon.
-
Click the Active option switch to enable outgoing email.
-
Select the email server protocol type:
-
SMTP (default)
-
Exchange
-
Office365
For an Office365 protocol type, the system uses the current browser session to detect if you are already signed in to a Microsoft Office365 MFA account. If you are, it activates the integration with the email details of that Microsoft account. If you are not, it asks you to sign-in.
In this way, there is a possibility that you inadvertently activate the server integration for an incorrect account. To avoid this, sign out of your Microsoft account before activation.
-
-
Select the Enable SSL checkbox.
Secure Sockets Layer (SSL) encrypts your email messages during transport and is only supported in these scenarios:
-
Secure (TLS) - StartTLS - Port 587
-
Secure (SSL) - SSL - Port 465
-
-
Enter the host name and its port.
-
Enter the account user name and password.
-
In the From field, enter the account user name.
If you selected the Office365 protocol type, it supports alias email addresses in a single mailbox. When you want to use any of these addresses as the sender address, use this field. Only email addresses that are associated with the Office365 account are used. The system does not spoof any addresses.
-
Enter the Timeout value in milliseconds.
This value specifies how long the system waits for a successful connection to your email server before it times out.
If you are using SMTP as protocol type, select the Requires Authentication checkbox.
-
Click Test Connection to verify your outgoing email settings.
The system validates your settings, and displays a confirmation message.
-
Click
 .
.
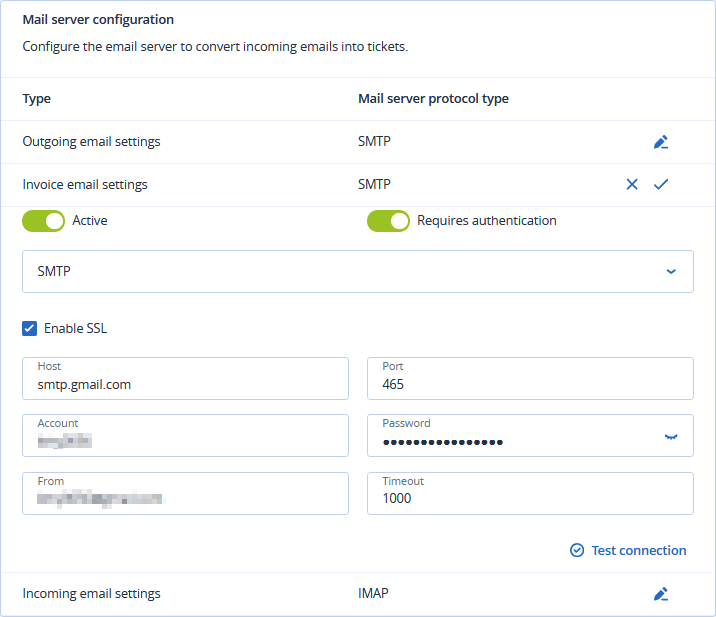
Invoice email server
-
In the Invoice email settings row, click the pencil icon.
-
Click the Active option switch to enable outgoing invoice emails.
-
Select the relevant mail server protocol type:
-
SMTP (default)
-
Exchange
-
Office365
For an Office365 protocol type, the system uses the current browser session to detect if you are already signed in to a Microsoft Office365 MFA account. If you are, it activates the integration with the email details of that Microsoft account. If you are not, it asks you to sign-in.
In this way, there is a possibility that you inadvertently activate the server integration for an incorrect account. To avoid this, sign out of your Microsoft account before activation.
-
-
Select the Enable SSL checkbox.
Secure Sockets Layer (SSL) encrypts your email messages during transport. SSL is only supported in these scenarios:
-
Secure (TLS) - StartTLS - Port 587
-
Secure (SSL) - SSL - Port 465
-
-
Enter the host name and port.
-
Enter the account user name and password.
-
In the From field, enter the account user name.
If you selected the Office365 protocol type, it supports alias email addresses in a single mailbox. When you want to use any of these addresses as the sender address, use this field. Only email addresses that are associated with the Office365 account are used. The system does not spoof any addresses.
-
Enter the Timeout value in milliseconds.
This value specifies how long the system waits for a successful connection to your email server before it times out.
If you are using SMTP as protocol type, select the Requires Authentication checkbox.
-
Click Test Connection to verify your outgoing email settings.
The system validates your settings, and displays a confirmation message.
-
Click
.
Incoming email server
To use this feature, you must use a dedicated email account or a test email account. Do not use a personal email account with the same address as a Management Portal user account.
When the PSA email parser processes an incoming email message, the message is not deleted. The message moves to an archive folder. If there is no archive folder, the system creates one.
The system cannot assign tickets to users that are not present in Management Portal, as there can be no association with an email address.
If you are using a mail server other than Office365 or Gmail, ensure that it supports RFC 6851.
-
In the Incoming email settings row, click the pencil icon.
-
Turn on the Active option switch to enable incoming emails.
When you activate the parser, it will convert all unread messages that it finds in the inbox into tickets. If you do not want this to happen, select the Do not process messages received before the specified date option. See below for more details.
-
Select the relevant email server protocol type:
-
IMAP (default)
-
Exchange
-
Office365
For an Office365 protocol type, the system uses the current browser session to detect if you are already signed in to a Microsoft Office365 MFA account. If you are, it activates the integration with the email details of that Microsoft account. If you are not, it asks you to sign-in.
In this way, there is a possibility that you inadvertently activate the server integration for an incorrect account. To avoid this, sign out of your Microsoft account before activation.
-
-
Select the Enable SSL checkbox.
Secure Sockets Layer (SSL) encrypts your email messages during transport. SSL is only supported in these scenarios:
-
Secure (TLS) - StartTLS - Port 587
-
Secure (SSL) - SSL - Port 465
-
-
Enter the host name and port.
-
Enter the account user name and password.
-
Enter the Timeout value in milliseconds.
This value specifies how long the system waits for a successful connection to your email server before it times out.
-
Select the Process messages from unknown users checkbox to convert messages from unknown users, without assigning to a user or company.
If not selected, the system will not convert incoming emails from an address that is not in the customer database into a ticket.
If selected, the system still ignores 'no-reply' emails. The system will neither create nor update tickets from the following types of email:
-
The sender email address contains: '
noreply', 'no-reply','no_reply', 'notreply'. -
Email header contains:
-
Auto-Submitted, when value differs from 'no'. -
X-Auto-Response-Suppress, when value is 'All', 'DR' or 'AutoReply'.
-
-
-
Select the Do not process messages received before the specified date checkbox to ensure that tickets are created for emails received after a specified date only.
This option prevents automatic ticket creation for all existing emails, including those received prior to you configuring the incoming email server.
If you select this checkbox, additional date and time fields appear. Make the appropriate selections.
-
Click Test Connection to verify your incoming email settings.
The system validates your settings, and displays a confirmation message.
-
Click
.