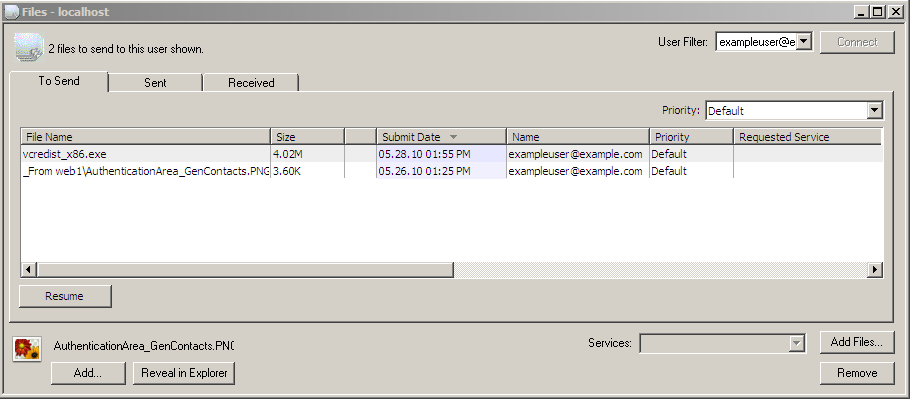
The Files window in the MassTransit Administrator application shows all files that are sent, received, or waiting to be sent, on the server or for a particular contact, as well as information about the files themselves - file size, transmission date, contact name, set priorities, and requested services.
To open it:
Open the Window main menu and click on the Files option.
-OR-
Click on the Files button from the Navigation Bar.
Files Window Options
In the Files window, you can filter your contacts in order to see only the files that are sent, received, or waiting to be sent for a particular contact. In addition, you are allowed to connect to contacts, to create job tickets and attach them to the files, to reveal mailboxes in Windows Explorer. The job tickets provide detailed information about the transmission, the transmitted files, shipping and billing information, etc.
Note: See the Job Tickets page for more information about job tickets.
All actions available in the Files window are listed below:
Filter the displayed files by contact – select a contact from the User Filter drop-down menu and the files to send, sent, and received from that contact will be displayed in the To Send, Sent, and Received tabs respectively.
Designate files for sending – in the Files window there are two ways to designate files for sending to a contact:
Note: Designating files in the Files window is available on MassTransit HP servers only.
Drag and drop the files in the To Send tab of the window.
Select a contact from the User Filter drop-down menu and click on the Add Files... button. Then, browse for the files, select them and add them to the list.
Connect to a Server contact – select the desired Server contact from the User Filter and click on the enabled Connect button.
Note: This action is available on MassTransit HP servers only.
Update the information displayed in the Files window – click Resume or close and reopen the Files window.
Reveal contact's mailbox in Windows Explorer – select a contact that has files in any of the tabs of the Files window or highlight a file and click on the Reveal in Explorer button.
Add job ticket – highlight a file and click on the Add... button. This will display the Job Ticket window. Enter the desired information in it and click on the OK button.
Note: Find more information about job tickets and how to configure them on the Job Tickets page.
Note: This action is available on MassTransit HP servers only.
Select a priority for sending of the files – highlight a designated file from the To Send tab and select a predefined priority from the Priority drop-down menu.
Note: Find detailed information about configuring priorities in the Setting Priorities for Sending Files section of the Transferring Files page.
Note: This action is available on MassTransit HP servers only.
Select services to be performed for a file – in the Received tab, highlight a file and select a service from the Services drop-down menu. The selected service will be displayed in the Requested Service column of the files table.
Note: Find detailed information about configuring services on the Services page.
Note: This action is available on MassTransit HP servers only.
Process a service – highlight a file from the Received tab of the window, select a service if there is not a selected one, and click on the Process button.
Note:This action is available on MassTransit HP servers only.
Filter the received files by the status of the assigned services – in the Received tab of the Files window, select a service status from the Status Filter drop-down menu. You can filter the files by the following statuses:
All – displays all files.
All Not Completed – displays all files that haven't been processed by a service.
Holding – displays all received files.
Error – displays all files where an error occurred during a service execution.
Queued – displays the files which are queued to a service.
Processing – displays the files which currently are being processed by a service. The files processing is quite fast so you may not see any files if this filter is selected.
Completed – displays all files where a service has been completed.
Remove files from MassTransit – there may be times when you want to remove a file from your system, either without processing it or after you have already processed it and sent a copy to your contact. Or, the list of files you’ve sent may be too long and you may want to reduce it. A long file list may slow MassTransit down. Whenever you remove a file from one of MassTransit’s default locations (for example, a received file in the Received tab or folder or a file for sending in the To Send tab or folder), MassTransit asks you if you want to move files to the trash. However, if you remove a file that is in a custom mailbox folder, only its name is removed from the list; the file and its location remain unchanged. If you want to delete or move such a file, you must do so using the Windows Explorer. If you want to remove only entries for files that have already been sent or for received files that have already been processed, you can have MassTransit remove those entries automatically. This automatic deletion does not affect entries for files that are waiting to be sent or entries for files that have been received and not processed. Furthermore, automatic deletion does not delete the files themselves. You need to remove the files manually. Automatic file-entry deletion only affects entries in the Files window.
To remove a file from MassTransit manually, follow these steps:
In the Files window, select a file you want to remove from any tab.
Press Shift and click to select multiple nonadjacent files. You can also press Control and click to select/deselect an individual file. To select all, choose Select All from the Edit main menu, or press Control+A.
Click on the Remove button. If the file you are removing is in the default mailbox folder, MassTransit asks whether to move the file to the Trash. Select Delete or click Cancel. If the file you are removing is not in its default location, clicking Remove eliminates the item from the list, but leaves the file itself in its current location.
To remove files entries automatically, follow these steps:
Open the Setup window of the MassTransit Administrator by clicking on the Setup button from the Navigation Bar or by selecting the Setup... option from the Window main menu.
Open the Special tab of the Setup window.
From the Log and File Handling section, select the Clear File Entries Older Than __ Days checkbox and type an age in days.
Click OK to save the changes.
Note: For more information about the Files window and its options, please refer to the Tracking page.