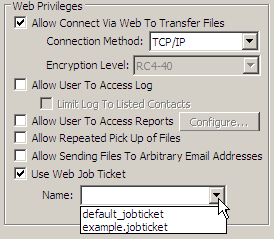
Note: For detailed information on how to create a new Web client contact, please see the Web Client Contacts section on the Contacts page.

If you want to, you can require a job ticket from a Web client contact.
Note: Web client contacts using FTP cannot use a job ticket.
Note: The configuration for requiring a job ticket from a Web client contact can be set per contact only or for ALL contacts. The configuration below is for requiring a job ticket from a Web client contact only.
To require a job ticket from ALL Web client contacts, you need to edit the mtweb.ini file and set a value to the mForceHTMLJobTicket = 0 setting. For more information, please refer to Configuring Contacts to Use MTWeb section on the MTWeb page.
To require a Web client contact to fill in a job ticket when he/she sends files to you, follow these steps:
Note: For detailed information on how to create a new Web client contact, please see the Web Client Contacts section on the Contacts page.

Note: You can duplicate the default job tickets and edit copies using a text or HTML editor to require the Web client contact to fill in certain information before being able to send you files (validation). These newly created job tickets must reside in the folder with the default job tickets, by default:
for MassTransit HP 7.0: ~\MassTransit Server 7\MTWeb\JobTickets
for MassTransit HP 7.1 and later: ~\MassTransit Server\MTWeb\JobTickets
Note: If you want to, you can create a new job ticket button in the Web client contact's user interface. For information on how to do that, please refer to the Customizing MTWeb User Interface section on the MTWeb page.
You can manually localize Job Tickets by adding the string you wish to translate and the desired translation. These changes will be reflected in the MassTransit webUI.
Selecting the localized template
Note: For detailed information on how to create a new Web client contact, please see the Web Client Contacts section on the Contacts page.

Adding the desired strings
The text is located between the <span class="ts"> and </span> tags.
e.g. In this case: <span class="ts">Proceed</span> - the text you need is Proceed.
"text that will be translated": "translated version of the text"
Note: These items must be entered between the two main curly brackets - { and }.
Note: Multiple items must be separated by a comma (,). e.g.:
{
"Release Date":"localized text",
"Proceed":"another localized text"
}
i.e. "Proceed":"Test" will change the Job Ticket text Proceed to Test in the webUI but it will not change Proceed Forward to Test Forward. You must write the exact text item you want translated.