
Once you have set up the server or servers you plan to administer and connect to a server (for information about connecting to a server, see the Connecting to a Local MassTransit Engine and the Connecting to a Remote MassTransit Engine pages), you can start administering that server. Before you can use MassTransit to transfer files, you must add contacts to the Contacts window and configure the communication method you plan to use when calling them. To receive calls, configure your available communication method.
The Contacts window of the MassTransit Administrator not only shows a list of the registered contacts, but also provides information on the number of files received from, sent to, or waiting to send to each contact, as well as the date and status of your last connection with each contact.
To open it:
OR
MassTransit includes all the tools you need to maintain a list of Contacts. Store custom settings and privileges for each remote site in the Contact Window. As you add new contacts to your Contacts window, MassTransit automatically generates mailbox folders for each contact's incoming and outgoing files.
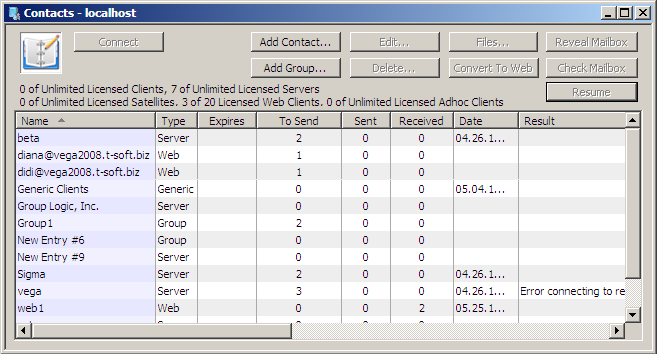
In the Contacts window, you can do the following:
Note: This action is available in MassTransit HP Server only!
Note: This action is available only in MassTransit HP Servers that have limited number of web client contact licenses!
Ad hoc contacts do not take from your Web client contact licenses until you convert them to Web client contacts.
Note: While a name in your Contacts window is highlighted, information such as files received is not updated!
Note: MassTransit HP Servers can connect to their own Web client contacts and to an unlimited number of Ad hoc contacts and other HP Servers. MassTransit SFTP Servers can connect to their own Client contacts.