Note: The Web client contacts are available in MassTransit HP only.
Before creating Web client contacts, you need to configure MTWeb first.
Info: You can find detailed steps for the MTWeb installation on the Installing MTWeb 7 page.
Web client contacts connect to the MassTransit server using MTWeb. They have a lot of features which can be configured to suit for different purposes to the different users. They can be set to pick up, drop off, and forward files. Web client contacts can also send a request for files to other contacts, and can fill out job tickets for the files. In addition, you can give Web client contacts permission to forward files to contacts in your Contacts window and choose a Service to process files remotely. Your connection can be secured using Secure Sockets Layer (SSL) technology to provide certificates for authentication and encryption of data during transfer. The number of Web client contacts is restricted by the Web client contact limit that came with your license.
Supported Web Browsers
The supported web browsers which you can use for connecting in to the MassTransit Server are:
Windows
Internet Explorer 7 or higher
Firefox 3 or higher
Macintosh
Safari 3 or higher
Firefox 3 or higher
Info: See the ReadMe for the latest information about the browsers you can use to connect to MassTransit over the web.
Once Web client contacts connect to your server via the Internet, they see the MassTransit web pages. By default, the web pages are installed in the folder where the MassTransit application is located in. You may rename the folder containing the web pages or move it to a different location. However, if you do, you must use the Setup window to configure MassTransit to find the folder. See the Moving or Renaming the Web Pages section on the MTWeb page for instructions.
Adding a New Web Client Contact Entry
To add a new Web client contact to your Contacts window, follow these steps:
General Steps
Open the Contacts window by clicking on the Contacts button from the Navigation Bar or by selecting the Contacts option from the Window main menu.
In the Contacts window, click on the Add Contact... button.
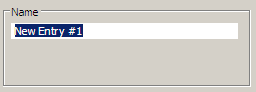
The Contact Information window appears. In the General tab, enter a name for the Web client contact under the "Name" area.
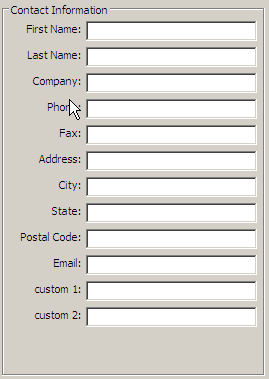
Enter the Web information in the "Contact Information" area of the General tab.
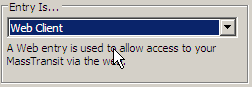
Under the "Entry Is..." area, select the Web Client option:
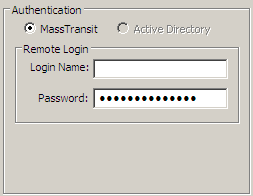
Under the "Authentication" area, choose the authentication method for the Web client contact:
MassTransit – if you select this option, the Web client contact will have to authenticate with the username and password set by the administrator.
Active Directory – this option allows the Web client contact to use his Active Directory credentials to log in to the MassTransit server. If you select this option, a green light should appear when MassTransit finds the domain account. If the domain account cannot be found, a red light appears.
Info: For information about creating a contact using Active Directory, see Active Directory Contacts section or Active Directory page.
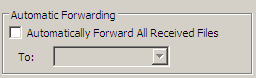
Under the "Automatic Forwarding" area, if you want to forward automatically all received files from that Web client contact to another contact, check the Automatically Forward All Received Files checkbox. Then, select the contact that you want to forward all files to from the To drop-down menu.
Under the "Expiration" area, select an expiration period if you want that contact to expire. After the contact is expired, he will be removed from the list in the Contacts window and his mailbox will be deleted.
Setting Mailbox Options
When you add a new contact, MassTransit creates a folder for that contact called mailbox. MassTransit uses this folder to store all the incoming files for that contact.
Info: For detailed information about contacts' mailboxes, see the Mailboxes page.
Open the Mailbox tab of the Contact Information window.
Select a location for the contact's mailbox. The default location is:
for MassTransit HP 7.0:
on 32-bit machines: C:\Program Files\Group Logic\MassTransit Server 7\User Mailboxes
on 64-bit machines: C:\Program Files (x86)\Group Logic\MassTransit Server 7\User Mailboxes
for MassTransit HP 7.1 to 7.6:
on 32-bit machines: C:\Program Files\Group Logic\MassTransit Server\User Mailboxes
on 64-bit machines: C:\Program Files (x86)\Group Logic\MassTransit Server\User Mailboxes
for MassTransit HP 7.6 and newer:
on 64-bit machines: C:\Program Files (x86)\Acronis\MassTransit Server\User Mailboxes
To configure a different directory for the mailbox, select the Use Custom Mailbox option and click on the Select... button next to it to browse for a custom location.
Note: If you are changing from a custom mailbox to a default mailbox, or changing from one custom mailbox to another, MassTransit does not affect your original custom mailbox. To delete or move its contents, you must do so manually using the Windows Explorer.
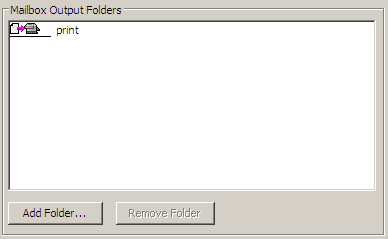
Under the "Mailbox Output Folders" area, you can configure an output folder which will appear in the To Send directory of the contact's mailbox. The configured output folders serve to specify the service that the files are a subject of at the receiver. Using these folders, you can print on a remote printer or a hot folder. The names of the folders must be identical to those of devices such as printers or hot folders that the remote contact has defined.
To set a folder, click on the Add Folder... button. Then, enter a name identical to those of devices such as printers or hot folders that the remote contact has defined and type for the folder. There are three folder types available:
Print To – this folder type specifies that the files in the folder will be printed at the receiver side.
Output To – for files that will be moved to a different folder at the receiver.
Forward To – for files that will be forwarded to another contact at the receiver side.
When the folder name and type are configured, click on the OK button to save this setting.
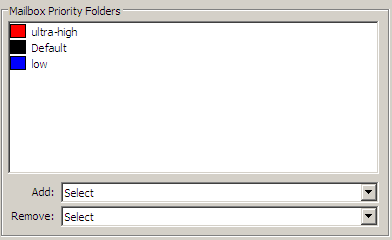
Under the "Mailbox Priority Folders" area, you can specify a folder for each set priority. The specified folders appear in the To Send directory of the contact's mailbox. They define the priority for sending the files.
You can add and remove priority folders using the Add and Remove drop-down menus.
Note: To set priority folders, you need to configure priorities first. Find detailed information about how to do that on the Transferring Files page.
Setting Contact Privileges
Open the Security tab of the Contact Information window.
Select the privileges you want to grant to the Web client contact from the following areas:
Info: For a detailed information about privileges, see the Contact Privileges section of this page.
Completing the Contact Creation
Click on the OK button in the right bottom corner of the Contact Information window.
The contact creation is complete. The newly created Web client contact should appear in the Contacts window.
Configuring Password Security for Web Client Contacts
Password Rules
By default, MassTransit enforces the following rules to prevent Web client and Ad hoc contacts from using easily guessed passwords.
Minimum length = 6
Contains at least one character from each of the following sets: English characters, numbers, and non alpha-numeric characters (!, $, #, %, etc.)
Password does not match or contain the login name or the contact name.
These rules apply to passwords that MassTransit is storing.
For contacts already in the Contacts window, the rules apply when they or the administrator change their password.
For accounts linked to Active Directory, password rules set up by domain administrators for Active Directory password rules apply.
To disable the password feature globally:
Edit the MassTransit.cfg file. It is located in:
for MassTransit 7.6 and later:
on 64-bit machines:
C:\Program Files (x86)\Acronis\MassTransit Server
for MassTransit 7.1 to 7.6:
on 32-bit machines:
C:\Program Files\Group Logic\MassTransit Server
on 64-bit machines:
C:\Program Files (x86)\Group Logic\MassTransit Server
for MassTransit 7.0.x:
on 32-bit machines:
C:\Program Files\Group Logic\MassTransit Server 7
on 64-bit machines:
C:\Program Files (x86)\Group Logic\MassTransit Server 7
Change the ENFORCE_PASSWORD_COMPLEXITY setting from TRUE to FALSE. In addition, make sure you remove the comment characters (%%) at the beginning of the line. The change takes effect when the MassTransit Engine is restarted. ENFORCE_PASSWORD_COMPLEXITY=FALSE
Configuring Password Security for Web Client Contacts
You can require Web client contacts to change their password if you wish. To set password changing requirements, follow these steps.
Open the MassTransit HP Setup window by clicking on the Setup button from the Navigation Bar or by selecting the Setup... option from the Window main menu.
In the Setup... window, select the Security tab.
To require Web client contacts to change their password after a set number of days, type the number of days you wish in the field on the Web login passwords are valid for ___day(s) after which users must change their password setting.
To require Web client contacts to change their password the first time they log in, place a check in the Force web client users to change their password at first login checkbox.
Note: The Force web client users to change their password at first login option is not applicable for automatically created contacts. Only web client contacts manually created by the server administrator will be forced to change their password.
Note: For security, MassTransit encrypts passwords before storing them. As a result, scripts cannot access passwords...
Note: The rules you set apply to passwords that MassTransit is storing. For accounts linked to Active Directory, domain administrators have already set up certain password rules for Active Directory passwords.