The Ad Hoc delivery feature allows Web client contacts to send files or a request for files to users designated by email addresses that may or may not already have accounts in MassTransit. After logging in to the MassTransit Web (MTWeb) site, Web client contacts are allowed to send files or a request for files to any valid email address. If the entered email address does not belong to an existing contact on the server, an account with that address is automatically created. All contacts that have been automatically created by the Ad Hoc delivery feature are considered Ad Hoc contacts.
There are two types of Ad Hoc contacts:
Ad Hoc entries
Web entries
Note: The Ad hoc entries are available only in MassTransit HP servers that have limited number of Web client contact licenses. They do NOT take from your Web client licenses. You can have unlimited number of Ad hoc contacts on your server. For users with unlimited number of Web client contact licenses the automatically created contact would be Web entry. The automatically created entry would be Web entry when files or request for files is sent to a valid Active Directory user email, no matter if you have limited web client licenses or not.
Ad hoc entries have General privileges and some of the Web privileges. They can be set to pick up and drop off files, and forward files to the Web client contact that sent them or requested files from them for a first time.Your connection can be secured using Secure Sockets Layer (SSL) technology to provide certificates for authentication and encryption of data during transfer. This type of contacts does not take from your Web client licenses. If you have free Web client contact licenses, you can convert an existing Ad hoc entry to a Web client contact. The converted contact will have the same Web client features available as all other Web client contacts.
The supported web browsers for the Ad hoc contacts are the same as for the Web client contacts.
Before creating Ad hoc contacts, you need to configure MTWeb and the Ad Hoc delivery feature first.
Ad hoc contacts can be created only automatically when existing Web client Contacts send files or a request for files to valid arbitrary email addresses.
Info: Find detailed steps for the MTWeb installation on the Installing MTWeb 7 page. Find detailed steps from configuring the ad hoc delivery feature on the Ad Hoc Delivery page.
Info: For more information about how to send files and a request for files from the web site, see Web Client User Guide.
You can configure a Web client contact to be used as a profile account for automatically created by the Ad Hoc feature contacts. If the default auto account profile is set, the settings found in the Security tab of the "Contact Information" window (only the ones that are available for Ad hoc contacts) will be propagated to the new Ad hoc contact.
Note: The default auto account profile MUST have the default mailbox option set!
Setting a default ad hoc auto account profile
To set a default auto account profile:
Open the MassTransitEngine.cfg file located in the installation folder of MassTransit. By default, the installation folder is in:
for MassTransit 7.6 and later:
on 64-bit machines:
C:\Program Files (x86)\Acronis\MassTransit Server
for MassTransit 7.1 to 7.6:
on 32-bit machines:
C:\Program Files\Group Logic\MassTransit Server
on 64-bit machines:
C:\Program Files (x86)\Group Logic\MassTransit Server
for MassTransit 7.0.x:
on 32-bit machines:
C:\Program Files\Group Logic\MassTransit Server 7
on 64-bit machines:
C:\Program Files (x86)\Group Logic\MassTransit Server 7
Under the AD HOC ADDRESSING CONFIGURATION section in the MassTransitEngine.cfg file, find the ADHOC_AUTO_ACCOUNT_PROFILE= setting.
Enter the user name of an existing web client contact whose settings will be used as default ones for the new Ad hoc contacts, as a value of the ADHOC_AUTO_ACCOUNT_PROFILE= setting as shown below: ADHOC_AUTO_ACCOUNT_PROFILE=accountname where accountname is the name of the web client contact.
Save and close the MassTransitEngine.cfg file.
In order to apply the changes immediately, restart the MassTransit Service from the Services console (available in Start→All Programs→Administrative Tools)
Available Configurations for Ad Hoc Contacts
All available configuration settings for Ad hoc contacts are described below:
General Configurations
Info: The available configurations for automatically created by the Ad Hoc feature contacts, that are Web entries, are listed in the Adding a New Web client entry section.
Open the Contacts window by clicking on the Contacts button from the Navigation Bar or by selecting the Contacts option from the Window main menu.
In the Contacts window, highlight an existing Ad hoc contact or a Web client contact that would be the default auto account profile.
Click on the Edit... button in the Contacts window.
Note: If the selected Ad hoc contact is created using a default auto account profile, some of the settings may not be editable.
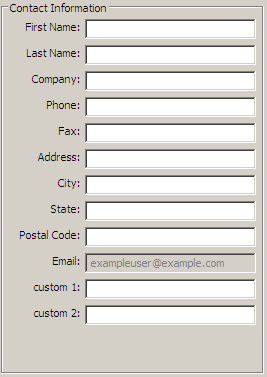
The Contact Information window appears. In the General tab, you can see the name of the contact under the "Name" area. The user names of the Ad hoc entries cannot be modified.
Enter or edit the information in the "Contact Information" area of the General tab. The email address of the Ad hoc entries cannot be modified.
Under the "Entry Is..." area, the contact type is displayed. For Ad hoc entries:
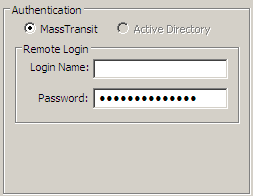
Under the "Authentication" area, the authentication method for the Ad hoc entries is displayed:
MassTransit – only this option is available for Ad hoc entries. By default, the used username is the e-mail address of the contact and the password is being dynamically generated. The administrator can change the contact's username and password anytime.
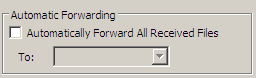
Under the "Automatic Forwarding" area, if you want to forward automatically all received files from that Ad hoc contact to another contact, check the Automatically Forward All Received Files checkbox. Then, select the contact that you want to forward all files to from the To drop-down menu.
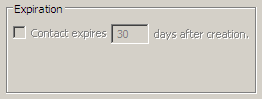
The "Expiration" area for Ad Hoc entries is disabled.The Ad hoc entries expire when the passkey link for sending/requesting files expires. After the expiration period the contact will be removed from the Contacts window list and his mailbox will be deleted.
When you add a new contact, MassTransit creates a folder for that contact called mailbox. MassTransit uses this folder to store all the incoming files for that contact.
Info: For detailed information about contacts' mailboxes, see the Mailboxes page.
Open the Mailbox tab of the Contact Information window.
Select a location for the contact's mailbox. The default location is:
for MassTransit HP 7.0:
on 32-bit machines: C:\Program Files\Group Logic\MassTransit Server 7\User Mailboxes
on 64-bit machines: C:\Program Files (x86)\Group Logic\MassTransit Server 7\User Mailboxes
for MassTransit HP 7.1 to 7.6:
on 32-bit machines: C:\Program Files\Group Logic\MassTransit Server\User Mailboxes
on 64-bit machines: C:\Program Files (x86)\Group Logic\MassTransit Server\User Mailboxes
for MassTransit HP 7.6 and newer:
on 64-bit machines: C:\Program Files (x86)\Acronis\MassTransit Server\User Mailboxes
Note: If you are editing the Web client contact that is the default auto account profile, you MUST select the default mailbox location.
To configure a different directory for the mailbox, select the Use Custom Mailbox option and click on the Select... button next to it to browse for a custom location.
Note: If you are changing from a custom mailbox to a default mailbox, or changing from one custom mailbox to another, MassTransit does not affect your original custom mailbox. To delete or move its contents, you must do so manually using the Windows Explorer.
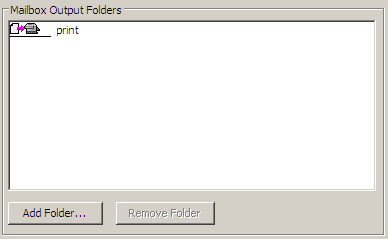
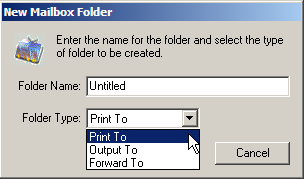
Under the "Mailbox Output Folders" area, you can configure an output folder which will appear in the To Send directory of the contact's mailbox. The configured output folders serve to specify the service that the files are a subject of at the receiver. Using these folders, you can print on a remote printer or a hot folder. The names of the folders must be identical to those of devices such as printers or hot folders that the remote contact has defined.
To set a folder, click on the Add Folder... button. Then, enter a name identical to those of devices such as printers or hot folders that the remote contact has defined and type for the folder. There are three folder types available:
Print To – this folder type specifies that the files in the folder will be printed at the receiver side.
Output To – for files that will be moved to a different folder at the receiver.
Forward To – for files that will be forwarded to another contact at the receiver side.
When the folder name and type are configured, click on the OK button to save this setting.
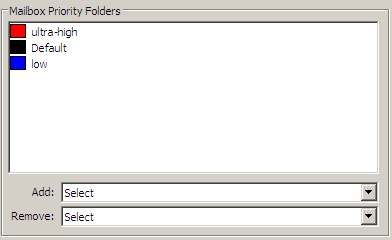
Under the "Mailbox Priority Folders" area, you can specify a folder for each set priority. The specified folders appear in the To Send directory of the contact's mailbox. They define the priority for sending the files.
You can add and remove priority folders using the Add and Remove drop-down menus.
Note: To set priority folders, you need to configure priorities first. Find detailed information about how to do that on the Transferring Files page.
Setting Contact Privileges
Open the Security tab of the Contact Information window.
Select the privileges you want to grant to the Ad hoc contact from the following areas: