There are two main ways you can load balance Files Advanced:
Load balancing only the Files Advanced Mobile Gateways
This configuration ensures that the components under the heaviest loads, the Files Advanced Mobile Gateway Servers, are load balanced and always accessible for your mobile clients. The Files Advanced server is not behind the load balancer as it is not required in order to connect to the Files Advanced Mobile Gateways for unmanaged access. For more information visit the Cluster Groups article.
Load balancing all of Files Advanced
This configuration load balances all of Files Advanced' components and ensures high-availability for all users. You will need at least two separate machines in order to test this setup. Many of the settings when configuring load balancing differ between different software and hardware so they will not be covered in this guide.
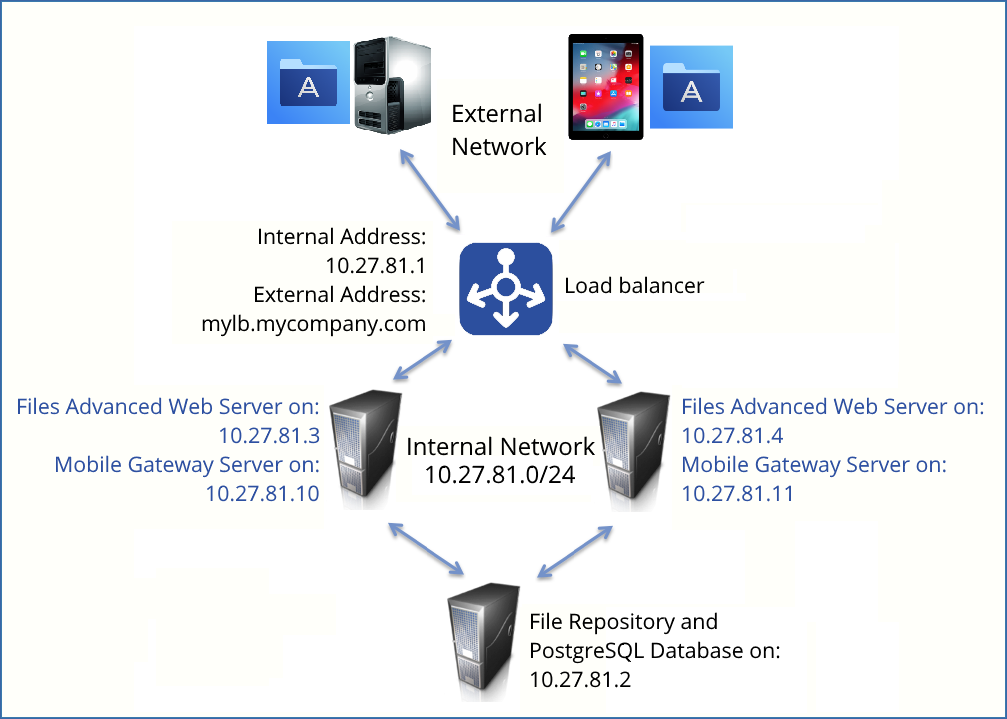
In the setup example we will use three separate machines. One of them will act as our File Repository and Database and the other two as both Files Advanced Web Servers and Files Advanced Mobile Gateways. Below you can see a guide on how to configure this setup.
This guide will provide the details necessary to properly load balance the Files Advanced product in your environment.
On the server that will be hosting your PostgreSQL database and File Repository, perform the following steps:
Start the Files Advanced installer and press Next. Read and accept the license agreement.
In the Files Advanced installer, choose Custom, and select Files Advanced File Repository and PostgreSQL Database Server and press Next.
Select where the File Repository and Configuration Utility will be installed.
Select where PostgreSQL should be installed and enter a password for the superuser postgres.
Open TCP port 5432. You will be using it to access the PostgreSQL database from the remote machines.
After finishing the installation procedure, proceed with going through the Configuration Utility.
You will be prompted to open the Configuration Utility. Press OK.
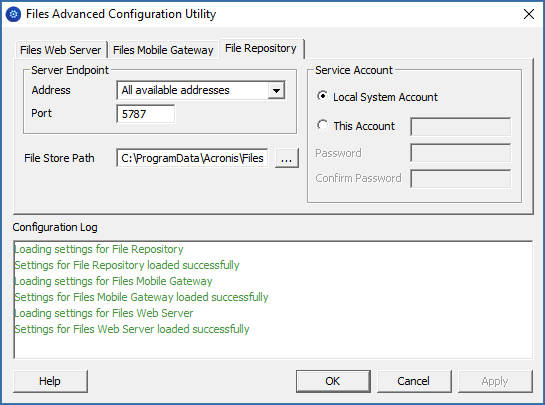
Select the address and port on which your File Repository will be accessible.
Select the path to the File Store. This is where the actual files will reside.
Click OK to apply changes and close the Configuration Utility.
Navigate to the PostgreSQL installation directory (for example, C:\Program Files (x86)\Acronis\Files Advanced\Common\PostgreSQL\<VERSION>\data\) and edit pg_hba.conf with a text editor.
Include host entries for each of your Files Advanced servers using their internal addresses and save the file.The pg_hba.conf (HBA stands for host-based authentication) file controls client authentication and is stored in the database cluster's data directory. In it you specify which servers will be allowed to connect and what privileges they will have. e.g.:
# TYPE DATABASE USER ADDRESS METHOD # First Files Advanced & Gateway server
host all all 10.27.81.3/32 md5
# Second Files Advanced & Gateway server
host all all 10.27.81.4/32 md5
In these examples all users connecting from the First Files Advanced server (10.27.81.3/32) and the second Files Advanced server (10.27.81.4/32) can access the database with full privileges (except the replication privilege) via a md5 encrypted connection.
If you wish to enable remote access to this PostgreSQL instance, you will have to edit the postgresql.conf file. Follow the steps below:
Navigate to and open the postgresql.conf. By default it is located at: C:\Program Files (x86)\Acronis\Files Advanced\Common\PostgreSQL\<VERSION>\Data\postgresql.conf
Find the line #listen_addresses = 'localhost'
Enable this command by removing the # symbol at the start of the line.
Replace localhost with * to listen on all available addresses. If you want PostgreSQL to listen only on a specific address, enter the IP address instead of *.
e.g. listen_addresses = '*' - This means that PostgreSQL will listen on all available addresses.
e.g.listen_addresses = '192.168.1.1' - This means that PostgreSQL will listen only on that address.
Save any changes made to the postgresql.conf.
Restart the Files Advanced PostgreSQL service.
Open the Files Advanced PostgreSQL Administrator tool (it could also be called PgAdmin).You can find it in Windows Start menu, under the Files Advanced folder. Connect to your local server, select Databases, and either right-click or select New Database from the Edit -> New Object menu to create a new database. Name it acronisaccess_production.
Note: PostgreSQL uses port 5432 by default. Make sure that this port is open in any firewall or routing software.
On the two servers that will be acting as both Files Advanced Servers and Files Advanced Gateways, perform the following steps:
Start the Files Advanced installer and press Next. Read and accept the license agreement.
In the Files Advanced installer, choose Custom, and select only Files Advanced Web Server and Files Advanced Mobile Gateway and continue with the installation procedure.
After finishing the installation procedure, proceed with going through the Configuration Utility.
You will be prompted to open the Configuration Utility. Press OK.
On the Files Advanced Web server tab:
Enter the address and port on which your Files Advanced management server will be reachable (i.e. 10.27.81.3 and 10.27.81.4).
Select your certificate. This should be the same SSL certificate that is tied to the DNS address of the load balancer.
Press Apply.
Note: If you don't have a certificate, a self-signed certificate will be created by Files Advanced. This certificate should NOT be used in production environments.
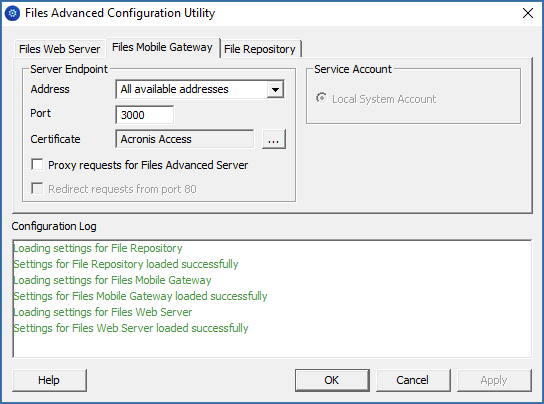
On the Files Advanced Mobile Gateway tab:
Enter the address and port on which your Gateway Server will be reachable (i.e. 10.27.81.10 and 10.27.81.11).
Select your certificate.This should be the same SSL certificate that is tied to the DNS address of the load balancer.
Press Apply.
Note: If you don't have a certificate, a self-signed certificate will be created by Files Advanced. This certificate should NOT be used in production environments.
Navigate to the Files Advanced installation directory (e.g. C:\Program Files (x86)\Acronis\Files Advanced\Acess Server\) and edit acronisaccess.cfg with a text editor.
Set the username, password, and internal address of the server that will be running the PostgreSQL database and save the file. This will configure your Files Advanced server to connect to your remote PostgreSQL database. e.g.:
DB_DATABASE =acronisaccess_production
DB_USERNAME =postgres
DB_PASSWORD =password123
DB_HOSTNAME =10.27.81.2
DB_PORT =5432
Open Services.msc and restart the Files Advanced services.
On one of your Files Advanced Web Servers and Files Advanced Mobile Gateways, perform the following steps:
This is the server which you will configure first and it's settings will be replicated across all other servers. After the settings get replicated, all servers will be identical. It does not matter which server you choose.
Open Services.msc and restart the Files Advanced Tomcat service. This will populate the database you have created.
Visit https://myaccess (i.e. https://10.27.81.3 or https://10.27.81.4) in your web browser and complete the Setup Wizard.
Under the Licensing tab:
Enter your license key, mark the checkbox and press Continue.
Under the General Settings tab:
Enter a Server Name.
The Web Address should be the external address of your load balancer (i.e. mylb.company.com). If you are not using port 443 you will have to write the port as well.
The Client Enrollment Address should be the external address of your load balancer (i.e. mylb.company.com).
Select your Color Scheme.
Select the language for the Audit Log messages.
Under the SMTP tab:
Enter the DNS name or IP address of your SMTP server
Enter the port of your SMTP server.
If you do not use certificates for your SMTP server, unmark Use secure connection?.
Enter the name which will appear in the "From" line in emails sent by the server.
Enter the address which will send the emails sent by the server.
If you use username/password authentication for your SMTP server, mark Use SMTP authentication? and enter your credentials.
Press Save.
Under the LDAP tab:
Mark Enable LDAP.
Enter the DNS name or IP address of your LDAP server.
Enter the port of your LDAP server.
If you use a certificate for connections with your LDAP server, mark Use Secure LDAP Connection.
Enter your LDAP credentials, with the domain. (for example, mycompany\myname).
Enter your LDAP search base.
Enter the desired domain(s) for LDAP authentication. (i.e.to enable LDAP authentication for an account with the email joe@glilabs.com, you would enter glilabs.com)
Press Save.
Under the Local Gateway tab:
Note: If you're installing both a Files Advanced Mobile Gateway and the Files Advanced Web Server on the same machine, the Gateway will automatically be detected and administered by the Files Advanced Web Server.
Set a DNS name or IP address for the local Gateway Server. This is an internal address behind the load balancer (i.e. 10.27.81.10).
Press Save.
Under the File Repository tab:
The File Repository Address should be the internal address of the server you have created for the file repository role (i.e. 10.27.81.2).
Once you've completed the Setup Wizard, press Finish and navigate to Mobile Access -> Gateway Servers.
It is time to register your second Gateway server:
Enter a Display name for the second Gateway.
The Address For Administration should be an internal address behind the load balancer (i.e. 10.27.81.11).
Enter the Administration Key. You can obtain it by going to the machine on which the Gateway you are adding is installed, navigating to https://mygateway:443 (i.e. https://10.27.81.10 or https://10.27.81.11) and the key will be displayed there. For more information visit the Registering new Gateway Servers article.
Press Save.
Create a Cluster Group and add all of your Gateway servers to it. Your primary server should be the one you have already gone through the Setup Wizard on. For more information visit the Cluster Groups article.
Note: Please make sure that you have already configured a correct Address for Administration on each Gateway before proceeding. This is the DNS or IP address of the Gateway server.
Expand the Mobile Access tab.
Open the Gateway Servers page.
Press the Add Cluster Group button.
Enter a display name for the group.
Enter the internal DNS name or IP address of the load balancer (i.e. 10.27.81.1).
Mark the checkbox for each Gateway you want to be in the group.
Select the Gateway which will control the group's settings. This should be the Gateway which you configured first. All of the existing settings on that Gateway (including assigned Data Sources and excluding the address for administration) will be copied to every Gateway in the group.
On the load balancer:
Enable duration-based session stickiness (or your load balancer's equivalent) on your load balancer and configure it to not expire.
If a health-check is required (looking for an HTTP status of 200 to be returned), a ping to https://INTERNALSERVERNAME:MANAGEMENTPORT/signin will satisfy it (i.e. https://myaccessserver1.company.com/signin and https://myaccessserver2.company.com/signin).
Using a browser, open https://mylb.company.com to verify the configuration is working.