Recovering your system to a new disk under bootable media
Before you start, we recommend that you complete the preparations described in Preparing for recovery. You do not need to format the new disk, as this will be done in the process of recovery.
It is recommended that your old and new hard drives work in the same controller mode. Otherwise, your computer might not start from the new hard drive.
To recover your system to a new disk
- Install the new hard drive to the same position in the computer and use the same cable and connector that was used for the original drive. If this is not possible, install the new drive to where it will be used.
- Attach the external drive if it contains the backup to be used for recovery and make sure that the drive is powered on.
-
Arrange the boot order in BIOS so as to make your bootable media (CD, DVD or USB stick) the first boot device. See Arranging boot order in BIOS or UEFI BIOS.
If you use an UEFI computer, pay attention to the boot mode of the bootable media in UEFI BIOS. It is recommended that the boot mode matches the type of the system in the backup. If the backup contains a BIOS system, then boot the bootable media in BIOS mode; if the system is UEFI, then ensure that UEFI mode is set.
- Boot from the bootable media and select Acronis True Image.
- On the Home screen, select My disks below Recover.
-
Select the system disk or partition backup to be used for recovery. When the backup is not displayed, click Browse and specify path to the backup manually.
If the backup is located on a USB drive, and the drive is not recognized correctly, check the USB port version. If it is a USB 3.0 or USB 3.1, try connecting the drive to a USB 2.0 port.
-
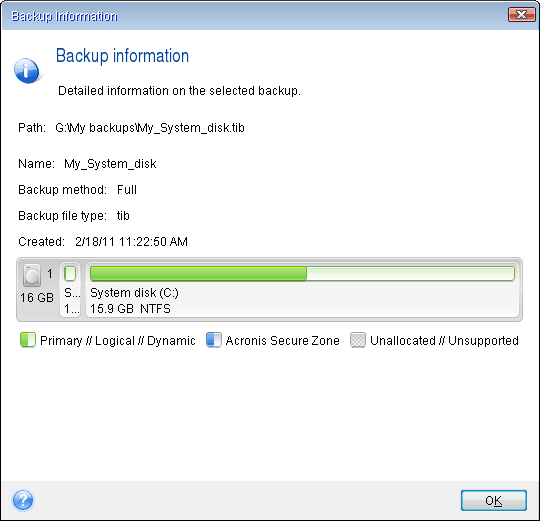
If you have a hidden partition (for example, the System Reserved partition or a partition created by the PC manufacturer), click Details on the wizard's toolbar. Remember the location and size of the hidden partition, because these parameters need to be the same on your new disk.
- Select Recover whole disks and partitions at the Recovery method step.
-
On the What to recover step, select the boxes of the partitions to be recovered.
If you select an entire disk, MBR and Track 0 of the disk will also be recovered.
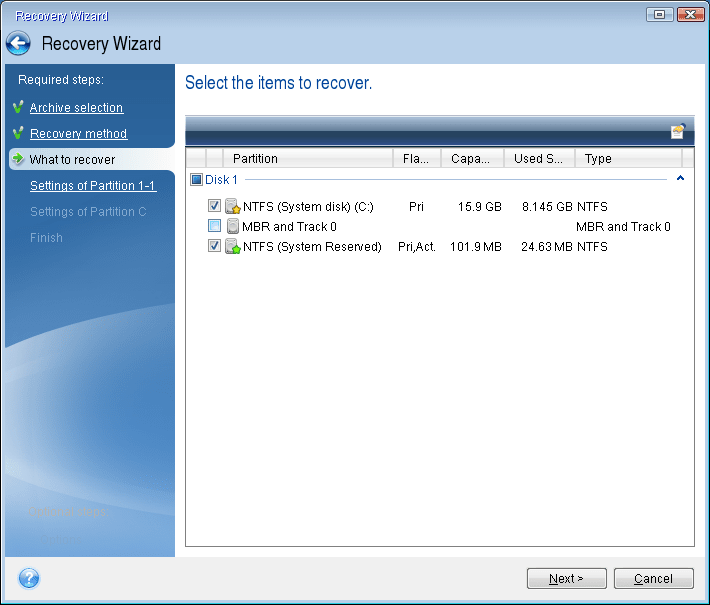
Selecting partitions leads to appearance of the relevant steps Settings of partition. Note that these steps start with partitions which do not have an assigned disk letter (as usually is the case with hidden partitions). The partitions then take an ascending order of partition disk letters. This order cannot be changed. The order may differ from the physical order of the partitions on the hard disk.
-
On the Settings of the hidden partition step (usually named Settings of Partition 1-1), specify the following settings:
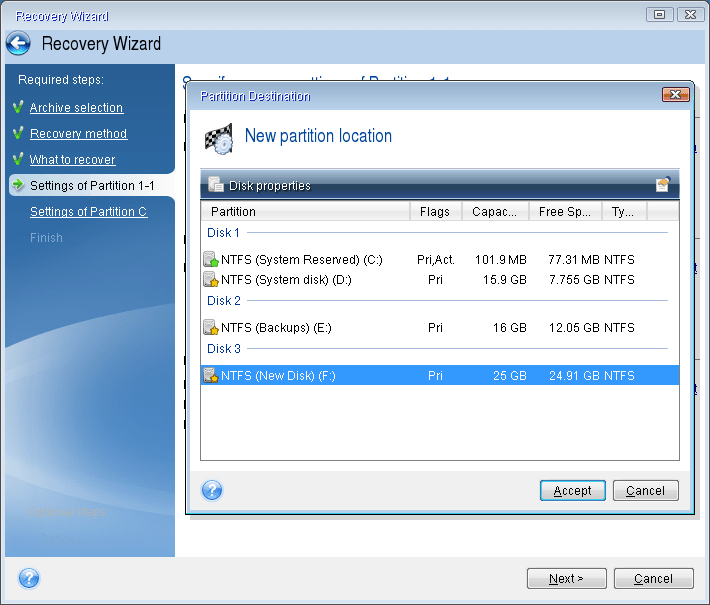
- Location—Click New location, select your new disk by either its assigned name or capacity, and then click Accept.
- Type—Check the partition type and change it, if necessary. Ensure that the System Reserved partition (if any) is primary and marked as active.
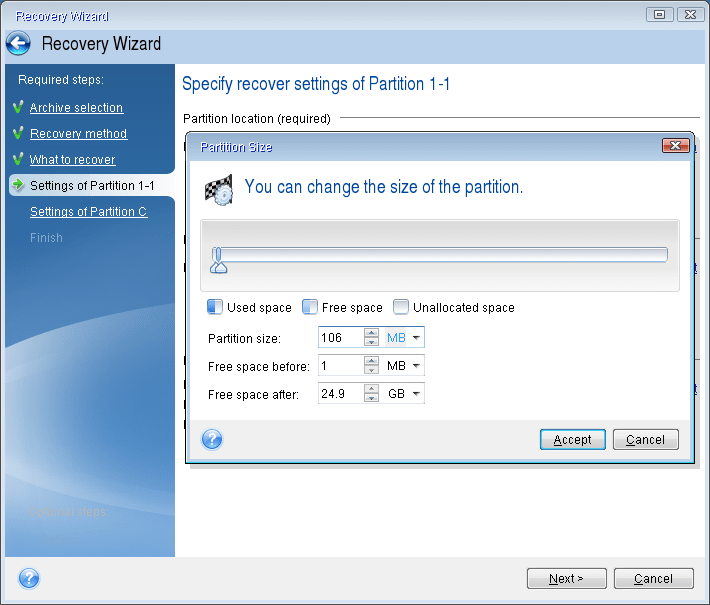
- Size—Click Change default in the Partition size area. By default the partition occupies the entire new disk. Enter the correct size in the Partition size field (you can see this value on the What to recover step). Then drag this partition to the same location that you saw in the Backup Information window, if necessary. Click Accept.
-
On the Settings of Partition C step, specify the settings for the second partition, which in this case is your system partition.
-
Click New location, and then select unallocated space on the destination disk that will receive the partition.
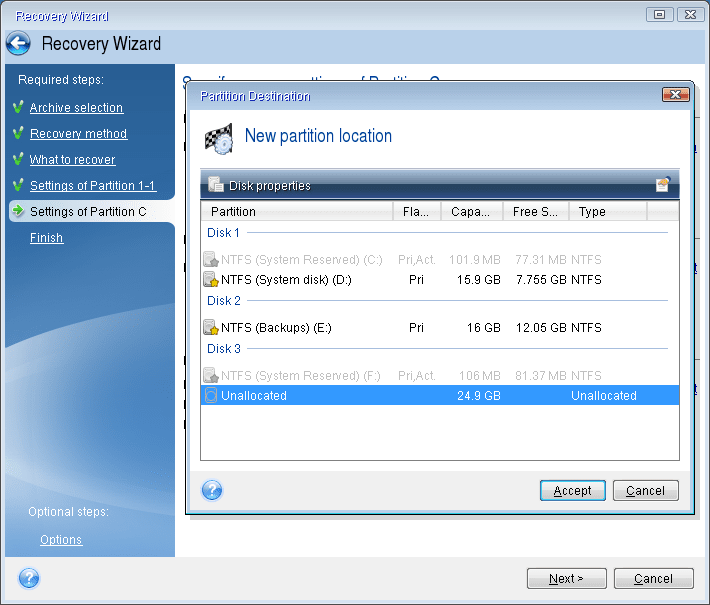
- Change the partition type, if necessary. The system partition must be primary.
-
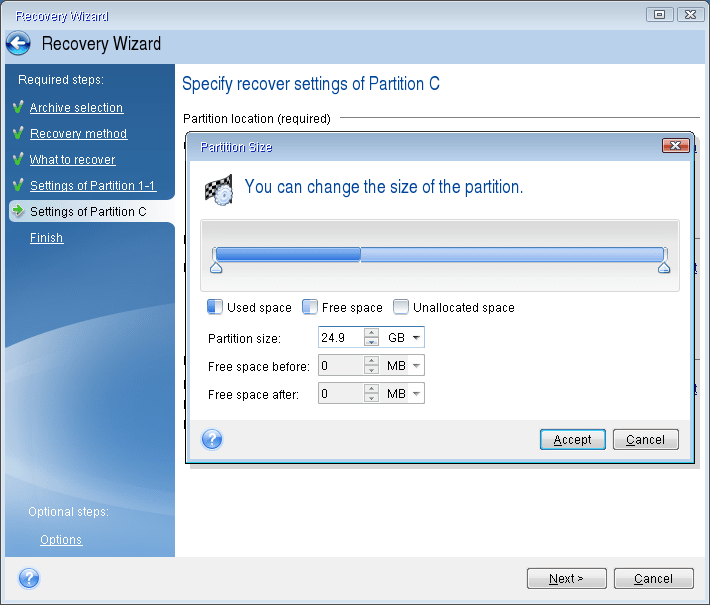
Specify the partition size, which by default equals the original size. Usually there is no free space after the partition, so allocate all the unallocated space on the new disk to the second partition. Click Accept, and then click Next.
-
- Carefully read the summary of operations to be performed and then click Proceed.
When the recovery is complete
Before you boot the computer, disconnect the old drive (if any). If Windows "sees" both the new and old drive during the boot, this will result in problems booting Windows. If you upgrade the old drive to a larger capacity new one, disconnect the old drive before the first boot.
Remove the bootable media and boot the computer to Windows. It may report that new hardware (hard drive) is found and Windows needs to reboot. After making sure that the system operates normally, restore the original boot order.
Acronis Universal Restore
When you recover your system to dissimilar hardware, the target computer could fail to boot. This is because the new hardware is incompatible with critical drivers included in the image. Acronis Universal Restore will help you make the target computer bootable. Refer to Acronis Universal Restore for details.