Operations on the target machine
In this phase, you install and configure a new management server, and then you migrate the data to it.
Before performing the operations on the target machine, ensure that you completed the procedure in Operations on the source machine.
To migrate the data to the new management server
- Set the host name of the machine on which you will install the new management server. This name must be the same as the name of the machine with the original management server.
- Create a firewall rule to block all traffic on TCP port 9877.
- Run the Acronis Cyber Protect setup program.
Accept the terms of the license agreement and the privacy statement, and then click Proceed.
- Click Customize installation settings.
- In What to install, select only the following components, and then click Done.
- Management Server
- Components for Remote Installation
- Bootable Media Builder
- Command-Line Tool
- In Database for the management server, keep the default option Use built-in SQLite.
- In Logon account for the management server service, use the same option as on the original management server.
- Stop all Acronis services.
Open Services, and then disable the startup of all Acronis services.
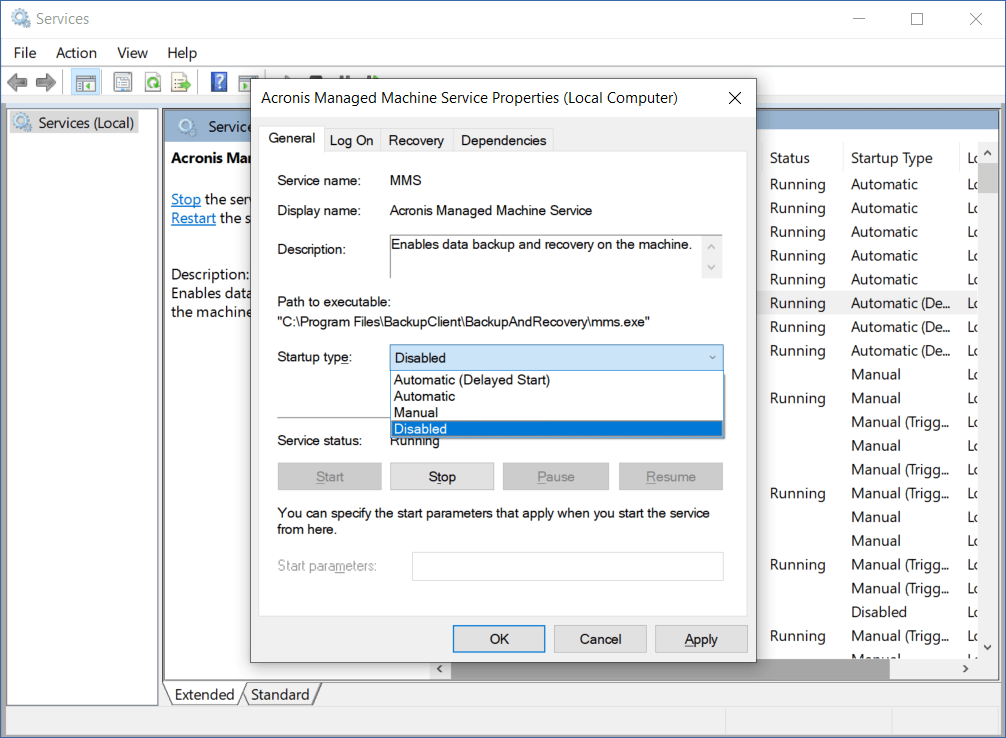
Restart the machine, and then verify that the disabled Acronis services are not running.
-
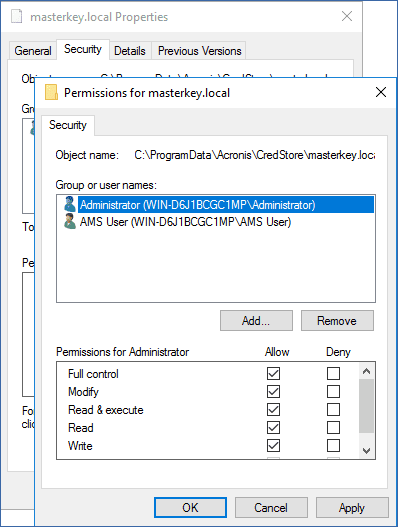
Navigate to %ProgramData%\Acronis\CredStore, and then adjust the permissions for the masterkey.local file, as follows:
-
Grant the file ownership to the Administrator user account.
-
Grant the Administrator user account Full control permissions.
-
-
Navigate to %ProgramData%\Acronis\AMS\AccessVault\config, and then grant the Administrator user account Full control permissions for the following files:
- %ProgramData%\Acronis\AMS\AccessVault\config\preferred
- %ProgramData%\Acronis\AMS\AccessVault\config\preferred.json
- Replace the following folders with the folders that you copied from the original management server machine to a network share:
- %ProgramData%\Acronis
%ProgramFiles%\Acronis
Overwrite the existing folders without deleting them first.If you see a message that the %ProgramFiles%\Acronis\ShellExtentions folder cannot be replaced, you can safely skip this folder.
-
Restore the permissions for the following files:
-
%ProgramData%\Acronis\CredStore\masterkey.local – Remove the Administrator user account from the list of users with permissions.
- %ProgramData%\Acronis\AMS\AccessVault\config\preferred – Grant the Administrator user account only Read permission.
-
%ProgramData%\Acronis\AMS\AccessVault\config\preferred.json – Grant the Administrator user account only Read permission.
-
-
Create a directory junction for the NGMP\latest folder.
-
In Windows Command Prompt, navigate to %ProgramData%\Acronis\NGMP, and then delete the latest folder.
cd %ProgramData%\Acronis\NGMP
rmdir latest
-
Create directory junction latest and point it to the folder named after the current NGMP version, for example:
mklink /j latest C:\ProgramData\Acronis\NGMP\1.0.2653.0
-
- Point the new management server to the Microsoft SQL Server database that the original management server used.
- Open Regedit.
- In the key HKEY_LOCAL_MACHINE\SOFTWARE\Acronis\AMS\Settings, modify the AmsDmlDbProtocol value, by changing its data to config://C:\ProgramData\Acronis\AMS\mssql\dml_mssql.config.
-
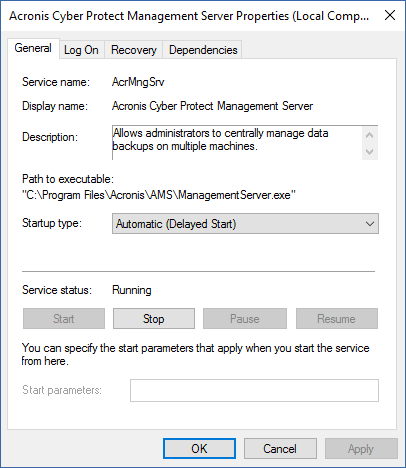
Open Services, and then enable all disabled Acronis services.
Set the startup type of Acronis Cyber Protect Management Server to Automatic (Delayed Start) and the startup type of all other Acronis services to Automatic.
- In the firewall, allow all traffic on TCP port 9877.
- Restart the machine, and then verify the all Acronis services are running.
- Run the Acronis Cyber Protect setup program and install the following items:
- Agent for Windows
Cyber Protect Monitor
- Restart the machine.