Note: Depending on your deployment, some of the paths used in this article might not be the same as yours. Upgrades from previous versions of Files Advanced and custom installations can affect the folder structures of your deployment.
Pick one of the Files Advanced Web Server machines to act as the Primary. This machine is the Primary node only in the sense that it will be upgraded first and it will migrate any changes/settings to the PostgreSQL database. If the database is very large, these migrations can take several minutes.
Warning!: DO NOT upgrade any other Tomcat servers until the Primary server is upgraded and you can log into the web interface to test it out.
Vacuum the database
This will help speed up the backup and restore process by optimizing your database
Open the Files Advanced PostgreSQL Administrator tool (it could also be called PgAdmin). You can find it in Windows Start menu, under the Files Advanced folder. Double-click on localhost to connect to your server.
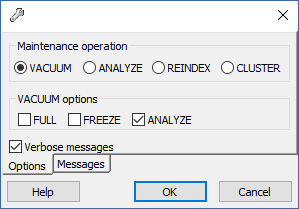
Right-click on the acronisaccess_production database and choose Maintenance.
Select the VACUUM radio button and the ANALYZE checkbox.
Warning! If your database is very large, the vacuum can take some time. This process should be run during periods of low load on the server.
Open the Files Advanced PostgreSQL Administrator tool. You can find it in Windows Start menu, under the Files Advanced folder. Connect to the database server. You may be prompted to enter the password for your postgres user.
Expand Databases and right-click on the acronisaccess_production database.
Choose Maintenance and select the Vacuum radio button and the ANALYZE checkbox. Press OK.
Expand the database, expand Schemas and expand Public. Take note of the number of the Tables section. This can help you verify that the database restore is successful after a recovery.
Close the PostgreSQL Administrator tool and open an elevated command prompt.
In the command prompt, navigate to the PostgreSQL bin directory.
Note: You will need to edit the path to point to your PostgreSQL bin folder if you use an older or a custom installation (e.g. C:\Program Files (x86)\Acronis\Access\Common\PostgreSQL\9.4\bin\).
Enter the following command: pg_dumpall --host localhost --port 5432 --username postgres --file alldbs.sql
alldbs.sql will be the filename of the backup. It will be saved in the PostgreSQL bin directory. You can use a path in the above command if you wish to save it somewhere else - e.g. change the last part of the command above like so: --file D:\Backups\alldbs.sql
If you are using a non-default port, change 5432 to the correct port number.
If you are not using the default PSQL administrative account postgres, please change postgres to the name of your administrative account in the command above.
You will be prompted to enter the postgres user'spassword several times for this process. For each prompt, enter the password and hit Enter.
Note: Typing the password will not result in any visual changes in the Command Prompt window.
Copy the backup file to a safe location.
Do NOT shutdown the Postgres service as PostreSQL itself will not be upgraded.
Backup additional important components
Backup the Tomcat conf and logs folders. By default located in: C:\Program Files (x86)\Acronis\Files Advanced\Common\apache-tomcat-<version>\
Note: Replace <version> with the correct version of your Files Advanced Tomcat instance, e.g. \apache-tomcat.70.0.70\
Backup the acronisaccess.cfg file. By default located in: C:\Program Files (x86)\Acronis\Files Advanced\Access Server
Backup all web.xml files. located by default in C:\Program Files (x86)\Acronis\Files Advanced\Access Server\Web Application\WEB-INF\.
Backup the newrelic.yml file. Its location depends entirely on where you have saved it. You can skip this step if you are not using New Relic monitoring.
Backup the Gateway Servers databases
Turn off all the Files Advanced Gateway services
Go to the Gateway database folders, by default C:\Program Files (x86)\Acronis\Files Advanced\Gateway Server\database
Make a backup of the mobilEcho.sqlite3 file.
Repeat these steps for each Gateway Server.
Stop all Files Advanced services on all machines
It is vital that all Files Advanced Tomcat services are stopped before you upgrade. We recommend also stopping all other Files Advanced services, except the PostgreSQL service as it must remain running.
Upgrading the File Repository
Upgrade the File Repository first regardless of where it is located.
Copy the Files Advanced installer to the machine with the File Repository component and run the installer.
Note: If you have multiple File Repository services, repeat these steps for all repositories before you proceed with the other components.
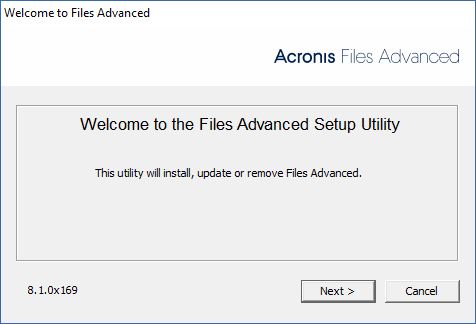
On the Welcome screen click Next.
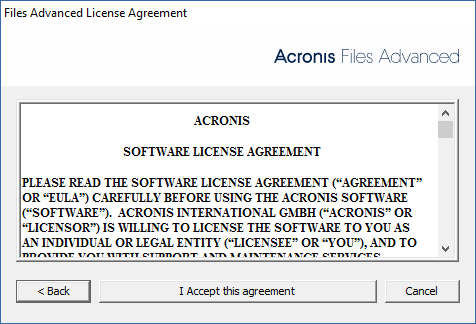
Accept the License Agreement.
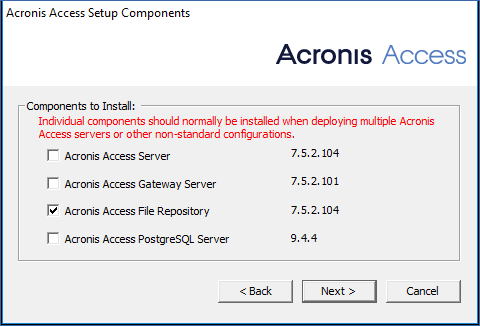
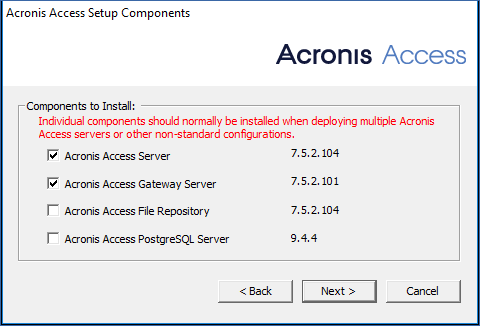
Choose Custom... and select only the Files Advanced File Repository to upgrade.
Click Next, review what is going to be installed and click Install.
When the upgrade is done, click Exit. When the Configuration Utility launches, click OK.
Continue by upgrading your Primary Files Advanced Web Server on its corresponding machine.
Upgrading the Primary Files Advanced Web Server
Copy the Files Advanced Advanced installer to the Primary Files Advanced Web Server machine.
On the Primary node, start the Files Advanced installer.
Press Next on the Welcome screen and then Custom. This will allow you to upgrade only the necessary services that are already installed on the machine, without installing others.
Select the Files Advanced services that you are going to upgrade. Choose only the Files Advanced Web Server and any components that are already present on the machine.
Note: Our installer will not update PostgreSQL. If you wish to update your version of PostgreSQL please view our article on the subject and contact Acronis support before proceeding.
Press Install, let the installer finish and launch the the Configuration Utility.
Note: Do not change any settings in the Configuration Utility! Changing settings can cause issues with your configuration.
Once the Configuration Utility starts all the necessary services, and the database migrations are finished, verify that Files Advanced web interface on the Primary server works as expected. A web browser will launch automatically and display the Files Advanced server log-in screen.
Log in as an administrator and verify that the settings are the same and there are no changes or issues.
Leave this instance of Files Advanced running while you update all other components.
Warning!: DO NOT upgrade or start any other Files Advanced Tomcat server until the Primary server is back up and you have verified that it is working correctly.
Upgrading Gateway Servers
Copy the Files Advanced installer to any machine with only a Gateway Server and run the installer.
On the Welcome screen click Next.
Accept the License Agreement.
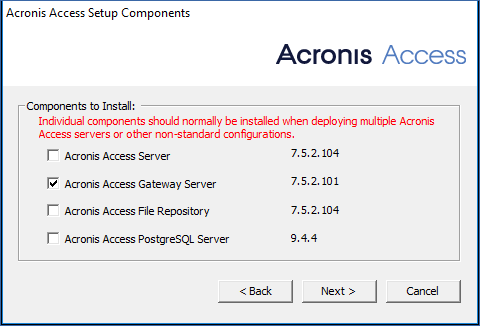
Choose Custom... and select only the Files Advanced Gateway Server to upgrade.
Click Next, review what is going to be installed and click Install.
When the upgrade is done, click Exit. When the Configuration Utility launches, click OK.
Upgrading all remaining nodes
Once you have successfully updated the Primary Files Advanced node, all File Repository servers and all Gateway Servers, continue by upgrading the rest of the Files Advanced Servers.
Copy the Files Advanced installer to the desired node and start it.
Press Next on the Welcome screen and then Custom. This will allow you to upgrade only the necessary services that are already installed on the machine, without installing others.
Select any Files Advanced services that you wish to upgrade. Choose only the ones that are already present on the machine.
e.g. If there is only a Gateway server installed, select only the Gateway Server component in the installer.
e.g. If there is a Gateway Server and a Files Advanced Server, select both.
Note: Our installer will not update PostgreSQL. If you wish to update your version of PostgreSQL please view our article on the subject and contact Acronis support before proceeding.
Press Install and let the installer finish and launch the the Configuration Utility.
Note: Do not change any settings in the Configuration Utility! Changing settings can cause issues with your configuration.
Once the Configuration Utility starts all the necessary services, verify that the Files Advanced components on this node work as expected.