Permission Examples
For all users all USB devices are denied except the mouse and keyboard:
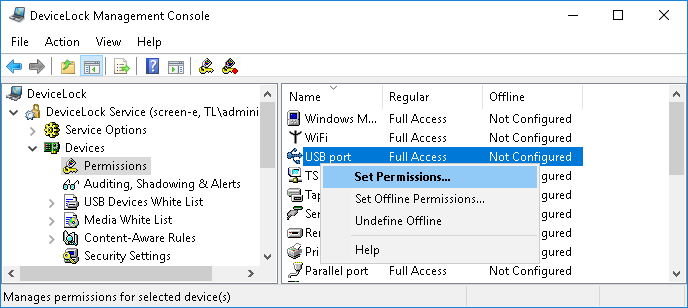
1. Select the USB port record from the list of device types under Permissions, and then select Set Permissions from the shortcut menu available by a right mouse click.
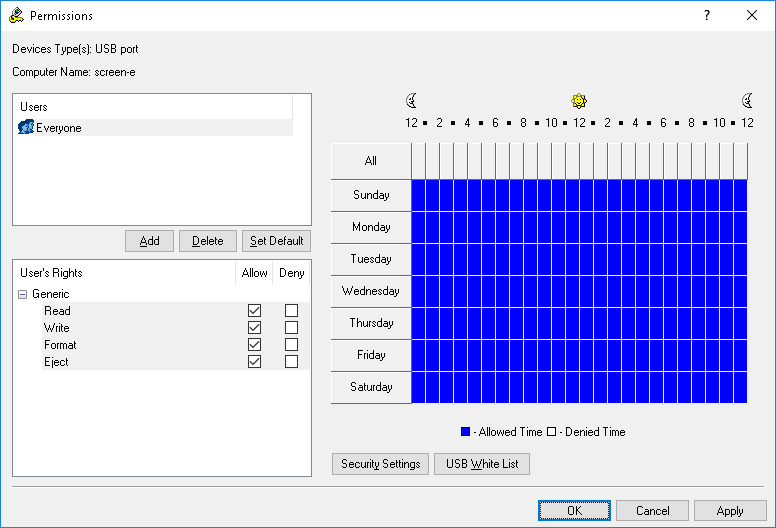
2. Click the Add button in the Permissions dialog box, add the Everyone user (type the name or browse for all available names and select the needed one), click OK to close the Select Users or Groups dialog box, select the Everyone record and disable all rights in the User’s Rights list.
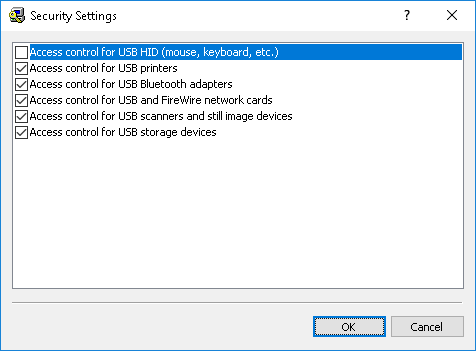
3. Click the Security Settings button in the Permissions dialog box, and then clear the Access control for USB HID (mouse, keyboard, etc.) check box.
4. Click OK to close the Security Settings dialog box, click OK to apply changes and close the Permissions dialog box, and then click Yes to confirm that you really want to deny all users access to the USB port.
For all users all USB devices are denied except the mouse and keyboard but the Administrators group can use any USB devices:
1. Select the USB port record from the list of device types under Permissions, and then select Set Permissions from the shortcut menu available by a right mouse click.
2. Click the Add button in the Permissions dialog box, add the Administrators group (type the name or browse for all available names and select the needed one), click OK to close the Select Users or Groups dialog box, select the Administrators record and enable all rights in the User’s Rights list.
3. Click the Security Settings button in the Permissions dialog box, and then clear the Access control for USB HID (mouse, keyboard, etc.) check box.
4. Click OK to close the Security Settings dialog box, and then click OK to apply changes and close the Permissions dialog box.
For all users all storage devices except fixed hard disk drives are denied but all non-storage USB devices are allowed:
1. Select the USB port record from the list of device types under Permissions, and then select Set Permissions from the shortcut menu available by a right mouse click.
2. Click the Add button in the Permissions dialog box, add the Everyone user (type the name or browse for all available names and select the needed one), click OK to close the Select Users or Groups dialog box, select the Everyone record and enable all rights in the User’s Rights list.
3. Click OK to apply changes and close the Permissions dialog box.
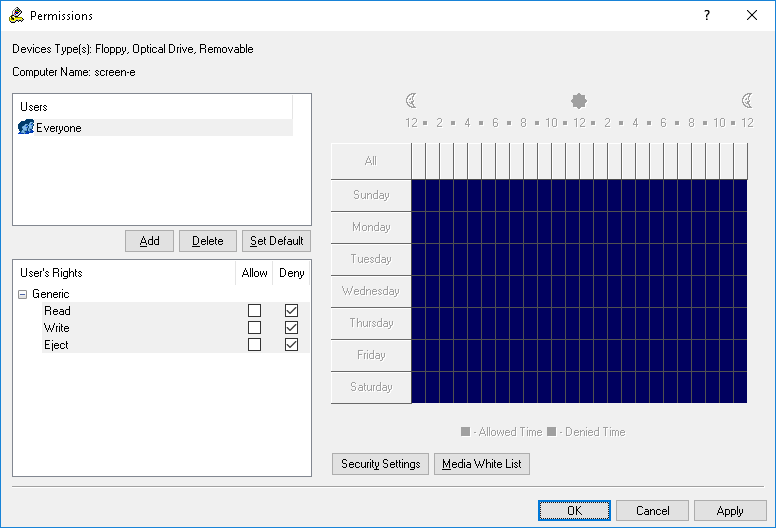
4. Select the Floppy, Optical Drive, and Removable device types in the Permissions node, and then select Set Permissions from the shortcut menu available by a right mouse click.
5. Click the Add button in the Permissions dialog box, add the Everyone user (type the name or browse for all available names and select the needed one), click OK to close the Select Users or Groups dialog box, select the Everyone record and disable all rights in the User’s Rights list.
6. Click OK to apply changes and close the Permissions dialog box, and then click Yes to confirm that you really want to deny access to these devices for all users.
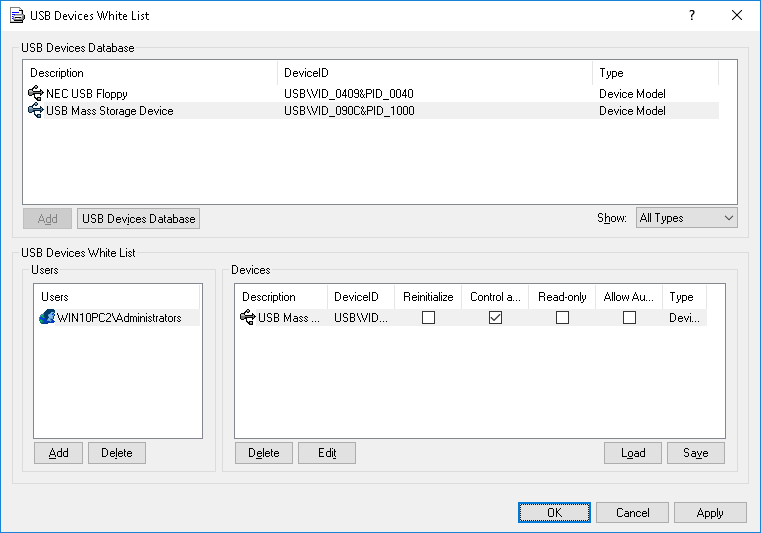
For all users all USB devices are denied except the mouse and keyboard but the Administrators group can use a certain model of USB storage devices:
1. Select the USB port record from the list of device types under Permissions, and then select Set Permissions from the shortcut menu available by a right mouse click.
2. Click the Add button in the Permissions dialog box and add the Everyone user (type the name or browse for all available names and select the needed one). Click OK to close the Select Users or Groups dialog box, select the Everyone record and disable all rights in the User’s Rights list.
3. Click the Security Settings button in the Permissions dialog box, and then clear the Access control for USB HID (mouse, keyboard, etc.) check box.
4. Click OK to close the Security Settings dialog box
5. Click the USB White List button in the Permissions dialog box.
6. In the USB Devices White List dialog box that appears, click the Add button below the Users list and add the Administrators group (type the name or browse for all available names and select the needed one). Click OK to close the Select Users or Groups dialog box, and then select the Administrators record.
7. Select the device model’s record in the USB Devices Database list, and then click the Add button below this list.
If you do not have devices in the
USB Devices Database list, click the
USB Devices Database button below this list, and then add devices as described in the
USB Devices Database section of this manual. When you finished adding devices to the database, click
OK to save this database and close the
USB Devices Database dialog box.
8. Click OK to apply the white list settings and close the USB Devices White List dialog box, click OK to apply changes and close the Permissions dialog box, and then click Yes to confirm that you really want to deny all users access to the USB port.
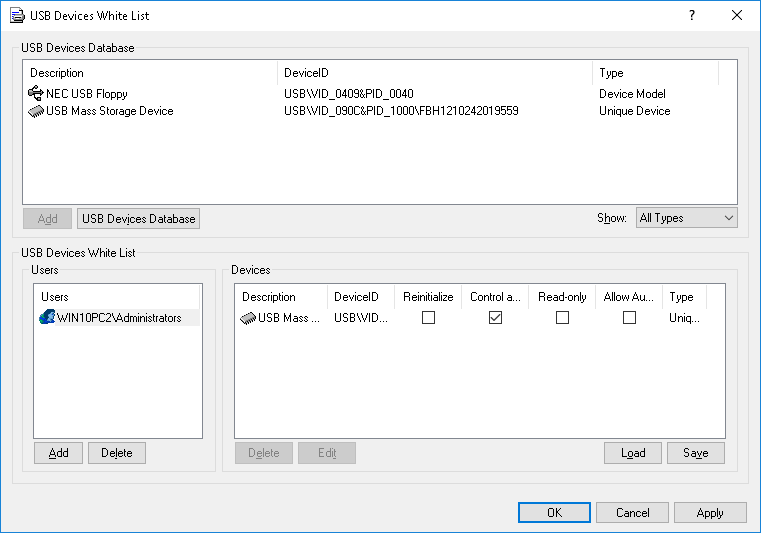
For all users all USB devices are denied except the mouse and keyboard but the Administrators group can use a certain unique USB storage device:
1. Select the USB port record from the list of device types under Permissions, and then select Set Permissions from the shortcut menu available by a right mouse click.
2. Click the Add button in the Permissions dialog box and add the Everyone user (type the name or browse for all available names and select the needed one). Click OK to close the Select Users or Groups dialog box, select the Everyone record and disable all rights in the User’s Rights list.
3. Click the Security Settings button in the Permissions dialog box, and then clear the Access control for USB HID (mouse, keyboard, etc.) check box.
4. Click OK to close the Security Settings dialog box
5. Click the USB White List button in the Permissions dialog box.
6. In the USB Devices White List dialog box that appears, click the Add button below the Users list and add the Administrators group (type the name or browse for all available names and select the needed one). Click OK to close the Select Users or Groups dialog box, and then select the Administrators record.
7. Select the unique device’s record in the USB Devices Database list, and then click the Add button below this list.
If you do not have devices in the
USB Devices Database list, click the
USB Devices Database button below this list, and then add devices as described in the
USB Devices Database section of this manual. When you finish adding devices to the database, click
OK to save this database and close the
USB Devices Database dialog box.
8. Click OK to apply the white list settings and close the USB Devices White List dialog box, click OK to apply changes and close the Permissions dialog box, and then click Yes to confirm that you really want to deny all users access to the USB port.
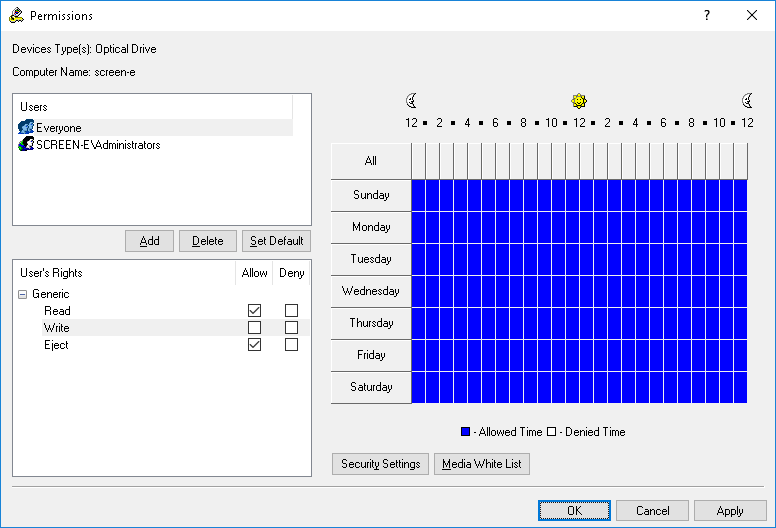
For all users all CD/DVD/BD drives are read-only but the Administrators group can burn (write) CD/DVD/BD disсs:
1. Select the Optical Drive device type in the Permissions node, and then select Set Permissions from the shortcut menu.
2. Click the Add button in the Permissions dialog box and add the Administrators group (type the name or browse for all available names and select the needed one). Click OK to close the Select Users or Groups dialog box, select the Administrators record and enable all rights in the User’s Rights list.
3. Click the Add button in the Permissions dialog box and add the Everyone user (type the name or browse for all available names and select the needed one). Click OK to close the Select Users or Groups dialog box. Select the Everyone record and disable the Write right in the User’s Rights list.
4. Click OK to apply changes and close the Permissions dialog box.
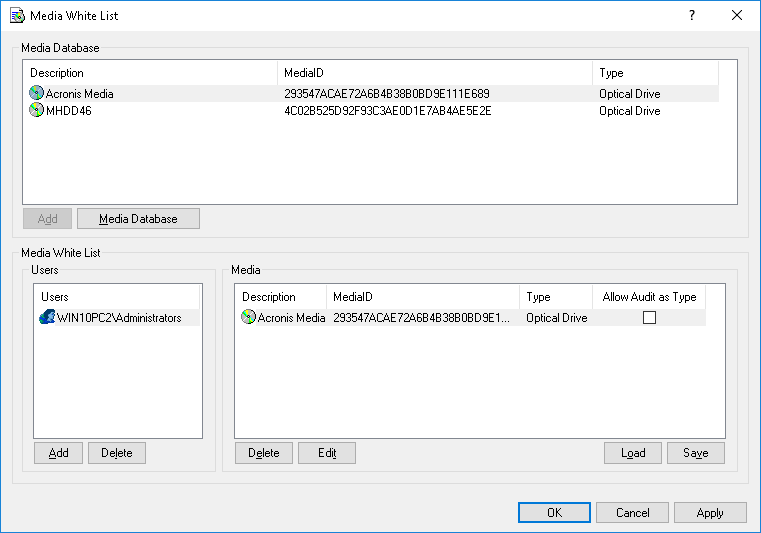
For all users all CD/DVD/BD drives are denied but the Administrators group can read a certain optical disс:
1. Select the Optical Drive device type in the Permissions node, and then select Set Permissions from the shortcut menu available by a right mouse click.
2. Click the Add button in the Permissions dialog box and add the Everyone user (type the name or browse for all available names and select the needed one). Click OK to close the Select Users or Groups dialog box, select the Everyone record and disable all rights in the User’s Rights list.
3. Click the Media White List button in the Permissions dialog box.
4. In the Media White List dialog box that appears, click the Add button below the Users list and add the Administrators group (type the name or browse for all available names and select the needed one). Click OK to close the Select Users or Groups dialog box, and then select the Administrators record.
5. Select the media’s record in the Media Database list, and then click the Add button below this list.
If you do not have records in the
Media Database list, click the
Media Database button below this list, and then authorize a media as described in the
Media Database section of this manual. When you finish authorizing a media, click
OK to save the database and close the
Media Database dialog box.
6. Click OK to apply the white list settings and close the Media White List dialog box. Click OK to apply changes and close the Permissions dialog box. Then click Yes to confirm that you really want to deny access to CD/DVD/BD drives for all users.