Creating a Unit
To create a unit, open and complete the Create Unit dialog box. You can open that dialog box as follows:
1. In the console tree, expand DeviceLock Content Security Server > Discovery Server > Units.
2. Right-click the Units node, and then click Create Unit on the shortcut menu.
- OR -
Select the Units node, and then click Create Unit on the toolbar.
The Create Unit dialog box appears.
Complete the Create Unit dialog box as follows:
•Name - Specify a display name for the newly created unit.
•Unit type - To discover files on computers and servers, choose the Computers unit type. Choose the Elasticsearch nodes unit type for document discovery in Elasticsearch.
This section describes the
Computers unit type. For description of the
Elasticsearch nodes unit type, see
Elasticsearch Units.
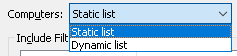
•Computers - Specify the computer list for this unit. There are two list types: Static list and Dynamic list. You can choose the type of the list when creating a unit. Thereafter the list type cannot be changed.
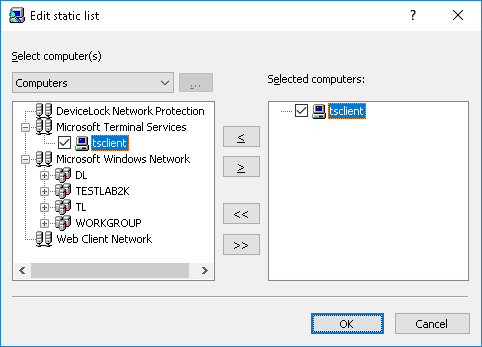
1. Static list - All computers are specified in the list by their names or IP addresses. Since this list is static, even if some computer no longer exists in the network, it will be scanned (and the error logged) until its record is deleted from the list manually.
Computers that will be scanned must be specified in the list on the right. Select computers from the list on the left, and then move them to the list on the right by clicking the

button.
If you need to exclude some computers from the scanning job, select them in the list on the right and click the

button.
By using the

and

buttons, you can add and remove all available computers at the same time (no need to select computers in the list).
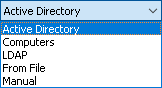
There are several ways to choose network computers from the left-hand list:
•Active Directory - Select computers from Active Directory folders (organizational units).
•Computers - Select computers that exist on the network.
•LDAP - Select computers from an LDAP-compatible directory.
•From File - Load a list of computers from a text file and then select computers. To open a text file, click the

button. In the file, each computer’s name or IP address must be on a separate line.
•Manual - Type computer names manually to select the computers. Press ENTER as needed to type each computer’s name or IP address on a separate line.
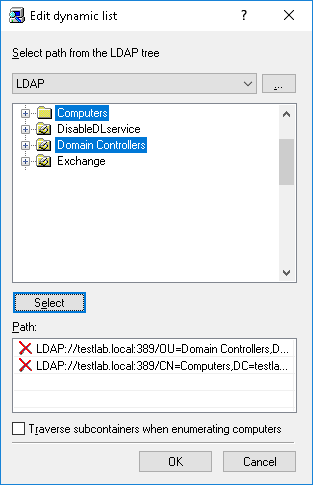
2. Dynamic List - Instead of computer names or IP addresses, you may specify a dynamic list containing path to the container (for example, an organizational unit) in the directory service tree such as Active Directory, Novell eDirectory, OpenLDAP and so on. Every time the task is executing, Discovery Server retrieves all the computers that currently exist in that container. Hence, if some computer was removed from the directory tree or moved to another container it will not be scanned anymore. And vice versa, if there is some new computer that did not exist in the container at the time the task was created/ modified, but was added to this container later, it will be retrieved and scanned at the time of executing the task. You can select one or more containers.
The path to the selected containers is specified in the Path field. Select containers in the tree by clicking while holding down the Shift or Ctrl key. Then click the Select button. To deselect the container, click the red X in the Path field.
Select the Traverse subcontainers when enumerating computers check box to allow Discovery Server to retrieve computers from all the nested containers located inside the selected container. Otherwise, if this check box is cleared all nested containers are ignored, and only computers located directly in the selected container are retrieved at the time of executing the task.
There are two modes to work with the directory service:
•Active Directory - You browse the Active Directory tree and select the needed container.
While the Active Directory tree can also be displayed by choosing the LDAP option (see below), the Active Directory mode results in greater efficiency between the directory service and DeviceLock Discovery Server and thus resource savings.
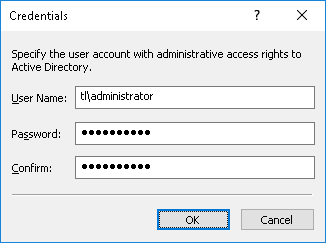
If you need to supply alternative credentials to access Active Directory, click the
button and specify the needed user account and its corresponding password.
Note: If no alternative credentials are specified when accessing Active Directory, DeviceLock Discovery Server uses the credentials of the account under which the DeviceLock Content Security Server service is started. For more information, see
Setting the service startup account. |
Select the Synchronization check box to allow DeviceLock Discovery Server to use the synchronization feature of Active Directory. This will dramatically reduce the load on the domain controller and speed up the process of retrieving computers at the time of task execution.
Note: To use the synchronization feature, DeviceLock Discovery Server must have access to Active Directory with domain administrator rights. |
•LDAP - You browse the LDAP (Lightweight Directory Access Protocol) tree and select the needed container.
To configure a connection to the LDAP server, click the
button and complete the
LDAP Settings dialog box that appears.
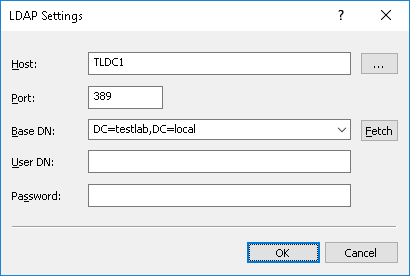
•Host - The name or the IP address of the LDAP server to connect to.
•Port - The TCP port on which the LDAP server accepts connections. The default port is 389.
•Base DN - The starting point to search the directory tree. This must be a valid distinguished name (DN), such as cn=users,o=company,c=US. If the base DN is not specified, the search goes from the tree root. Click the Fetch button to select a naming context for the base DN.
•User DN, Password - The distinguished name (DN) and password of the directory user to access the LDAP server. User DN must be a valid DN, such as cn=admin,o=company,c=US.
Note: If no user DN is specified, Discovery Server uses the credentials of the DeviceLock Content Security Server service’s startup account. For more information, see
Setting the service startup account. |
•Set Credentials - Optionally, click to specify the name and password of the user account with sufficient rights to access the listed computers. It is advisable to choose an account with administrative rights on all those computers.
Setting credentials is optional. If no credentials are set, Discovery Server accesses remote resources with the DeviceLock Content Security Server service’s startup account, or uses the DeviceLock Certificate to access the DeviceLock Service with a Certificate installed.
Note: •In order to apply the specified credentials, the DeviceLock Content Security Server service’s startup account must be an account with local administrator rights. •If using a database from another Discovery Server, you will need to re-enter the credentials. Since credentials are encrypted with a key securely stored on the server, they cannot be decrypted by another Discovery Server, so they must be re-entered. |
•Include Filter(s) / Exclude Filter(s) - Use include and exclude filters to specify which disks, folders and files you want the server to scan. By default, DeviceLock Discovery will scan all disks, files and folders except removable and network devices.
Click
Add under corresponding filter list to create a new filter. The
Add Exclude Filter dialog will appear when adding an exclude filter. The
Add Include Filter dialog appears when adding an include filter. For details, see
Adding Filters. You can also change or delete filters by clicking the
Edit or
Delete button, respectively.
The rules in each filter are combined by OR logic. For example, if an include filter has the
System,
Non-system and
Removable, Floppy & Optical check boxes selected, then only devices of these types will be scanned. If, in addition, you select the
Documents check box, then only the
Documents folder will be scanned on the selected device types. If you specify multiple filters, they will be combined by OR logic, i.e. the scanning area includes the items that match any of the filters. Include and exclude filters are combined by AND logic. See also
Creating a filter: Example.
•Agentless Discovery - Select this check box if you want the server to scan remote computers without using Discovery Agent. The Agent is not installed on remote systems, and the scanning is performed via the SMB protocol. Depending on specified detection rules, the full content of the files being analyzed may be required. If this is the case, the files being analyzed will be transferred to the server for analysis, which may consume large amounts of bandwidth.
•Install Discovery Agent automatically - Select this check box if you want the server to install the Discovery Agent on the remote system if one is not yet installed, or if the remote system is not running DeviceLock Service with its bundled Discovery Agent.
•Remove Discovery Agent automatically - Select this check box if you want the server to remove the Discovery Agent from remote systems after the scanning task completes. Note that this option does not cause the server to remove DeviceLock Service and its bundled Discovery Agent.
Note: If the DeviceLock Content Security Server service is configured to run under the Local System account, Discovery Server cannot install or remove Discovery Agents on remote computers. |
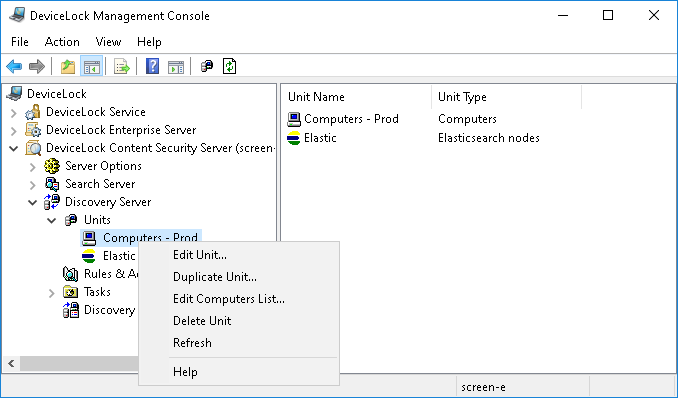
The unit you have created appears in the console tree: