Note: TCP/IP Secure communication method is available in MassTransit HP only.
TCP/IP Secure is an implementation of SSL (Secure Socket Layer) and TLS over TCP/IP. TCP/IP Secure is used to establish a secure and encrypted communication channel between two Internet connected devices. In MassTransit, you can configure your TCP/IP Secure connections to use the following encryption methods:
RC4-128
3DES
AES-128
AES-256
AES-256 method performs the highest level of encryption to the transmitted files and it is the most secure method. Selecting an encryption method with a higher level of encryption is more secure but increases the time for the file transfer.
MassTransit uses SSL to provide a certificate to calling parties to verify who they are. In addition, the certificate provides a public/private key combination that allows files to be encrypted and decrypted. The certificate verifies that the contact communicating with you is not an impostor. MassTransit works with two types of certificates:
Self-generated by MassTransit itself (which is the default option), or
Certificates issued by a Certificate Authority (CA) such as VeriSign or Thawte.
Using self-generated certificates allows you to avoid paying fees and maintenance issues. However, no one verifies that the certificate owner is who they claim to be. When you have a certificate, issued by a CA, they verify the identity of the other party you are about to connect to. You can buy a certificate from one of the well known Certificate Authorities, such as VeriSign or Thawte, or you can become your own CA and issue certificates for all the MassTransit servers within your organization.
When a secure connection is selected, MassTransit verifies the certificate presented by each caller. When MassTransit provides your certificate to a remote contact, it contains your identity name and your public key. The remote MassTransit server uses the public key contained in the certificate to encrypt files to be transferred. When you receive the encrypted file, MassTransit decrypts it using the private key. Since you are the only one who has the private key, you are the only one who can decrypt the files.
Configuring TCP/IP Secure Incoming Calls
To receive an incoming TCP/IP Secure call on your MassTransit HP Server, you need to configure a TCP/IP Secure Listen.
Info: For information about available additional configurations, see the Additional Configurations section on this page.
Configuring a TCP/IP Secure Listen
Note: MassTransit allows you to configure multiple TCP/IP listens.
To receive an incoming TCP/IP Secure call, you first need a TCP/IP Secure Listen:
In MassTransit Administrator, open the Setup window by clicking on the Setup button from the Navigation Bar or select the Setup... option from the Window main menu.
In the Incoming Calls tab, click on the Add... button.
The "Add Incoming Call" window appears. From the Method drop-down menu, select the TCP/IP Secure option.
The TCP/IP Secure Configuration For Incoming Calls window appears. Select the IP address you want MassTransit to listen on from the IP Address to listen on for incoming calls drop-down menu. Selecting All means that MassTransit will be listening for incoming calls on all network interfaces. That is the default option. If you select a particular IP address, MassTransit will use only that address to listen on.
Enter the port number that will be used for the TCP/IP Secure connection in the Port field, or leave the default setting.
Note: If you or the calling party have a firewall, it must be set to allow traffic on this port.
In the Minimum encryption level for incoming calls drop-down menu, you can set a level of encryption of the files. Selecting a particular encryption level will allow your server to receive incoming calls from users with the same or higher level of encryption. Incoming calls from contacts using an encryption method with a lower level of encryption will be rejected. The available methods are the following depending on the case:
If the Use legacy TLSv1.0 protocol checkbox is checked, the available encryption methods are:
RC4-128;
AES-128;
These methods are not the most secure ones but they do not delay the file transfer time very much. 3DES is the method with highest level of encryption from the listed ones. For connections with MassTransit servers 6.0 and later, it is recommended to use methods higher than RC4-40.
If the Use legacy TLSv1.0 protocol checkbox is NOT checked, the available encryption methods are:
AES-256.
The AES-128 and AES-256 are encryption methods from a new generation. AES-256 provides the highest level of encryption. It is a standard adopted by the U.S. government. Please consider the time transfer delay before selecting this encryption method.
Click on the OK button to save the changed settings. The configured TCP/IP method should appear as active in the Setup window.
Click on the OK button in the Setup window.
You should be able to receive incoming TCP/IP Secure calls now from contacts with the same or higher level of encryption set.
Enabling and Disabling the Listen
In the "Incoming Calls" tab of the Setup window, all created listens are listed. In the first column of the list, there is an indicator showing whether the listen is enabled or not.
If the indicator is green, the listen is enabled.
If the indicator is red, the listen is disabled.
To enable a disabled listen, highlight it and click on the Enable button of the "Incoming Calls" tab.
To disable an enabled listen, highlight it and click on the Disable button of the "Incoming Calls" tab.
Configuring TCP/IP Secure Outgoing Calls
In order to be able to place an outgoing TCP/IP Secure call to a contact, you need to configure that contact to use the TCP/IP Secure communication method.
Info: In MassTransit HP 7.0.1, there is a new option available to prevent "File Transfer Failed" actions firing (if configured) when Receive Files From User or Send Files To Usergeneral privileges are disabled.
When Send Files To User or Receive Files From User privileges are disabled and there are files for sending or receiving on TCP/IP connections, a warning is logged. This warning causes actions with File Transfer Fails trigger condition to fire. This behavior can be disabled by setting the "LOG_SEND_RECV_PRIVILEGE_AS_WARNING" parameter in the MassTransitEngine.cfg file (the file is located in the MassTransit installation directory) to false as shown below: LOG_SEND_RECV_PRIVILEGE_AS_WARNING = FALSE This will cause the messages to be logged as "Info" instead of "Warning", which will prevent the "File Transfer Fails" actions from firing. You must restart the MassTransit service for changes to apply.
Info: For information about available additional configurations, see the Additional Configurations section on this page.
Configuring a TCP/IP Secure Server Contact
Note: This configuration is per contact. You need to set the TCP/IP Secure communication method for each contact that you want to use TCP/IP Secure.
Follow these steps for setting a TCP/IP Secure Server contact:
In the MassTransit Administrator, open the Contacts window.
In the Contacts window, click on the Add... button to add a new contact, or highlight an existing Server contact and click Edit... to edit it.
Enter/change the desired information:
if you are creating a new Server contact, see detailed information about how to do that on the Contacts page and then continue with the steps below.
if you are editing an existing Server contact, continue with steps below.
In the Outgoing Calls tab of the Setup window, select the TCP/IP Secure option from the Communication method drop-down menu.
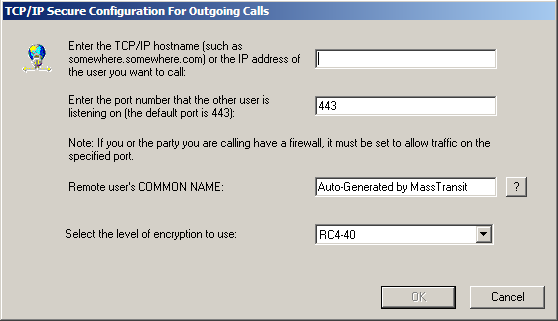
The TCP/IP Secure Configuration For Outgoing Calls window appears.
In the top field of the window, type the hostname or the IP address of the Server contact.
In the second field, enter the port number that the other server is listening on.
Note: If you or the party you are calling have a firewall, it must be set to allow traffic on the specified port.
In the Remote user's COMMON NAME field, enter the common name of the contact. The "Common name" is usually provided to you by the remote user and is a component of his SSL certificate. The default common name (which is "Auto-Generated by MassTransit") should be used only if the remote user is using a certificate that is automatically generated by MassTransit. Leaving this field blank will set the default option.
Note:If the user's common name is different from the default one, he can locate it in the Setup window by following these steps: 1. Open the Setup window of the MassTransit Administrator. 2. Open the Security tab. 3. Under the "SSL Certificate" area, the Use certificate issued by Certificate Authority checkbox would be checked. Click on the View... button to see information about the selected SSL certificate.
The resulting dialog will display the certificate's Issuer, Expiration Date, and Common Name. The Common Name is what must be entered on the "TCP/IP Secure Configuration For Outgoing Calls" window.
Select the level of encryption that MassTransit will use to connect to the user from the Select the level of encryption to use drop-down menu.
Click OK when the required information is entered. If you click Cancel the changes will not be saved.
Click on the OK button in the "Contact Information" window to save the changes. If you click Cancel, the changes will be canceled.
The configuration of the TCP/IP Secure Server contact is complete. You should be able to place a call to the remote TCP/IP Secure server.
You can choose what certificate to use for the SSL authentication:
Automatically generated by MassTransit SSL certificate – this certificate includes public and private keys for encrypting files. Creating your own certificates allows you to avoid fees and maintenance issues. However, no one verifies that the certificate owner is who they claim to be and you may be susceptible to some forms of attacks that break encryption called “man-in-the-middle” attacks.
Using your own Certificate Authority – you can create your own certificate authority using the OpenSSL Toolkit. Creating your own authority allows you to avoid paying fees. For more information and detailed instructions on how to create your own authority, go to the website www.openssl.org.
Certificate issued by a Trusted Certificate Authorities (CA) – it verifies that the information in a certificate accurately represents who it claims to represent. The authority charges to provide a certificate, usually by the year. Usually, you contact a CA at their web site and request a certificate. Two popular CAs issuing certificates are VeriSign® and Thawte®. Visit their web sites for more information at www.verisign.com and www.thawte.com.
The certificate configuration can be set in the Setup window of the MassTransit Administrator. To do that, follow the steps below:
Open the Setup window of the MassTransit Administrator by clicking on the Setup button from the Navigation Bar or by selecting the Setup... option from the Window main menu.
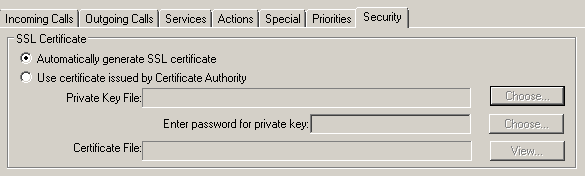
Open the Security tab of the Setup window.
In the SSL Certificate section, you can choose whether to use an automatically generated by MassTransit certificate or a certificate issued by a Certificate Authority. The default option is the MassTransit certificate.
If you choose to have MassTransit generate the SSL certificate, MassTransit creates a private key, creates a certificate request, and then signs the certificate request creating the certificate. The pass phrase for the private key file is automatically generated. In this case, just click Cancel in the Setup window and your certificate configuration is done. You do not need to perform the steps below.
If you want to use a certificate issued by a Root Certificate Authority, continue with the steps below.
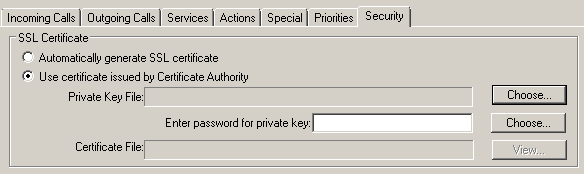
To use a certificate issued by a Root Certificate Authority, check the Use certificate issued by Certificate Authority check box in the SSL Certificate section.
Next, click on the Choose... button next to the Private Key File field and select the private key file for the certificate. Then, click Open.
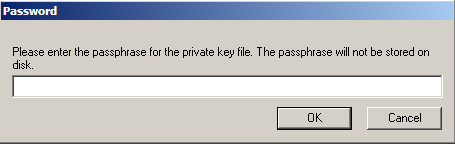
In the Password window that appears, enter the password for the private key and click OK in order to load the file in MassTransit.
Enter the private key password in the Enter password for private key field in order to enable MassTransit to use the file without being prompted for a password.
To choose a certificate, click on the Choose... button next to the Enter password for private key field and select the certificate file. Then, click Open.
The certificate file should be loaded and its path and name should be displayed in the Certificate File field.
When you have selected a certificate file, you can see certificate information if you click on the View... button. The following certificate information should be displayed: file name, common name (used in the outgoing calls configuration), "not valid before" date, expiration date, and certificate issuer. Click OK to close the window.
When you are ready with the SSL certificate configuration, click on the OK button in the Setup window in order to save the changes.
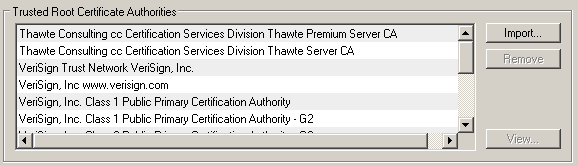
Configure Trusted Root Certificate Authorities
Trusted Certificate Authorities (CA) verify that the information in a certificate accurately represents who it claims to represent. They charge to provide a certificate, usually by the year. Usually, you contact a CA at their web site and request a certificate. Two popular CAs issuing certificates are VeriSign® and Thawte®. Visit their web sites for more information at www.verisign.com and www.thawte.com.
In the Setup window of the MassTransit Administrator, there is a list with the trusted root certificate authorities. You can add/remove authorities to/from the list and observe the issued certificates following these steps:
Add a CA to the list
Open the Setup window of the MassTransit Administrator by clicking on the Setup button from the Navigation Bar or by selecting the Setup... option from the Window main menu.
Open the Security tab of the Setup window.
In the Trusted Root Certificate Authorities section, click on the Import... button.
In the window that appears, select a X.509 certificate file to import and click Open. The Certificate Authority that issued the certificate should be added to the list with trusted authorities. Then, when you attempt to connect to users using a certificate that is issued by this authority, MassTransit will recognize it as a trusted one and will establish a secure connection to the user.
Info: X.509 is a standard format for public key certificates issued by a Certificate Authority.
When the trusted CA is added to the list, click on the OK button in the Setup window in order to save the changes.
View information for a certificate issued by a particular CA
Open the Setup window of the MassTransit Administrator by clicking on the Setup button from the Navigation Bar or by selecting the Setup... option from the Window main menu.
Open the Security tab of the Setup window.
In the Trusted Root Certificate Authorities section, click on the View... button. The Certificate Information window appears next displaying the following information: file name, common name (used in the outgoing calls configuration), "not valid before" date, expiration date, and certificate issuer. Click OK to close the window.
Remove a CA from the list
In the Setup window of the MassTransit Administrator, open the Security tab.
In the Trusted Root Certificate Authorities section, highlight a CA from the list and click on the Remove button.
A dialog box for deletion confirmation appears. Click Delete if you are sure you want to remove the record from the list with trusted root CAs. Otherwise, click Cancel.
When you are ready with the configuration of the trusted root CAs list, click on the OK button in the Setup window in order to save the changes.