You can assign specific privileges for each contact when you add them to the Contacts window or edit the privileges later. In this section, you can find detailed information about each of the privileges options from the Security tab of the Contact Information window.
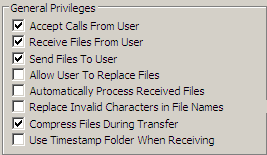
General Privileges
All MassTransit contacts have general privileges. Below, you can find information about each of the options.
Accept Calls From User – lets remote contacts make a connection to your system.
Receive Files From User – allows the remote contact to send files to you.
Send Files To User – automatically sends files designated for sending each time a connection is made. For more information, see Transferring Files.
Allow User To Replace Files – automatically overwrites files of the same name in the contact’s Received folder during file transfer. If you don’t want to overwrite files, you can use a timestamp folder.
Automatically Process Received Files – starts processing received files to a service as soon as the files arrive at the Server system. See the Servicespage for information about setting up services. This option is available for HP contacts only.
Replace Invalid Characters in File Names – for Windows, permanently converts filenames from Macintosh computers that have invalid Windows characters (such as \ or ?) by substituting dashes (-) for invalid characters. See Correcting for Windows and Macintosh Filename Differences for more information. If this option is not checked, the server does not accept files that have illegal characters in their names. The log receives a message in this case.
Compress Files During Transfer– compresses files during the transfer process. MassTransit uses a lossless compression algorithm so there is no change to the file in the transfer process. This option is available for HP contacts only.
Use Timestamp Folder When Receiving (not applicable for FTP and SFTP connections) – places files received from a contact in a new folder for each transfer; the folder is named with the date and time.
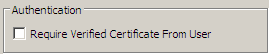
Authentication Privileges
Note: These privileges are available for Server contacts only.
In the Security tab of the Contact Information window, the "Authentication" area is displayed. You can find under this area the following checkbox: Require Verified Certificate From User.
The checkbox is enabled only when a TCP/IP Secure communication method is selected for that Server contact. Checking this option will require a verified certificate from a trusted authority every time the contact connects to your server.
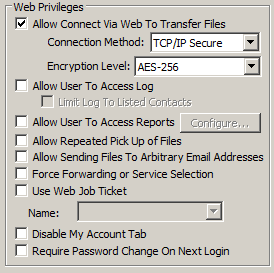
Note: These privileges are available for Web client and Ad hoc contacts only.
Allow Connection Via Web to Transfer Files – allows file transfers between the Server and the particular Web client or Ad hoc contact.
Connection Method– select the communication method you want the Web client/Ad hoc contact to use when connecting to the server from this drop-down menu.
Info:Find detailed information about communication methods on the Communications page.
Encryption Level – this drop-down menu is enabled only when the TCP/IP Secure communication method is selected from the option above. Here, you can specify the level of encryption for the secure connection. The highest level is AES 256.
Info: Find detailed information about the encryption algorithms and TCP/IP secure on the Communications page.
Allow User to Access Log window - check this checkbox when you want the Web client contact to have access to the Log window.
Note:This option is not available for Ad hoc contacts.
Limit Log to Listed Contacts – limits the contacts the Web client contact sees. You can specify these contacts in the Web Log & Files Limit Contact List privileges area which is enabled only when you check the Limit Log to Listed Contacts checkbox.
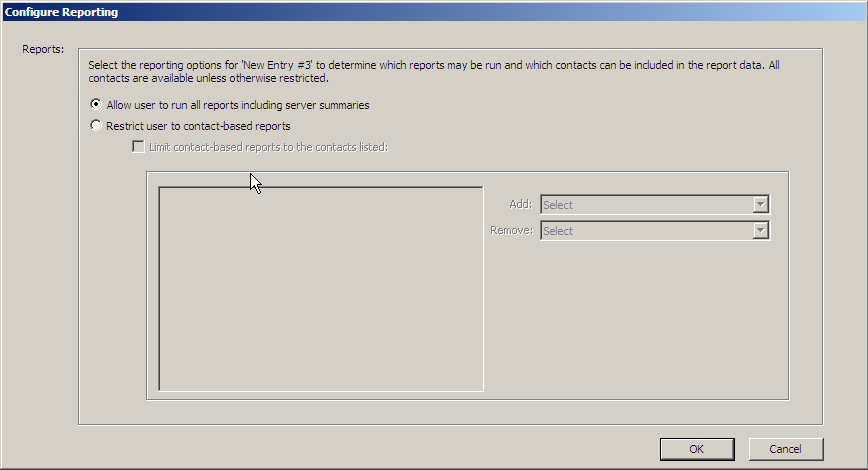
Allow User To Access Reports – allows the Web client contact to have access to Reports. Checking this checkbox opens the Configure Reportingwindow. This option can be used to allow the administrator(s) of the server to observe its status remotely.
Note: This option is not available for Ad hoc contacts.
In the Configure Reporting window, you can select whether to allow access to all reports or to restrict the user to contact-based reports:
Allow user to run all reports including server summaries – selecting this option enables access to all available MassTransit reports.
Restrict user to contact-based reports – enables access to contact-based reports only. If you then click on the Limit contact-based reports to the contacts listed checkbox below, you'll restrict the user to access reports for the specified in the list contacts only. Use the Add and Remove drop-down menus to determine the particular contacts you want the user to see. When you are ready with the reporting configuration, click on the OK button to save the settings.
Info: You can find detailed information about Reports on the Tracking page.
Allow Repeated Pickup of Files – check this checkbox if you want the files you send to the Web client or Ad hoc contact to stay in the Download Files tab of the MTWeb site until you remove them using the MassTransit Administrator File window or until the contact removes them by clicking the X under Remove on the Download Files tab. This setting allows the Web client/Ad hoc contact to download files multiple times.
Allow Sending Files To Arbitrary Email Addresses – after logging in to the MassTransit Web (MTWeb) site, the Web client contacts are allowed to send files or a request for files to any valid email address. If the entered email address does not belong to an existing contact on the server, an Ad hoc contact with that address will be automatically created.
Note: Before selecting this option, you need to have MTWeb and ad hoc delivery features configured on the server first.
Note: This setting is not available for Ad hoc contacts.
Info: For information about the Request Files feature, see the Request Files page.
Use Web Job Ticket – allows using a job ticket. Selecting this option opens a "Browse For Folder" window where you need to specify the folder that contains the MassTransit web pages. This is the MTWebfolder and by default it is located in:
for MassTransit 7.6 and later:
on 64-bit machines:
C:\Program Files (x86)\Acronis\MassTransit Server
for MassTransit 7.1 to 7.6:
on 32-bit machines:
C:\Program Files\Group Logic\MassTransit Server
on 64-bit machines:
C:\Program Files (x86)\Group Logic\MassTransit Server
for MassTransit 7.0.x:
on 32-bit machines:
C:\Program Files\Group Logic\MassTransit Server 7
on 64-bit machines:
C:\Program Files (x86)\Group Logic\MassTransit Server 7
Note: This setting is not available for Ad hoc contacts.
When the folder containing the web pages is selected, the Namedrop-down menu enables. Select a job ticket from the menu.
Info: For information about the Job Tickets, see the Job Tickets page.
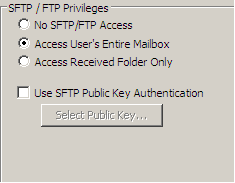
SFTP/FTP Privileges
Note: These privileges are available for HP Web client contacts and SFTP Clients only.
No SFTP/FTP Access – disables the FTP and the SFTP access of the contact to the server. By default, Web client contacts and Client contacts are allowed to connect via SFTP/FTP (and SFTP/FTP listen must also be configured).
Access User's Entire Mailbox – this is the default option for both Web client contacts and Client contacts. It allows the users to access their entire mailbox.
Access Received Folder Only – allows the user to access the Receivedfolder only from his mailbox, so that the mailboxes appear as a more traditional FTP mailbox when connecting with FTP. Note that this mode does not affect what files the user will see when logging in with the MassTransit web interface.
Note: The Access Received Folder Only option is enabled for MassTransit SFTP Clients, and for web client contacts in MassTransit 7.2 or later.
Info: See the Client Contacts section and the Mailboxes page for more information about Client's mailboxes.
Use SFTP Public Key Authentication checkbox – when using SFTP communication method, you can set a public key for server authentication. Checking this checkbox opens a window where you can select the public key file.
In the MassTransit.cfg file located in the MassTransit installation directory, there is also a setting for enabling FTP/SFTP privileges: ON_FOR_WEB_CLIENTS_BY_DEFAULT = TRUE By default, this setting is set to TRUE. Uncomment it and set it to FALSE to change the default behavior (to disallow FTP/SFTP Privileges). You must restart the MassTransit Service to apply changes.
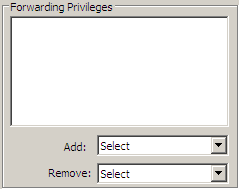
Forwarding Privileges
Note: These privileges are available for Web client contacts only.
If you grant forwarding privileges to a Web client contact, he will be able to forward files to particular users.
Select the users the Web client contact will forward files to from the Add drop-down menu. The selected users should appear in the list above the drop-down menu.
To remove users from the forwarding list, select them from the Remove drop-down menu.
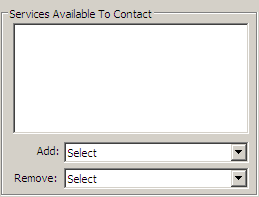
Services Available to Contact Privileges
Note: These privileges are available for Web client contacts only.
MassTransit allows configuring different services and then assigning them to contacts. To grant privileges for a Web client contact to use a particular service, you need to configure the service first.
Info: Find detailed information about Services on the Services page.
After configuring the desired services, you can designate them by selecting them from the Add drop-down menu.
To remove services from the list, select them from the Remove drop-down menu.
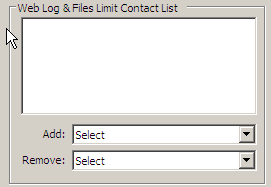
Web Log & Files Limit Contact List Privileges
Note: These privileges are available for Web client contacts only.
This area is enabled only when the Limit Log to Listed Contacts checkbox from Web privileges is checked. Here you can specify which users the Web client contact will see log information about.
Select the users the Web client contact will see log information about from the Add drop-down menu. The selected users should appear in the list above the drop-down menu.
To remove users from the list, select them from the Remove drop-down menu.
General Contact Expiration Defaults
Note: This configuration is not available on MassTransit SFTP server.
You can configure all contacts to expire by default. To do that, follow the steps below:
Open the Setup window of the MassTransit Administrator by clicking on the Setup button from the Navigation Bar or by selecting the Setup... option from the Window main menu.
Open the Special tab of the Setup window.
Under the Contact Defaults area, check the New contacts expire after __ days check box and enter a number (in days) in the field:
Click OK to save the changes.
As a result, all newly created contacts will be configured to expire after the set number of days by default.