As explained above, MassTransit actions are composed of action triggers and action tasks. Action tasks are the tasks that will be performed when the trigger conditions are met.
Detailed steps for configuring each type of action are displayed below.
Note: Please remember that when you configure the action task, you need to go back to the action creation steps in order to finalize the operation.
Email Notification Task
Email Notification action tasks serve to send preconfigured email messages to specified contacts. MassTransit email notification can contain tokens for contact names, files to transfer, contact email addresses, date, time, etc. The tokens are replaced with live text when the email is generated. A list with all available tokens can be found on the Email Notification Tokens page.
In order to be able to send emails, you need to configure the SMTP server settings first. Then, you can configure the Email notification action task.
Follow the steps below to configure the settings for the SMTP server:
If you need to, you can configure automatic removing of queued (To Send) file entries when the files cannot be found. Enabling automatic removing can avoid repeated errors if forwarded or programmatically added files are removed from their source locations.
Open the MassTransit.cfg in an application suitable for plain text editing. By default, this file is placed on the system drive in:
for MassTransit 7.6 and later:
on 64-bit machines:
C:\Program Files (x86)\Acronis\MassTransit Server
for MassTransit 7.1 to 7.6:
on 32-bit machines:
C:\Program Files\Group Logic\MassTransit Server
on 64-bit machines:
C:\Program Files (x86)\Group Logic\MassTransit Server
for MassTransit 7.0.x:
on 32-bit machines:
C:\Program Files\Group Logic\MassTransit Server 7
on 64-bit machines:
C:\Program Files (x86)\Group Logic\MassTransit Server 7
Locate the Missing Queued Files Settings section.
Note: Settings with a '%%' preceding them are not enabled. Delete the '%%' symbols at the front of the line in order to activate the settings.
Configure the following setting:
PURGE_TO_SEND_RECORDS = TRUE – setting this option to TRUE enables the automatic removing of missing queued file entries from the Files window; when set to FALSE, MassTransit will not remove the file entries from the To Send queue.
Note: If the queued files are on remote volumes, enabling this will unqueue the files permanently if the remote volume is inaccessible.
Save and close the MassTransit.cfg file.
Restart the MassTransit services in order to apply the changes immediately:
Go to Start → Control Panel → Administrative Tools → Services;
Highlight the MassTransit (for MasTransit SFTP, the service name is MassTransit SFTP) service and click on the Stop button from the Services tool bar, or select the Stop option from the context menu of the service.
Highlight the MassTransit Transporter service and click on the Restart button from the Services tool bar, or select the Restart option from the context menu of the service;
Highlight the MassTransit (for MassTransit SFTP, the service name is MassTransit SFTP) service and click on the Start button from the Services tool bar, or select the Start option from the context menu of the service.
Note: All lines beginning with "%%" in the MassTransit.cfg file are considered commented and therefore ignored. Please ensure that all settings you change are uncommented (if you see "%%" characters at the beginning of any of the settings you modify, delete them).
Under the SMTP SERVER CONFIGURATION section in the MassTransit.cfg file, find the notification_smtp_server_address= setting and set it to the address of your SMTP server.
Under the same section, find the notification_smtp_server_port= setting and set the port number which will be used for the communication between the MassTransit server and the SMTP server.
If you have configured encryption of the entire web traffic on your web server, you should set the notification_smtp_server_secure= setting to true, as shown below. Otherwise, leave the setting to false. notification_smtp_server_secure=true
You can configure a name and an email address that will be displayed as a sender's name and address in all emails sent by MassTransit.
To do that:
Enter an email address as a value of the notification_smtp_from_address= setting.
Enter the name that will be displayed as a sender name in the emails to the users as a value of the notification_smtp_from_display_name= setting.
Enter the user name and the password for logging into the SMTP server in order to authenticate and allow MassTransit sending emails. If you leave these settings blank, the default login credentials will be used.
Enter the username for authenticating on the SMTP server as a value of the notification_smtp_auth_user= setting.
Enter the password for the used in point a username as a value of the notification_smtp_auth_password= setting.
After setting up the desired configuration settings, save and close the MassTransitEngine.cfg file.
Note: Any time you make a change to the MassTransit.cfg file, you must restart the MassTransit services for the changes to take effect.
To configure an email notification task:
In the Add Actions window, click on the first button from the Tasks area:
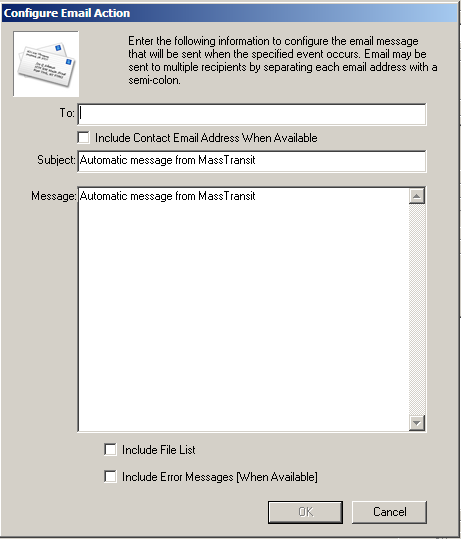
The Configure Email Action window appears next:
Note: In MassTransit 7.2 and later the Configure Email Action window contains a From field.
Note:In MassTransit 7.6 and later, you have the option to send a copy of the email to an address specified in the CC field.
In the To field of the window, you can specify the email notification receiver by entering his email address:
you can leave the To field empty and check the Include Contact Email Address When Available check box below – this will make the email notification available for sending to all contacts. If you want to apply this action for all contacts, you need to use this option.
if you specify the receiver's email address in the To field, it will be sent only to the configured address; you may add multiple email recipients by separating addresses with a semi-colon; you can also have the Include Contact Email Address When Available check box checked.
In the From field of the window, you can specify the email notification sender by selecting one of the three available options:
you can configure the From field to use the sender email address, specified in the MassTransit.cfg file. To do so please select the first available option:"Use default email address specified in the MassTransit.cfg file".
you can configure the From field to "Use originating user email address if available" by selecting this option in the menu.
you can configure the From field to "Use custom email address:", if you choose this option you can specify the desired sender email address in the field available. You can actually add multiple email senders by separating the address with a semi-colon.
In the Subject field of the "Configure Email Action" window, you can enter a subject for the email that will be sent when the action is triggered:
if you leave the Subject field with the default option or if you leave it blank, the automatic message from MassTransit will be applied;
if you modify the Subject field, the entered message will be displayed as a subject of the sent emails. You can also enter MassTransit tokens in the email subject in order to include the contact name, contact email address, date, time, etc. The tokens are replaced with live text when the email is generated.
Note: See the full list with available tokens that can be used in the Subject field on the Email Notification Tokens page.
In the Message field of the window, enter text to be displayed in the sent email notifications.
if you leave the Message field with the default option or if you leave it blank, the automatic message from MassTransit will be applied; MassTransit 7.2 and later does not apply automatic message to the Message field when left blank.
if you modify the Message field, the entered text will be displayed in the message body of the sent emails. You can also enter MassTransit tokens in the email subject in order to contact name, contact email address, date, time, and file transfer information such as number of files, length of transfer, size of transfer, etc. The tokens are replaced with live text when the email is generated.
Note: See the full list with available tokens that can be used in the Message field on the Email Notification Tokens page.
If you check the Include File List check box, a list with files will be included in the message body when applicable.
If you check the Include Error Messages (When Available) check box, a list with all errors will be included in the message body if they occur.
When you are ready with the email notification task configuration, click on the OK button to save the task. The task should appear in the Tasks area of the Add Actions window.
Go back to the action creation steps in order to finalize the action configuration.
Script Task
Script action tasks are designed to execute a predefined script when an event occurs. For example, you can use a script which lets you know when files are ready to be sent so that you can review the list of files and make changes.
You can use example scripts for MassTransit which can be downloaded from the Group Logic's web page or you can create your own to perform Actions. The scripts used must be Visual Basic scripts (with *.vbs filename extension) or JavaScript scripts (with *.js filename extension).
Note:Because MassTransit stores passwords in encrypted form, it cannot provide a contact’s remote login password in clear text for use in scripts. Scripts that ask for the password must be updated to reflect this change.
To configure a script task:
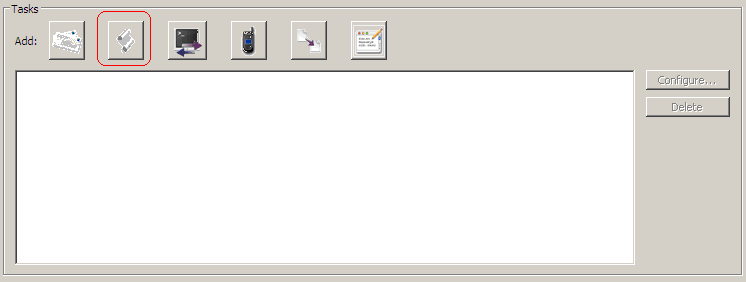
In the Add Actions window, click on the third button from the Tasks area:
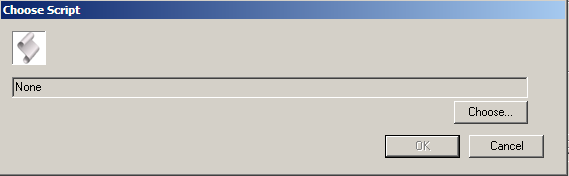
The Choose Script window appears next:
Click on the Choose... button and select a script file (*.vbs or *.js file), then click OK.
When you have chosen a script, click OK in the Choose Script window. The task should appear in the Tasks area of the Add Actions window.
Go back to the action creation steps in order to finalize the action configuration.
Launch Process Task
The Launch Process action task is available to users running MassTransit HP Server. This type of action task enables users to configure an action that launches other programs and scripts. Programs and scripts launched by MassTransit launch process actions run in the same fashion as the MassTransit Engine. They run as the same user as the MassTransit service, with the same permissions. They do not have any user interface to display dialogs and prompts.
Note:You should not configure processes and scripts that have any user interface or require user input of any kind to complete.
Launch Process action tasks enable greater flexibility because users may configure the action task to run a variety of different executable file types. Since MassTransit data is accessible externally via MySQL, users may use Launch Process action tasks to create custom MassTransit workflows more easily by using a variety of languages that include MySQL support such as Python and Perl.
When a Launch Process action task has been triggered to run, MassTransit will do the following:
Launch the specified executable file
Pass a standard set of command line arguments to the file
Define a standard set of predefined environment variables
Define any additional environment variables that the user specified during configuration of the action task
To configure a launch process task:
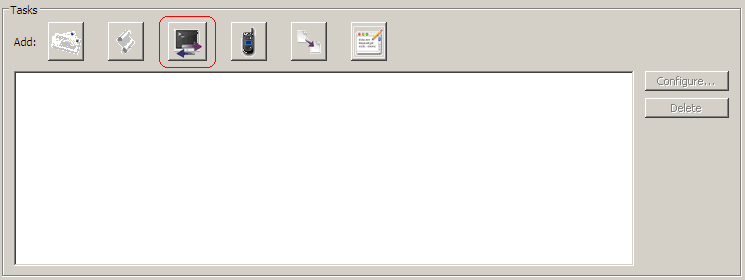
In the Add Actions window, click on the fourth button from the Tasks area:
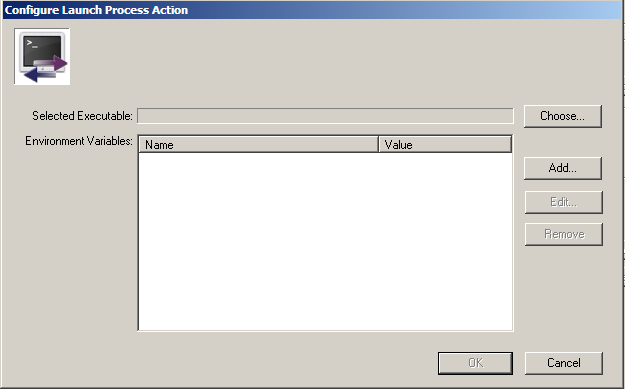
The Configure Launch Process Action window appears next:
Within the "Configure Launch Process Action" window, click the Choose… button to select the executable file that MassTransit will launch when the action is triggered. After selecting the desired executable file, click the Select button. Within the "Configure Launch Process Action" window, the file name and path should now be displayed in the "Selected Executable" text field.
In addition to the standard set of command line arguments and predefined environment variables that MassTransit always provides to the executable file, users have the option to define additional environment variables that may be accessed by the executable file.
If additional environment variables are not needed for the executable file to run as desired, then click the OK button to complete configuration of the action task and proceed directly to step 6.
If additional environment variables are needed for the executable file to run as desired, then please follow the steps below.
Click the Add... button to add an additional environment variable:
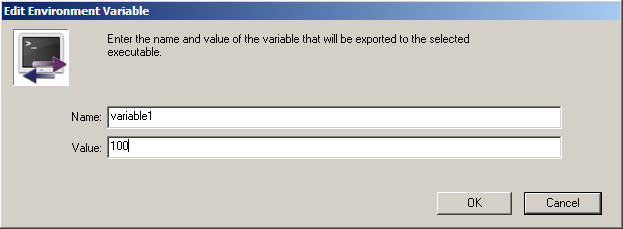
In the Edit Environment Variable window, enter the name of the variable and the corresponding value that MassTransit should assign to that variable. Please note that the Value field cannot be left blank.
When done entering the information, click the “OK” button to save the environment variable.
In the "Edit Environment Variable" window, the list of environment variables should have refreshed to include the environment variable that was just defined. At this point, users may either:
Add additional environment variables by following the instructions in steps a and b above;
Edit or remove environment variables currently in the list by highlighting the corresponding row in the list and then clicking either the Edit or Remove button to perform the desired function;
Save the current configuration by clicking the OK button in the Configure Launch Process Action window. The configured action task should appear in the Tasks area of the Add Actions window.
Go back to the action creation steps in order to finalize the action configuration.
Predefined Command Line Arguments:
Argument #
Contents/Value
1
Comma-separated list of file IDs that are related to this event (will return 0 if there are no related files) * Relevant table in MT DB: "dfiles"
2
Contact ID of the contact that the event triggered for (will return 0 if there was not a contact related to the event) * Relevant table in MT DB: "dclient"
3
ID of any related log entry (will return 0 if there are no related log entries) * Relevant tables in MT DB: "dlog" and "dlogmsgs"
4
ID of any related job ticket (will return 0 if there are no related job tickets) * Relevant table in MT DB: "djob"
5
Which MassTransit event triggered this action (will return a numeric digit, please refer to the key below)
1) Connection Completes 2) Connection Fails 3) File Transfer Fails 4) After Files are Added 5) After Files are Sent 6) Files are Received 7) Before a File is Processed 8) After a File is Processed 9) Output Processing Fails 10) All Errors 11) Contact Added 12) Contact Deleted 13) Before Log Entries are Deleted 14) Before File Entries are Deleted 15) After Each File is Sent 16) After Each File is Received 17) Before Files are Transmitted 18) Database Disk Space Low 19) Mailbox Disk Space Low
* File ID, Contact ID, Log ID, and Job Ticket ID are all referring to specific columns within the MySQL database schema that stores MassTransit data.
Accessing the Command Line Arguments:
How the above-referenced command line arguments are accessed will vary depending on the language that was used to develop the executable file.
For C/C++ files, users may access the arguments using the usual argv/argc mechanism. For shell script files (like SH), the arguments will typically be specially defined environment variables (in BASH for example they are available as $1, $2, $3, $4, and $5 respectively).
Predefined and User-defined Environment Variables:
Variable Name
Contents/Value
MT_DBHOST
IP or DNS address of the MySQL server hosting the MassTransit database; same value as the DATABASE_HOST in the MassTransitEngine.cfg file
MT_DBNAME
Name of the MassTransit database; same value as the DATABASE_NAME in the MassTransitEngine.cfg file
MT_DBUSER
Name of the MySQL user account that MassTransit uses to connect to the database; same value as the DATABASE_USER in the MassTransitEngine.cfg file
MT_DBPASSWD
Password used to connect to the database using the MySQL user account specified above; same value as the DATABASE_PASSWORD in the MassTransitEngine.cfg file
Accessing the Predefined and User-defined Environment Variables
How the above-referenced predefined environment variables are accessed will vary depending on the language that was used to develop the executable file.
For example, BASH environment variables are the name of the variable prefixed with a dollar sign ($), so "$MT_DBHOST" (without the quotes) would be used to access the predefined environment variable "MT_DBHOST".
User-defined environment variables (configured by the user in the MassTransit Administrator application – step 5 above) may be accessed in the same way that predefined environment variables are accessed.
When running interpreted scripts (e.g. Perl scripts, Python scripts, PHP scripts) using this feature, your Windows file associations will need to be properly configured to ensure that MassTransit can call the appropriate file interpreter for the script.
A good way to test that the associations are set correctly is to run the script at the Windows command line and see if the script runs properly.
Find the path to the script (e.g. c:\scripts\myscript.py).
Open the Windows command line.
Enter the full path to the script in quotes and press enter (e.g. "c:\scripts\myscript.py"):
if the script runs correctly, MassTransit action tasks for that script should work properly;
if the script does not run or runs unexpectedly, you can use the following commands to determine and set the file associations:
enter the following command at the command line: assoc [EXTENSION], where [EXTENSION] is the extension of your script (e.g. assoc .py). You should see the type of the file as recognized by Windows (e.g. .py=Python.File).
to determine the actual command used to launch that file type, enter the following command at the command line: ftype [FILETYPE], where [FILETYPE] is the type listed by the assoc command (e.g. ftype Python.File). You should see the command that will be used to launch files of that type (e.g. "Python.File="C:\Python\python.exe "%1" %*).
if your association or file type are not set or are incorrect, you should try reinstalling your script interpreter. The interpreter installer generally has an option for configuring file associations. If this does not solve the problem, you can use the assoc and ftype commands to manually set associations.
If you follow these instructions and are still having problems getting your scripts and programs to run as MassTransit action tasks, please contact Group Logic technical support.
Note: On the Launch Process Action and Web Service Integration page, you can find information on how to trigger notifications from MassTransit to an external web service using the Launch Process action and a script.
Standard file settings for Launch Process action task
If the executable you've configured to launch has standard output or generates error messages, you can also configure MassTransit to save those in text files in a specific location. By default this location is the same as the location of the executable or the batch file. These settings are located in the MassTransitEngine.cfg file, normally located in:
If you need to, you can configure automatic removing of queued (To Send) file entries when the files cannot be found. Enabling automatic removing can avoid repeated errors if forwarded or programmatically added files are removed from their source locations.
Open the MassTransit.cfg in an application suitable for plain text editing. By default, this file is placed on the system drive in:
for MassTransit 7.6 and later:
on 64-bit machines:
C:\Program Files (x86)\Acronis\MassTransit Server
for MassTransit 7.1 to 7.6:
on 32-bit machines:
C:\Program Files\Group Logic\MassTransit Server
on 64-bit machines:
C:\Program Files (x86)\Group Logic\MassTransit Server
for MassTransit 7.0.x:
on 32-bit machines:
C:\Program Files\Group Logic\MassTransit Server 7
on 64-bit machines:
C:\Program Files (x86)\Group Logic\MassTransit Server 7
Locate the Missing Queued Files Settings section.
Note: Settings with a '%%' preceding them are not enabled. Delete the '%%' symbols at the front of the line in order to activate the settings.
Configure the following setting:
PURGE_TO_SEND_RECORDS = TRUE – setting this option to TRUE enables the automatic removing of missing queued file entries from the Files window; when set to FALSE, MassTransit will not remove the file entries from the To Send queue.
Note: If the queued files are on remote volumes, enabling this will unqueue the files permanently if the remote volume is inaccessible.
Save and close the MassTransit.cfg file.
Restart the MassTransit services in order to apply the changes immediately:
Go to Start → Control Panel → Administrative Tools → Services;
Highlight the MassTransit (for MasTransit SFTP, the service name is MassTransit SFTP) service and click on the Stop button from the Services tool bar, or select the Stop option from the context menu of the service.
Highlight the MassTransit Transporter service and click on the Restart button from the Services tool bar, or select the Restart option from the context menu of the service;
Highlight the MassTransit (for MassTransit SFTP, the service name is MassTransit SFTP) service and click on the Start button from the Services tool bar, or select the Start option from the context menu of the service.
Locate the following lines:
%% actions_stdout_redirect=C:\TMP\STDOUT.TXT – This file contains any text output from the process.
%% actions_stderr_redirect=C:\TMP\STDERR.TXT – This file contains any error messages from the process.
Uncomment the lines you need by removing "%%".
Replace the default paths with paths of your choice.
Troubleshooting:
Problem: Nothing happens when the Launch Process action task should have triggered
Solution: First, ensure that the executable file can be run manually (outside the context of MassTransit) and achieve the desired results before attempting to run the executable file in a MassTransit Launch Process action task. If the executable file does not run as expected outside the context of MassTransit, then it may be one of two common issues:
Ensure that the executable file is using UNIX line endings (the file may have Macintosh or DOS/Windows line endings which are preventing it from running properly). Text editors often have default line break/ending settings that may need to be adjusted to specify that UNIX line endings should be used.
Ensure that the executable file has the proper file permissions. At a minimum, the user account that MassTransit is running within will need read & execute permissions for the executable file.
SMS Message Notification Task
SMS Message Notification tasks send text messages to your mobile phone using standard SMS delivery.
To configure it:
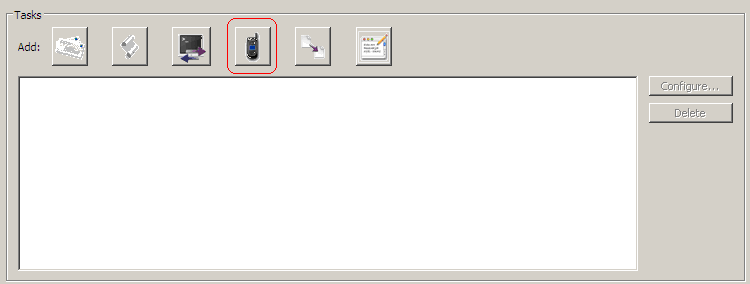
In the Add Actions window, click on the fifth button from the Tasks area:
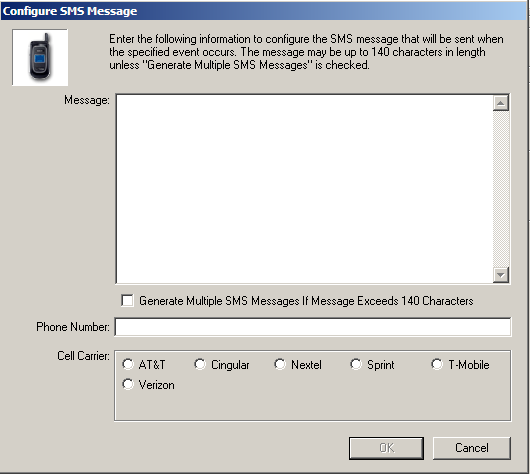
The Configure SMS Message window appears next:
In the Message field, enter the custom text message that you wish to send to the mobile phone of your choice. The message may be 140 characters in length unless Generate Multiple SMS Messages If Message Exceeds 140 Characters is checked.
Check the Generate Multiple SMS Messages If Message Exceeds 140 Characters check box, if you want multiple messages to be sent when the message text (entered in step 3 above) exceeds 140 characters. MassTransit will automatically span your text across multiple text messages, until message delivery is complete.
In the Phone Number field, enter mobile telephone number of the recipient.
From the Cell Carrier area, select the recipient’s mobile carrier by clicking on the appropriate radio button. The available options are the following:
AT&T;
Cingular;
Nextel;
Sprint;
T-Mobile;
Verizon.
Click the OK button to save these changes. The configured action task should appear in the Tasks area of the Add Actions window.
Go back to the action creation steps in order to finalize the action configuration.
Note: Please note that standard text messaging rates may apply to message recipients. Please check with mobile carriers for additional information.
Write to Log Task
Using the Write to log action task, you will have the flexibility to customize log messages. With this feature, you may have user-configurable text appear within the standard MassTransit Administrator Log window when the Who and When conditions are met.
To configure it:
In the Add Actions window, click on the sixth button from the Tasks area:
The Configure Write To Log window appears next:
In the Message field, enter the custom text message that you wish to be displayed in the MassTransit Administrator Log window.
From the Entry Type area, select the type of the custom log message entry to choose when you would like your custom message to appear by clicking on the appropriate radio button. The available options are the following:
Error;
Connection;
File Transfer;
Output;
Notification;
Summary;
Info.
From the Severity area, select the severity of the custom log message entry:
Error;
Warning;
Info.
Click on the OK button when you are ready with the action task configuration. The configured action task should appear in the Tasks area of the Add Actions window.
Go back to the action creation steps in order to finalize the action configuration.
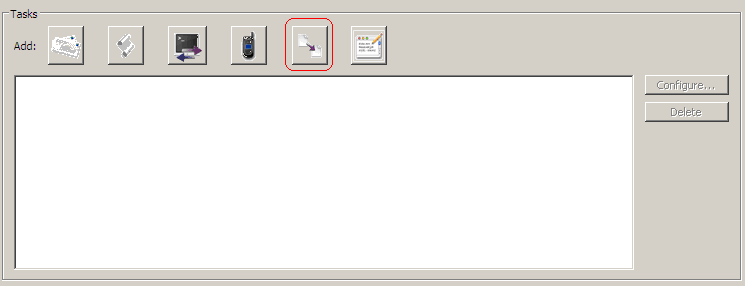
Copy/Move File Task
Using the Copy/move files action task, you can copy and move files to a destination of your choice, without the need for a Service. This feature eliminates the necessity of remote servers configuring "Print to" and "Output to" folders to comply with your internal workflow. When this feature is enabled, MassTransit will automatically move or copy files to the specified destination when Who and When events are configured.
To configure it:
In the Add Actions window, click on the last button from the Tasks area:
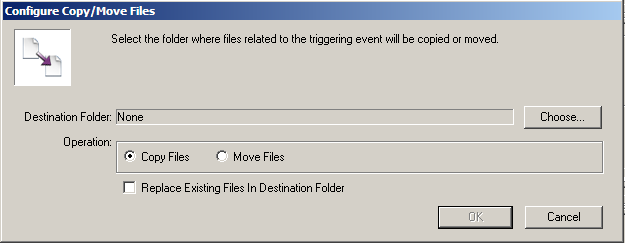
The Configure Copy/Move Files window appears next:
Click on the Choose... button and select a destination location. This will be the location where files will be copied/moved into.
From the Operation area, select the operation that will be performed on the files by clicking on the corresponding radio button:
Copy Files – this option will make an exact copy in the remote destination of choice, while keeping the original file in the Receivedmailbox folder.
Move Files – this option will send the file to the remote destination of your choice, while removing the original file from the Receivedmailbox folder.
If you check the Replace Existing Files In Destination Folder check box, files with the same names will be replaced automatically. Otherwise, an error message will appear stating that files cannot be copied/moved.
Click on the OK button when you are ready with the action task configuration. The configured action task should appear in the Tasks area of the Add Actions window.
Go back to the action creation steps in order to finalize the action configuration.
Pitfalls With The Copy/Move Files Action Task
One possible problem with the Copy/Move Files action task is that when an event happens no files are copied or moved. This usually occurs because the event that the task is configured to trigger on does not have any files associated with it. For example, there are never any files associated with the “Contact Added” event, so a Copy/Move Files action task will have nothing to do if it is configured to fire on this event. The list below shows the MassTransit events that may have files associated with them:
After Files Are Added
After Files Are Sent
After Files Are Received
Before A File Is Processed
After A File Is Processed
Output Processing Fails (May or may not have file associated with the event depending on what the error is and when it occurred)
Before File Entries Are Deleted
After Each File Is Sent
After Each File Is Received
Before Files Are Transmitted
File Transfer Fails (May or may not have file associated with the event depending on what the error is and when it occurred.)
If you configure this type of task to run for other MassTransit triggers, no files will be moved or copied.
Broken Workflows
Another common problem with the Copy/Move Files action occurs where its use causes a workflow to break. Usually the cause of the problem is that the action task has been used to move files to a different folder and that MassTransit or some other component of the workflow can no longer find these files.
For example, consider the situation where you have a Copy/Move Files action task configured to trigger “after files are added” and to move the files to a folder at /tmp/a_folder. When files are then added to MassTransit the action will fire and move all of the added files to /tmp/a_folder. When MassTransit later connects to send the added files it will not be able to find them because they have been moved and will therefore generate a “File Not Found” error for each missing file. Similar problems can occur in workflows that use forwarding or services if move actions are configured to trigger “after files are received”.
In general, it is safest to use the copy files action task to avoid moving files that are needed by later steps in the workflow. Please assess your workflow carefully before using the move files action task to avoid errors.