Managing the Discovery Log
You can manage the log by using commands from the shortcut menu:
•In the console tree, expand DeviceLock Content Security Server > Discovery Server, and then right-click Discovery Log Viewer under the Discovery Server node.
- OR -
•In the console tree, select DeviceLock Content Security Server > Discovery Server > Discovery Log Viewer, and then right-click any list record in the details pane.
The shortcut menu provides the following log management commands (next to the command name is the toolbar button corresponding to that command):
•Save - Saves the log to the file you specify.
•Refresh 
- Updates the list of events with the latest information.
•Quick filters - Choose from the following options to display only records for a certain period of time:
•Current day

•Current week

•Current month

•Current year

To cancel the quick filter that has been applied, select the same filter option again or use the Remove filter command.
A regular filter enabled by the Filter command disables quick filters, and cancels the current quick filter (if any was applied). To enable quick filters, disable the regular filter (for example, by using the Remove filter command).
•Remove filter 
- Show all records by disabling the currently applied filter.
•Clear 
- Delete all records that currently exist in the log.
This command also adds a deletion record to the log, indicating how many records have been deleted as well as who performed the deletion and from what computer.
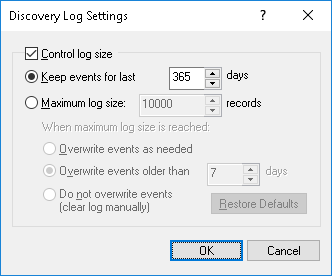
To view or change Discovery log settings
1. Click Settings on the shortcut menu.
2. View or change log settings in the dialog box that appears.
The following log settings are available:
•Control log size - Select this check box to allow the server to control the number of records in the log and delete outdated records. If this check box is cleared, the server uses all available database space to store the log.
•Keep events for last <number> days - Store records no older than a certain number of days. Then, specify the desired number of days. The default setting is 365 days.
•Maximum log size: <number> records - Store no more than a certain number of records. Then, specify the desired number of records, and select the server action to be performed when the log reaches the maximum size:
•Overwrite events as needed - New event records continue to be stored when the maximum log size is reached. Each record of a new event replaces the oldest record in the log.
•Overwrite events older than <number> days - New event records replace only records stored longer than the number of days specified. The supported setting is up to 32,767 days.
•Do not overwrite events (clear log manually) - New event records are not added when the maximum log size is reached. To enable the server to add new records, the log must be cleared by hand.
Important: If the log has no space for new records and log settings do not allow the deletion of old records, then the server does not add any new records to the log. |
To use the default log size, select the option Maximum log size and click Restore Defaults. The default log size settings are as follows:
•Maximum log size: 10,000 records
•Overwrite events older than 7 days
To configure the Discovery log filter
1. Click Filter on the shortcut menu.
2. View or change filter settings in the dialog box that appears.
Two filter types are available:
•Include - The console displays only the events that match these conditions. To set up and apply these conditions, select the Enable filter check box on the Include tab.
•Exclude - The console does not display the events that match these conditions. To set up and apply these conditions, select the Enable filter check box on the Exclude tab.
The filter can be temporarily disabled by clearing the Enable filter check box.
Note: The mark next to the tab name turns green if the filter on that tab is enabled. Otherwise, the mark is gray. |
When the filter enabled, its conditions are defined by entering values into the following fields:
•Event types - Select check boxes to filter events by type:
•Success - Task or operation completed successfully.
•Information - Certain action performed.
•Warning - A problem might occur unless action is taken.
•Error - A problem has occurred.
•Information, Server, Event ID - Include or exclude events depending upon whether event data matches the filter string specified. For example, to filter events by the name of the computer on which the event occurred, specify a filter string in the Server field. To filter events with certain IDs, enter ID numbers separated by a semicolon in the Event ID field.
Note: To assist with configuring a filter, string setting fields store previous entries and suggest matches for what is being typed. Previous entries are also available on the drop-down list of options for the setting field. |
•From - The beginning of the range of events to filter. Possible values: First Record (selected by default) or Records On. Select First Record to filter events from the earliest one in the log. Select Records On to filter events that occurred no earlier than a specific date and time.
•To - The end of the range of events to filter. Possible values: Last Record (selected by default) or Records On. Select Last Record to filter events up to the latest one in the log. Select Records On to filter events that occurred no later than a specific date and time.
When configuring a filter, consider the following:
•Filter conditions are combined by AND logic, that is, a given record matches the filter if it matches each of the filter conditions. Clear the fields that are not to be used in the filter conditions.
•Filter string fields may include wildcards, such as an asterisk (*) or a question mark (?). An asterisk represents zero or more characters; a question mark represents any single character.
•A filter string field may include multiple values separated by a semicolon (;). In this case, the values are combined by OR logic, that is, a given record matches the filter condition on a particular field if it matches at least one of the values specified in that field.
•The Clear button in the Filter dialog box provides the option to remove all the defined filter conditions and start setting up a new filter from scratch.
•The Save and Load buttons in the Filter dialog box are used to save the filter conditions to a file and to load previously saved filter conditions from a file.
 - Displays only the events that match the conditions set. For instructions, see
To configure the Discovery log filter.
- Displays only the events that match the conditions set. For instructions, see
To configure the Discovery log filter.