SSH File Transfer Protocol (SFTP) is a network protocol that provides file access, file transfer, and file management functionality over any reliable data stream. This protocol assumes that it is run over a secure channel, such as SSH, that the server has already authenticated the client, and that the identity of the client user is available to the protocol. SFTP's capabilities include resuming interrupted transfers, directory listings, and remote file removal.
SFTP is a much more secure communication method than FTP because of its encryption methods. In addition, you can resume interrupted transfers using SFTP unlike with FTP. On the other hand, the SFTP encryption mechanisms slow down the file transfers significantly.
You can configure your MassTransit HP or SFTP server to receive SFTP incoming calls. For this purpose, you need to configure an SFTP Server listen.
Note: If your server is using multiple IP addresses, it is possible that you receive a Transporter Service Initialization Failed message in your MassTransit Administrator log. If you don't want to use SFTP, you can just ignore this message, otherwise please follow these steps.
Info: For information about available additional configurations, see the Additional Configurations section on this page.
Configuring an SFTP Server Listen
Note: MassTransit allows you to configure multiple SFTP Server listens. For SFTP to listen in MassTranist the MassTransit Transporter service must be running.
In MassTransit Administrator, open the Setup window by clicking on the Setup button from the Navigation Bar or select the Setup... option from the Window main menu.
In the Incoming Calls tab, click on the Add... button.
The "Add Incoming Call" window appears. From the Method drop-down menu, select the SFTP Server option.
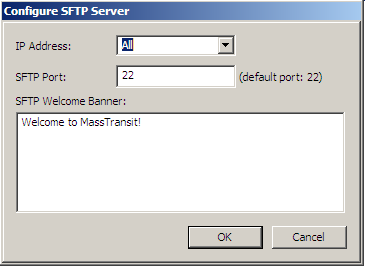
The Configure SFTP Server window appears. Select the IP address you want MassTransit to listen on from the IP Address drop-down menu. Selecting All means that MassTransit will be listening for incoming calls on all network interfaces. That is the default option. If you select a particular IP address, MassTransit will use only that address to listen on.
Enter the port that will be used for the SFTP connection in the SFTP Port field, or leave the default setting.
In the SFTP Welcome Banner field, enter a welcome message that will be displayed to the contacts when they connect to the server.
Click on the OK button in the "Configure SFTP Server" window to save the changed settings. The configured SFTP method should appear as active in the Setup window.
Click on the OK button in the Setup window.
You should be able to receive incoming SFTP calls now.
Enabling and Disabling the Listen
In the "Incoming Calls" tab of the Setup window, all created listens are listed. In the first column of the list, there is an indicator showing whether the listen is enabled or not.
If the indicator is green, the listen is enabled.
If the indicator is red, the listen is disabled.
To enable a disabled listen, highlight it and click on the Enable button of the "Incoming Calls" tab.
To disable an enabled listen, highlight it and click on the Disable button of the "Incoming Calls" tab.
Note: Since SFTP is a client-server protocol, only the SFTP client side can initiate the connection.
Configuring SFTP Outgoing Calls
Note: This is new functionality in MassTransit 8.0
Note: You can configure outgoing SFTP calls on MassTransit HP only.
Since SFTP is a client-server protocol, only the SFTP client side can initiate the connection. That is why you should configure your MassTransit server to act as an SFTP client. For this purpose, you need to add an SFTP Server contact. See the Configuring an SFTP Server Contact section below for detailed instructions about setting an SFTP Server contact.
Configuring an SFTP Client Contact
Note: This configuration is per contact. You need to set the SFTP communication method for each contact that you want to use it.
Follow these steps for setting an SFTP Server contact:
In the MassTransit Administrator, open the Contacts window.
In the Contacts window, click on the Add... button to add a new contact, or highlight an existing Server contact and click Edit... to edit it.
Enter/change the desired information:
if you are creating a new Server contact, see detailed information about how to do that on the Contacts page and then continue with the steps below.
if you are editing an existing Server contact, continue with steps below.
In the Outgoing Calls tab of the Setup window, select the SFTP Client option from the Communication method drop-down menu.
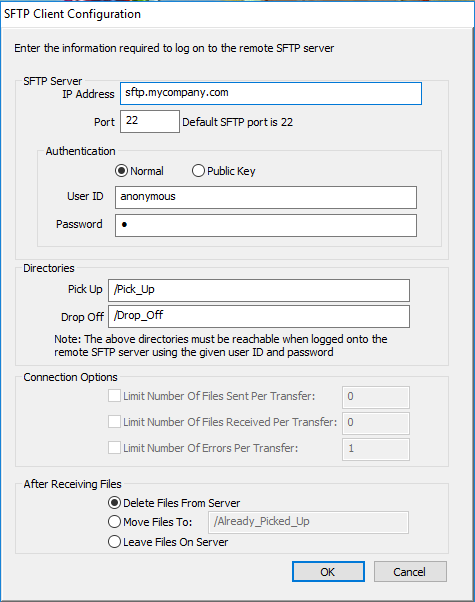
The SFTP Client Configuration window appears:
In the "SFTP Server" area of the window, enter the information about the server you want to call and the login credentials of the SFTP Client (which would be your server):
IP Address field – enter the IP address of the SFTP Server here.
Port – here, you should enter the port number which your server will contact the remote SFTP server on. The default port is "21".
User ID – enter the username your server will use to authenticate on the SFTP Server. If you leave the default setting ("anonymous"), the SFTP Client will be able to connect to the remote server only if it is configured to accept calls from anonymous servers.
Note: For more information about anonymous FTP/SFTP access, see Generic Clients Contact.
Password – enter the password for the username you chose above to connect the SFTP server.
In the "Directories" area, specify the names of the mailbox folders: a. Pick Up field – specifies the name of your "Pick Up" mailbox folder on the SFTP server. The default setting is: /Pick Up b. Drop Off field – specifies the name of your "Drop Off" mailbox folder on the SFTP Server. The default setting is: /Drop Off.
Note: The above directories must be reachable when you are logged onto the remote SFTP Server using the given user ID and password.
Under the "Connection Options" area:
Note: At the moment, these options are not supported for SFTP!
Limit Number Of Files Sent Per Transfer – checking this check box will enable the field next to it where you can specify a limit for the number of sent files per transfer; by default, the file transfers are not limited;
Limit Number Of Files Received Per Transfer – checking this check box will enable the field next to it where you can specify a limit for the number of received files per transfer; by default, the file transfers are not limited;
Limit Number Of Errors Per Transfer – checking this check box will enable the field next to it where you can specify a limit for the number of admissible errors per transfer; when this limit is reached, the connection will be interrupted; by default, the number of errors is not limited.
Under the "After Receiving Files" area, you can find the following radio buttons:
Delete Files From Server – selecting this option will delete the files from your contact's mailbox on the remote SFTP Server after downloading them.
Move Files To – if you select this option, you can specify a folder in your mailbox on the remote SFTP Server where the downloaded files will be moved into.
Leave Files on Server – if you select this option, the files will remain in your "Pick Up" mailbox folder on the remote SFTP Server even after downloading them.
When you are ready with the SFTP Client configuration, click on the OK button to save the settings. If you click "Cancel", the changed settings will not be saved.
The configuration of the SFTP Client user is complete. You should be able to place a call to the remote SFTP server.
Note: MassTransit allows you to configure multiple SFTP Client listens.
MassTransit gives you the ability to configure automatic calls to all your SFTP Server contacts. For this purpose, you need to configure an SFTP Client listen which will poll for files that are ready for pick up on the SFTP Server contacts.
For configuring an SFTP Client listen, follow the steps bellow:
In MassTransit Administrator, open the Setup window by clicking on the Setup button from the Navigation Bar or select the Setup... option from the Window main menu.
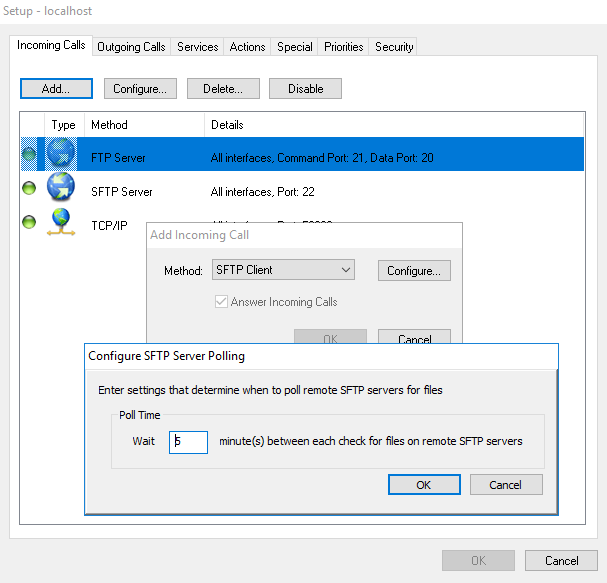
In the Incoming Calls tab, click on the Add... button or highlight an existing SFTP Client listen and click Configure... to edit it.
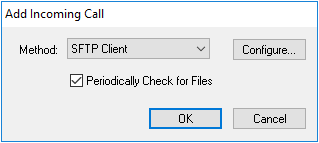
The "Add Incoming Call" window appears. From the Method drop-down menu, select the SFTP Client option.
The Configure SFTP Server Polling window appears.
In the "Poll Time" area of the window, you can configure how often should your server connect to the SFTP Server contacts and check if there are any files in the "Pick Up" folder for you.
When you are ready with the SFTP server polling configuration, click on the OK button to save the settings.
In the "Add Incoming Call" window, make sure the SFTP Client option is selected in the "Method" drop-down menu and the Periodically Check for Files checkbox is checked. If the checkbox is not checked, MassTransit will not check automatically for files on the SFTP Server and you will need to do that manually.
The newly created "SFTP Client" listen should appear in the "Incoming Calls" tab of the Setup window.
Click on the OK button in the Setup window to complete the configuration of the SFTP Client listen.
Enabling and Disabling the Listen
In the "Incoming Calls" tab of the Setup window, all created listens are listed. In the first column of the list, there is an indicator showing whether the listen is enabled or not.
If the indicator is green, the listen is enabled.
If the indicator is red, the listen is disabled.
To enable a disabled listen, highlight it and click on the Enable button of the "Incoming Calls" tab.
To disable an enabled listen, highlight it and click on the Disable button of the "Incoming Calls" tab.
SFTP Authentication
In order to establish an SFTP connection, the SFTP server and client need to be authenticated. Find detailed information about configuring the SFTP authentication on the server and on the client side below.
SFTP Server Authentication
SFTP servers have a public/private key that is used by the client for authentication. Specifically, a private key is needed on the server (either auto generated by MassTransit or supplied by the administrator). The public key is then either distributed to the client separately, or it is saved to the client’s "known_hosts" configuration table of known public keys the first time a connection is made. This is then used in subsequent connections by the client to authenticate that the server is who it says it is.
This is different than SSL authentication in MassTransit, where the server’s public key is certified through a signed certificate by a known certificate authority. SFTP/SSH relies on the either pre-distribution of server public keys, or the trust that the first connection to a server is "really the true server" to get the public key stored.
If the server’s private/public key changes, then any client that previously connected will error out that the server’s key is invalid. Many SFTP clients (i.e., the Mac OS X client) will fail to connect at this point because it views that it is highly likely having a man-in-the-middle attack. The only way to get the connection to work in this case is to remove the server’s public key from the "known_hosts" file, and reestablish connectivity. On Mac OS X, the known_host file is in the following location and can be edited using a text editor: ~/.ssh/known_hosts
The MassTransit Administrator has an interface in the Security tab of the Setup window to specify the server’s public/private key – see the steps below. This can be done by auto-generating the private key, or allowing the user to pick a private key / passphrase which will then be saved in your preferences in the same way as you save SSL private keys. There is also a button that allows you to save the public key to a disk for sending to clients that want to connect.
Note: If the server admin doesn’t send the public key, the client should be able to just retrieve it on the first connection.
Open the Setup window of the MassTransit Administrator by clicking on the Setup button from the Navigation Bar or by selecting the Setup... option from the Window main menu.
Open the Security tab of the Setup window.
In the SFTP/SSH Server Key section, you can choose whether to use an automatically generated by MassTransit private key or a supplied private key. The default option is the MassTransit key.
If you choose to have MassTransit generate the SSH private key, make sure the Automatically generate SFTP/SSH private key radio button is selected and click Cancel in the Setup window. The SFTP authentication configuration of your server is done and you do not need to perform the steps below.
If you want to use a supplied private key, continue with the steps below.
In the SFTP/SSH Private Key section, select the Use Private key radio button. A window should appear where you can browse for the private key of the SFTP server. If not, click on the Choose... button.
In the window, select the private key for the SFTP server and click Open.
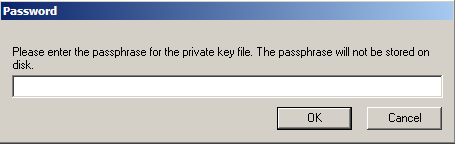
In the Password window that appears, enter the password for the private key and click OK in order to load the file in MassTransit.
In the SFTP/SSH Private Key section, enter the private key password in the Enter password for private key field in order to enable MassTransit to use the file without being prompted for a password.
Click OK in the Setup window to save the changes. Otherwise, click Cancel.
Save the public key to a disk space
When you have configured the server key for the SFTP authentication, you can save the server's public key in a file on a location you choose:
Open the Security tab of the Setup window.
In the SFTP/SSH Private Key section, click on the Save private key... button.
In the appeared window, select a location for the public key file and click on the Save button. The public key file should appear in the selected directory.
SFTP Client Authentication
Client authentication with SFTP in MassTransit is available in two ways – username/password and public key authentication.
Username/Password authentication
The first method is username/password authentication. For username / password, the client either specifies the username/password when configuring the connection or is prompted at login. This authenticates against the MassTransit server in the same way as FTP.
Public key authentication
The second method is public key authentication. In public key authentication, the client has a private key that only it knows about. The client pre-distributes its public key to servers that it wants to connect to. The server administrator can load that public key into the contacts information. This is available on a per contact basis. In the SSH/SFTP authentication process, the client passes its public key and also signs it with its private key. The server can then decrypt the signed public key with the public key it received to verify that the client has the real private key. Then the server matches the public key it received against its "known client public key" to determine if the user is valid.
In MassTransit 7, you can now specify the public key for each user that needs public key SFTP authentication. This is done within the contact editing process where the public key can be selected and loaded into the database for an individual contact:
Open the Contacts window of the MassTransit Administrator by clicking on the Contacts button from the Navigation Bar or by selecting the Contacts option from the Window main menu.
Highlight a contact that uses the SFTP connection method to contact the server and click on the Edit... button.
Open the Security tab of the Contact Information window that appears.
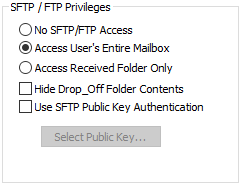
In the SFTP/FTP Privileges section, make sure the No SFTP/FTP Access radio button is NOT selected.
Check the Use SFTP Public Key Authentication check box. A window should appear where you can select the client's public key, otherwise, click on the Select Public Key... button.
In the window, locate and select the client's public key file. Then, click Open.
The client's public key should be loaded in MassTransit. Click OK in the Contact Information window to save the changes.
Now, the configured contact should be authenticated automatically on the server without being prompted for login credentials.