All over the world, countless Apple iPhone users depend on their devices to stay in touch and record important memories. And, because of the iPhone’s constant evolution over the years, owners are now storing incredible amounts of photo, video, and music data on their devices. This means, of course, that at some point, users must back up their iPhones before freeing up space for more files.
Unfortunately, though, this seems to be when problems often start. An increasing number of reports point to issues that can make backing up an iPhone difficult or, sometimes, impossible. In fact, backup issues with the Apple phone are so prevalent these days that “why won’t my iPhone backup” is now a popular search phrase. Therefore, in this article, we will try to help by addressing common iPhone backup problems and how to resolve them.
First, Know the Steps
In all fairness, not all iPhone backup problems are a result of issues with the phone or its operating system. Sometimes, problems with backing up an iPhone result from plain ole’ user error or a failure to follow backup steps properly. So, before, we get into addressing potential problems and issues with iPhone backup, ensure that you’re familiar with the steps needed to back up your device. If you’re not sure of the process, you can view the documentation for backing up to iCloud or iTunes on Apple’s support website.
Common iPhone Backup Issues and How to Resolve Them
For some users, iPhone backups work seamlessly and flawlessly without any hiccups or issues at all. For others, though, iPhone iCloud/iTunes backups fail for any of a number of reasons. Therefore, we will discuss some of the most common problems with iPhone backups and how to resolve them.
No Wi-Fi Connection
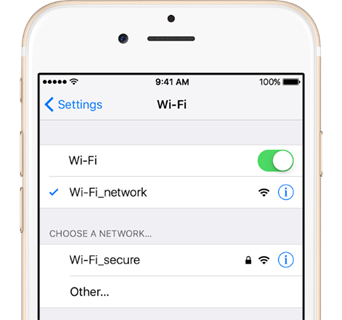
Before you can back up your iPhone to iCloud, you must have an active Wi-Fi connection. If you’re not connected to Wi-Fi, first ensure that you’re in a location that has an active network. Then, go to “Settings” on your phone and tap “Wi-Fi.” Next, select the Wi-Fi network to which you want to connect. If prompted, enter the password, and then tap “Join.” After connecting to the Wi-Fi network, check again to see if you can back up to iCloud.
Backups Are Disabled
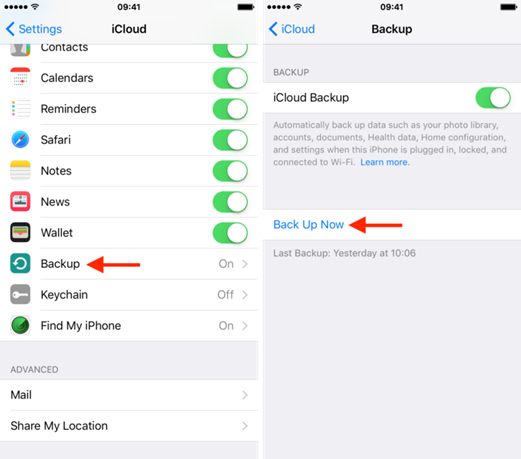
One of the most common iPhone backup problems is, fortunately, also one of the easiest to fix. With so many configurable settings and options on the iPhone, it’s really easy to inadvertently enable or disable something without meaning to do so. Therefore, if your iPhone is not performing automatic backups to iCloud, the very first thing you should do is ensure that the backup setting option is enabled on the device. To enable iCloud backups on your iPhone, follow these steps:
Step 1 – Open “Settings” on your iPhone.
Step 2 – Tap your name at the top of the display. Scroll down to and tap “iCloud.”
Step 3 – Tap “Backup”. Ensure that the slide labeled “iCloud Backup” is in the “On” position (the slide should be green when active.) If the slide is set to “Off” (greyed out,) slide it to the “On” position. Once you slide the toggle to the “On” position, the “Back Up Now” link should turn blue (which means it’s now active.)
Step 4 - Tap the “Back Up Now” link and attempt to back up your iPhone (if the link is still greyed out, check your Wi-Fi connection using the steps in the previous section.)
Corrupted or Incompatible Backups
For various reasons, some iPhone users prefer to back up their devices to personal computers rather than to iCloud. And, in most cases, backing up to a PC or laptop is relatively straightforward using Apple’s iTunes software. However, in some cases, iTunes users are presented with some daunting messages when trying to restore a backup from iTunes (and in some cases, even with iCloud backups.)
Two Reasons iPhone Backups Might Be Rendered Useless
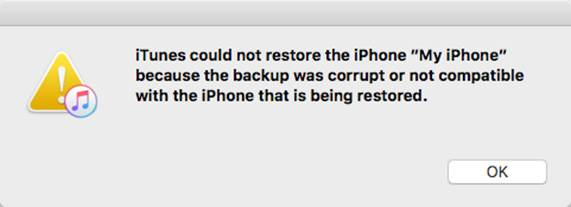
While there are several reasons a restore might fail (i.e. no Wi-Fi signal, dead battery, etc.) one of the most serious encountered by users is the near-heart-stopping “iTunes could not restore the iPhone (or iPad, iPod touch) because the backup was corrupt or not compatible with the iPhone (or iPad, iPod touch) that is being restored” error message. There are a few reasons why you might see this error, but the two most common are 1.) the previous backup did not complete successfully or 2.) the iOS software on the phone was updated after the last backup was performed.
Resetting the Backup in iTunes
When presented with errors regarding backup corruption or incompatibility, there is no way to restore or back up iPhone data without first deleting the current backup data in iTunes. After deleting the corrupted or incompatible backup in iTunes, though, you can start using the software again to back up and restore your iPhone normally. To clear corrupt or incompatible backup data in iTunes, follow these steps:
Step 1 – Connect your iPhone to your PC and launch iTunes.
Step 2 – Go to “Edit” and then “Preferences.”
Step 3 – Select “Devices,” and then select your iPhone. In the backup list, select the corrupt or incompatible backup entry, and then click “Delete Backup.”
Step 4 – Back up the iPhone again normally and restore as needed.
About iCloud Backup Compatibility Errors
While corruption or compatibility errors generally occur in iTunes, there have been reports of some users seeing similar errors when backing up to iCloud. Generally speaking, the fix for the iCloud problem is essentially the same: delete the corrupt or incompatible backup from iCloud. To do this, follow these steps:
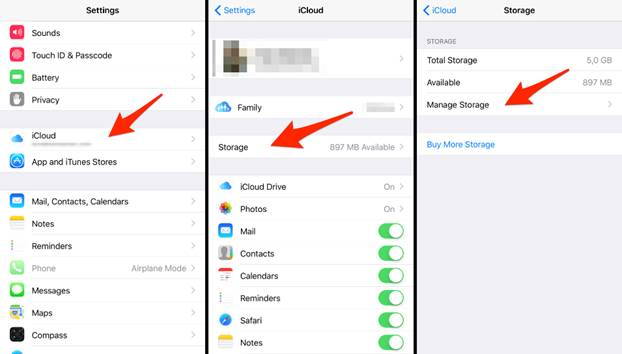
Step 1 – Go to “Settings,” and then tap “iCloud.”
Step 2 - Select “Storage,” and then tap “Manage Storage.”
Step 3 – Select the corrupt or incompatible backup entry, and then tap “Delete.”
Insufficient iCloud Storage Space
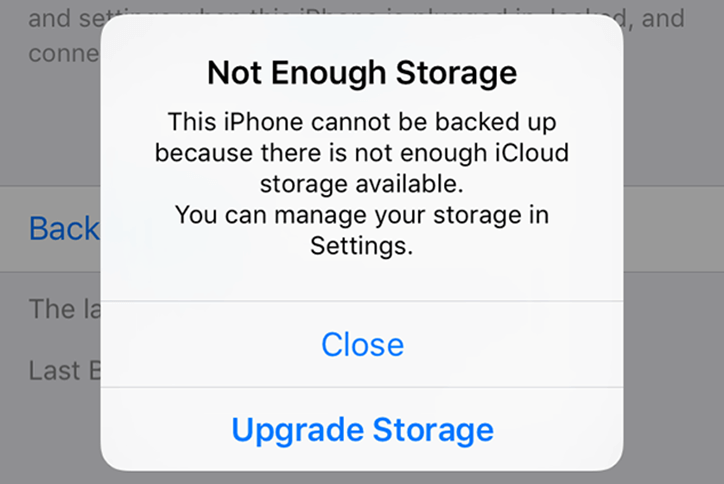
For iPhone users who create a lot of videos or snap a lot of pictures at least, one of the biggest problems associated with backups is insufficient iCloud backup storage. Apple provides 5GB of free iCloud storage to all users. However, if you create a lot of files with your iPhone, that doesn’t last very long. And, if you use the same iCloud account on multiple devices, that storage quota gets used up even faster. Of course, for “Not Enough Storage” errors, you can either purchase additional iCloud storage from Apple, limit your backups to PC only (with iTunes), or delete some files before backing up. If none of these solutions appeal to you, continue reading to see how Acronis True Image 2020 can help alleviate your iPhone backup woes.
If All Else Fails
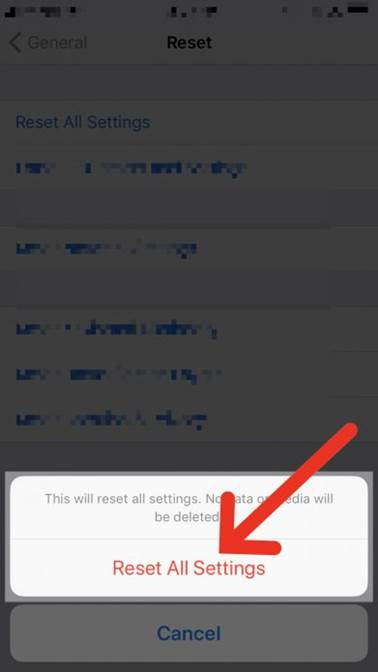
If you’ve tried all the steps suggested listed here, and are still experiencing backup/restore woes, it may be time to bite the bullet and do a soft reset of all your iPhone settings. This particular type of reset won’t erase your user data (i.e docs, photos, videos, etc.) However, doing a soft reset will wipe out your saved Wi-Fi passwords and set all other settings back to their defaults. In theory, this should also erase any settings or problems that may be interfering with your iTunes/iCloud backups. To do a soft reset, follow these steps:
Step 1 – Go to “Settings,” and then tap “General.”
Step 2 – Scroll down to and tap “Reset.”
Step 3 – Tap “Reset All Settings”, and then confirm when prompted.
Step 4 – After the phone restarts, try to the back up again.
The Real Last Resort
If resetting settings on your iPhone doesn’t help, you may have other issues that require you to contact Apple Support. Or, if you are of the technically-inclined variety, you may want to proceed with a much more hardcore reset option – the Device Firmware Upgrade, or DFU. A DFU is the deepest, most thorough type of reset/restore you can perform on an iPhone. Keep in mind, though, that a DFU erases and restores EVERYTHING – both hardware and software code. So, only use this option as a last resort
Steps to Doing a DFU Restore
Step 1 – Ensure that you have a valid backup in iTunes.
Step 2 – Use the USB cable to connect the iPhone to the PC with iTunes installed.
Step 3 – For iPhone 8s and below, press and hold the “Sleep/Wake” and “Home” buttons simultaneously for eight seconds. For iPhone 7 and newer models, press the “Sleep/Wake” and “Volume Down” buttons.
Step 4 – After iTunes displays a message stating it has detected an iPhone in recovery mode, release the “Home” or “Volume Down” button. The screen on your iPhone should be completely black (if not start the process again from the beginning.)
Step 5 – Use iTunes to restore the iPhone normally and then follow the prompts to restart the device.
Skip All the Hassle with Acronis True Image 2020
By now, you’ve probably noticed that most problems with iPhone backups/restores are associated with incorrect settings or limitations with the Apple software or cloud service. Therefore, if you would like to skip the hassles commonly associated with backing up an iPhone, you can save yourself a lot of time, effort, and frustration with our comprehensive, easy-to-use iPhone backup solution – Acronis True Image 2020.
Back Up Anything and Everything
With Acronis True Image 2020, you can back up all your computers and devices – including iPhone and Android devices -- with a just couple of clicks or taps. Additionally, our award-winning software provides premium features you just can’t get with Apple software. Check out just a few of the advanced features you get with Acronis True Image 2020:
- World’s fastest backup and recovery technology
- Support for unlimited mobile devices
- Back up to cloud or PC
- Migrate data between iPhone and Android (and vice versa)
- Automatic backup to a local computer (when in range of same Wi-Fi network)
- Restore individual files or entire backup
- Much more
And best of all, you can use our Acronis True Image mobile app completely free of charge (even if you don’t own a full version of Acronis True Image 2020.) To boot, we’ll even throw in 5GB of free Acronis Cloud Storage space for you to use. So, what are you waiting for? Download the Acronis True Image Mobile app now and start seeing why our backup application is the solution of choice for millions of users around the world.
About Acronis
A Swiss company founded in Singapore in 2003, Acronis has 15 offices worldwide and employees in 50+ countries. Acronis Cyber Protect Cloud is available in 26 languages in 150 countries and is used by over 20,000 service providers to protect over 750,000 businesses.


