Backup software creates copies of the data on your system so you can recover in case your original data is lost or damaged. Different backup solutions protect different kinds of data and different combinations of devices.
What is backup and restore?
"Backup and restore" is a primary practice for safeguarding your data from natural disasters, malware, or human error. Backup duplicates your data and stores it in a secure location, and restoration allows for recovery of said data to numerous devices in cases of data loss or corruption.
Typically, if your primary device or network gets damaged or corrupted, you can restore your backups to an alternative device to resume your day-to-day and business processes.
Optimally, backup copies would deny data altering post-creation to counter ransomware attacks. Such an approach allows users to redeem their data as if it's untouched by a successful hacking attack. Even if cybercriminals get ahold of your data and hold it hostage, you can safely recover the files your need onto a new device.
"Backup and restore" is also a part of on-site or cloud-based backup solutions. Such services can automate backups and support antimalware and antivirus features to further fortify your data against malicious actors.
The 3 primary data backup types
When it comes to backup, you can opt for three major approaches.
- Full backup
Full backups take all the data on a device or a system, copy it, and store it safely in protected storage. When initiating a full backup, users would get every bit of data on their device, server, database, or virtual machine (VM) into an encrypted backup. Logically, such backups take the most time out of the three options.
Full backups can take up to a few hours for individual users, depending on the data load being copied. For SMBs, the process can take a bit more, depending on the data you wish to back up and place in storage.
As for enterprises, the process can take days and sometimes even weeks.
Nevertheless, modern backup solutions have a way of cutting down on backup timers. Most robust solutions would only add new data to the backup if you already have a perfectly good full backup in storage. Additionally, you can speed up full backups depending on the storage option and the chosen backup solution.
For example, backups to local storage (external HDDs) usually take less time than cloud-based backups. However, cloud-based storage allows for restoration to any device, regardless of its physical location. It also presents an extra layer of protection, as your primary device data and the backup aren't stored in the same physical location.
- Incremental backup
Incremental backups serve to quicken the backup process and optimize your storage capacity. They only take new data since the last incremental backup and add it to the existing data copy. Keep in mind, you'd need to first perform at least one full backup before you can initiate incremental backups.
Once that's done, an automated solution would regularly run incremental backups and optimize the full backup to hold all critical data in storage.
- Differential backup
While incremental backups use the last performed incremental backup to optimize backup data, differential backups use the last performed full backup to determine new data eligible for storage.
As with incremental, differential backups need at least one full backup performed before you can initiate them. Based on your preferences, you can choose whether to use incremental or differential options for your backups.
Regardless of your choice, both options allow for speedier backups and take it easy on the available storage space, so you won't have to run a complete device backup every time you need to secure new data.
The seven types of data recovery
The amount of data users and businesses handle is different and often unique. This is why recovery options offer more comprehensive options than those used to create data copies. Let's give it a look.
- Instant mass restore
The first approach enables users and IT specialists to recover the entirety of data held in backup in one vast recovery operation.
Now, for individual users, a mass restore may not sound as glorious since they often back up fewer data than businesses. However, big organizations can initiate mass recovery to summon dozens and hundreds of VMs instantly.
Most modern backup and restore solutions enable customizable scaling, so users can restore data to any point in time, saving additional time and effort.
- Bare machine restore
This approach usually refers to restoring a backup to a brand-new machine.
Let's say you've gotten a new laptop and want to use it right away – you can initiate a bare machine recovery and transfer all software, apps, files, folders, and other data to the new laptop in one swift go.
- Granular recovery (files, folders, objects)
Granular recovery is restoring one or several specific data sets among many volumes in a full backup. It is also known as file-level or object-level restoration and is usually more beneficial with bigger backup volumes. However, you can use it at any level of backup volume.
Suppose you accidentally deleted a specific file from your primary computer and want it back from recovery. In that case, we can refer to that as a form of granular recovery, as you restore a single file among many others in the backup.
- Volume restore
For individual users, volume restore may refer to recovering a single volume from a full PC backup.
For example, let's say you keep all your personal photos and videos on volume D:\; while copying them to a flash drive, you accidentally hit "Cut" instead of "Copy". Typically, it's no problem to paste the photos on the flash drive and then copy them back to your PC.
However, for some reason, you can get distracted, not paste them right away, and proceed to copy another item. In such a scenario, the cut images will be removed from the command memory, and you'd lose them unless you have an operational backup available.
If you do, you can then choose to restore specifically the volume (in this case, volume D:\) holding the images back to your PC.
For businesses, volume recovery majorly refers to restoring an unlimited number of virtual machines (VMs) simultaneously to optimize recovery. For example, the IT staff of a company can choose to restore all VMs belonging to a specific application group and have them up and running as soon as possible.
- Instant volume mounts
This recovery approach refers to restoring entire data volumes to a Windows virtual machine. Again, the option is more suited toward businesses rather than individual users.
- Instant VM restores
This option allows IT specialists to restore numerous VMs to any specific recovery point, with backups available immediately.
- Virtual machine disk (VMDK) restore
This recovery option ensures secure and quick recovery of all apps and data on a specific virtual machine (VM).
Okay, we've gone over the different backup and restore types. Now that you know more about them, it's time to explore how to put them to work and optimize backup and recovery.
How to backup and restore a computer?
In today's cybercrime landscape, it's sensible to back up your computer regularly to avoid data loss and ransomware attacks.
Backups also come in handy if your laptop is stolen or you somehow lose it. In addition, if your hard drive fails, you could lose all data on it, depending on the damage. However, you can counter all of the above if you have an exact copy of your data stored safely in an external storage device or the cloud.
There are various backup options for individual users, each with its positive and negative sides.
Below, we will discuss the most common backup methods, so you can make an educated choice and pick the most suitable one. However, it's best to keep multiple data backups on both physical and cloud storage.
Having said that, let's dive in!
Backup on a physical storage device
When it comes to physical data carriers, there are several options to store your data. Some devices are easy to use, more flexible, and user-friendly. Others may seem more challenging but are often considered more secure.
Your choice will depend on your backup volume, availability preferences, and cybersecurity needs.
- USB
Let's start off with a good ol' backup helper.
The USB stick is small, affordable, and convenient. It's also super easy to use.
You can store data on a USB relatively safely; nonetheless, such an approach has downsides. As convenient as it may be to keep data on a USB, such a small device can easily be lost. Moreover, most USBs have a limited number of read/write cycles on them. If you're expecting to create new backups often and restore them multiple times to different devices, the USB may not be the best pick for you.
In summary, USBs are highly portable, cheap, and enable easy data transfer to various other sources. On the other hand, their size relates to potential easy loss and concerns regarding their read/write cycle longevity.
- External hard drive
External hard drives can be viewed as more extensive, more durable USBs.
External HDDs are relatives to the in-built hard drive of your computer or laptop. However, they reside outside of your machine. You can plug them into your personal computer or other sources to transfer data or simply access the data on them without moving it anywhere else.
If you decide to use an external HDD for backup, you can password-protect it so only you'd be able to access data on it. (once you provide the correct password, of course)
To comprise their pros and cons, external HDDs are relatively cheap, offer plenty of storage space, and are more durable than USBs. Additionally, losing them is less likely as they're bigger, and you won't usually carry them around in your pocket.
As a potential negative, users should remember that external HDDs can be liable to malware threats.
If your PC is infected by, let's say, ransomware during backup, the files on the external HDD can also get encrypted and held for ransom. Also, if a power surge strikes during backup, it can corrupt files on both the primary machine and the external HDD.
To minimize the risk of cyberattacks and outages messing with your data, it's best to initiate backups in a safe environment. To deny incoming web threats, you can start backups only when you're not connected to the internet. If you're backing up from a laptop with a strong battery, you can also unplug it from the power outlet and transfer data without the risk of a power outage striking at the worst moment.
- Time Machine (for Mac only)
Mac users can benefit from the brand's Time Machine feature to automate backups to external hard drives. While you can purchase a dedicated Time Capsule from Apple, you can also use any external HDD to initiate backups.
Via automation, you can ensure that you won't forget to back up your data as the option keeps hourly backups for the last 24 hours, daily backups for the last month, and finally, weekly backups until the HDDs memory is full.
Time Machine completes full device backups, so you can customize backups to store only specific files. The backup frequency here is both a pro and a con, as your HDD can fill up pretty quickly if you don't audit your backups regularly. If that happens, the feature won't be able to save new backups to storage successfully, and you can lose essential data.
Furthermore, Apple's wireless machine is more expensive and supports only Macs.
- Network-attached storage
Network-attached storage is typically used by businesses to back up data from multiple devices at once. However, many households nowadays have more than one computer, making the approach appealing to personal users.
Especially if you plan on backing up files from several computers, it's an idea worth considering.
Network-attached storage also allows for automated backups, so you won't need to keep backup reminders in your calendar. Additionally, network-attached storage works well with smartphones and tablets so that you can back up the entirety of your family's devices easily.
However, it's worth noting that such an approach is more costly than other, more affordable methods. Additionally, it takes a bit of effort to set up the attached storage, and maintenance can be challenging unless you're tech-savvy.
Backup to a storage device via Windows built-in tools
Now that we've gone through the most commonly used physical storage devices, it's time to explore how to initiate backups via the in-built Windows tool – File History.
Essentially, File History automatically saves specific files and folders to a chosen backup device and allows for easy recovery of a previous file version. In Windows 10, the feature is relatively easy to set up and use, whereas Windows 11 backup can be a bit more challenging.
Worry not, though, as we shall discuss how to use File History on both OS versions properly.
Before we explore the specifics, it's critical to mention some of File History's limitations.
In Windows 10 and 11, File History can only back up specific, predetermined folders – Documents, Pictures, Music, Videos, Desktop, and any offline OneDrive data stored on your computer. Users can no longer add customized folders to backup as they could with previous File History versions.
Microsoft recommends placing specific files you need to back up in one of the designated backup folders. If that seems like a hassle, you can turn to a third-party backup solution to securely store any file you want.
However, if you want to try File History despite its limitations, here's how.
Preparation for backups via File History
Firstly, you must ensure a viable storage drive accessible from your PC. You can use a media carrier dependent on physical or wireless connection – flash drives, external HDDs, network-attached storage devices, or other network locations.
While plug-in devices only need to be physically connected to your computer, wireless options must be connected to power and go through proper mapping.
When set up is complete, File History will initiate regular backups, so all external storage devices must remain connected and accessible by your PC.
Backup in Windows 10
Now that you have an operational external storage device, let's review the steps to use File History.
- Click on the Start button -> go to Settings -> Update & Security -> Backup
- There, you'll find the option "Back up using File History"; below the option, you'll see a line labeled "Add a drive"; if you have correctly connected at least one external storage device, Windows will display a list of all available backup destinations
- From the displayed list, select the desired backup destination
- Once you choose a storage device, File History is enabled; however, it's not yet backing up any data; you'd want to click on "More options" to set it up further
- In the Backup options menu, you can choose how often to back up your files via the "Back up my files" option – the choices vary from "every 10 minutes" to "daily" backups.
- Afterward, you can set up backup retention rates -> from the "Keep my backups" drop-down menu, select how long you want to keep backed up files – the choices here vary from "Until space is needed" to "Forever"
Keep in mind, File History will begin backups by default; this means it will back up data from all default folders on your PC – Desktop, Documents, Downloads, etc. Nevertheless, you can exclude any folder you don't want to back up from the list. To do so:
- Scroll down the "Backup options" window -> review the list of default folders set for backup -> select any folder (or folders) you wish to exclude from the backup -> click "Remove" to exclude them
- If you can't find the folder you wish to exclude from backups, click on the "Add a folder" button under "Exclude these folders" -> select the folders you want to exclude via File Explorer
- Once you're done with the setup, click on the "Back up now" button at the top of the screen; Windows will start backing up the files and folders in your backups list.
- After a completed backup, Windows will display the total size, date, and time of the backup
If you want to switch the backup destination, you'd need to stop using your current storage drive. To do so:
- Go to Settings -> Update & Security -> Backup -> click “More options”
- Scroll down to the bottom -> click "Stop using drive"
- Now go to the previous screen -> click "Add a drive" to restart the backup process with a new storage destination
If you ever decide to stop using File History for backups, you can turn off the switch for "Automatically back up my files" located on the "Backup settings" screen.
Backup in Windows 11
In Windows 11, File History is located in the Control Panel instead of the Settings screen. To locate it, click on the Search icon on the taskbar ad search for "File History", then select the result for the search.
- Once you locate File History, you'll see that the feature searches for any compatible storage drives available to your PC and picks one by default; if you don't want to use the default choice, you can select a new drive via the "Select drive" link, find the specific drive, and click "OK"
- As with Windows 10, if you wish to exclude any folders from the default backup set, click "Exclude folders"; in Windows 11, however, you won't see a pre-built list of folders waiting to be excluded; instead, you can manually add folders to the exclusion list; to do so, click "Add" and proceed to select any folder you don't want to include in the backup; when you're done, hit "Save changes"
- Afterward, go for the "Advanced settings" option from the File History screen -> click on the drop-down menu for "Save copies of files" to set the backup frequency; again, the options vary from "every 10 minutes" to "daily"
- Click on the "Keep saved versions" menu to determine backup retention timeframes; the options here vary from "Until space is needed" to "Forever", just like in Windows 10 -> when done, click "Save changes"
- From the "File History" screen, select the "Turn on" button to initiate the first backup
If you want to switch the backup destination, follow the steps below.
- Click on the "Select drive" link -> choose a new drive to store backups -> click "OK"
- Windows will ask if you wish to move all previous backups to the new location; if you want to do exactly that, click "Yes" to initiate the move
If you want to stop using File History for backups, return to the feature's page and click on the "Turn off" button.
Restore files in Windows 10 & Windows 11
Now that you know how to use File History for backups, it's time to learn how to restore backups when needed.
If a file or a folder gets accidentally perma-deleted or corrupted via malware, you can use File History to restore backed-up copies of the compromised files.
For Windows 10, go for the steps below to restore a file or a folder.
- Go for Settings -> Update & Security -> Backup -> click on the “More options” link
- Scroll down on the "File History" window until your reach the bottom -> click "Restore files from a current backup"
- Windows will now display all folders available for recovery from File History backups -> double-click on files or folders, view them, and proceed to restore them if they are the ones you need to restore; you can initiate recovery via the green button at the bottom of the window (placed in the middle of the screen)
- If the original file or folder is completely gone, Windows will automatically restore the backed-up copy to its previous location; if the file still exists in the original location, Windows will ask you if you wish to replace it, keep the original file as it is, or compare both items before choosing an option
In Windows 11, you can restore files or folders via the following steps:
- Go to the "File History" screen in the Control Panel -> click on the "Restore personal files" link
- You'll see a list of backed-up folders -> select the folder containing the file you need to recover
- Then, locate the file you wish to restore and click on it -> click the "Restore" button
- Again, if the original file is still in its original location, Windows will prompt you to choose one of three options – replace the file, skip the file, or compare both files before choosing an option; if the original file is gone from the primary location, Windows will restore the copy to its previous location
Backup via cloud storage
Lastly, we have a backup option non-reliant on physical components on your part.
Even if attached network storage is basically a personal Cloud server, it still depends on you for setup and maintenance. It also takes place physically in your home or office.
On the other hand, numerous third-party cloud services are available to store your backups.
You can choose a free option – Dropbox, Google Drive, OneDrive, iCloud, etc.
You can also opt for a paid cloud backup and recovery solution. Such services typically come with increased cybersecurity features and enhanced backup automation options.
The biggest pros of cloud storage are automated backups and free space customizable options. Also, cloud storage is "device agnostic" – it doesn't care where the backups are coming from, as long as you maintain a steady internet connection and the proper settings in place.
However, the last pro can also be con – you need an internet connection to initiate cloud backup and restores. As for using free cloud services, the companies offering them aren't obligated to keep the platforms forever to be used by anyone. In addition, free cloud storage providers commonly lack enhanced cybersecurity tools, so data breaches can occur unexpectedly. If such a scenario occurs, they can't be held accountable for the loss or corruption of your data.
With dedicated cloud solutions, users can expect high-tier cybersecurity features and added backup options to customize to their preferences. In addition, robust solutions come with a user-friendly interface, so even a non-tech-savvy user can set them up effortlessly.
Moreover, if you're a business owner, cloud backup solutions may be the only choice, depending on the data volumes you need to store securely. If you operate larger amounts of data compared to the casual user, USBs and external HDDs won't get the job done as efficiently.
Is Windows Backup and Restore good enough?
The File History feature in Windows is the primary backup tool for the OS. We've already discussed how to use it for backups and recovery, but let's explore how good it actually is.
The feature enables intuitive partial backups and is relatively easy to use if you want to save local copies of files and folders created in Windows. If you don't need to place many files in storage, File History may be all you need to keep reliable backups in place. However, here, we want to discuss the other Windows option available, and that is the Backup and Restore.
Backup and Restore serves a similar purpose to File History but also has several crucial limitations.
Let's go over them one by one.
Limited backup customization
Backup and Restore offers just two backup options – "Let Me Choose" and "Let Windows Choose". We've discussed those in the backup manual above.
Now, if you let Windows do its default thing, it will go for just that – backup all default folders unless you interrupt it. However, if you do interfere, Windows won't allow backups of the following items:
- Files in the recycle bin
- Files stored on FAT-formatted hard drives
- Temp files on small drives (below 1GB)
- Disks and partitions lacking a drive letter
- Files in Windows System folders
Doesn't allow single-file restores
We've mentioned that File History allows for individual file recovery. On the other hand, Backup and Restore does not.
So, if you want to restore a specific file from backup, you'd need to restore the whole set just to get that one file back on your primary system.
Limited number of stored system images
Backup and Restore lets users create a system image during backup. However convenient, you can only store a single backup at a time on a designated drive. Therefore, if you want to keep multiple system image backups available, you'd have to use various backup storage drives.
Moreover, system images created by Backup and Restore only hold drives with files required for the OS to run.
Doesn't support cloud backups
As with File History, Backup and Restore likes its backups old-school. Even if you can initiate countless backups to local storage devices, neither feature supports cloud backups. Or any form of online backups, for that matter.
If you want to store Windows backups online, you'd need to initiate the transfer manually using a third-party application or an online service.
All in all, Backup and Restore can serve a purpose for casual users but lacks a lot of the critical features used to define a dedicated backup solution.
Benefits of backup and restore (not to be confused with the benefits of Windows' native Backup and Restore)
Both individual users and businesses can agree that data loss is nasty. Even if it's accidental and not a result of a cyberattack, the consequences are plenty. This is why taking proactive measures to ensure your data's entirety is critical.
To give you a more detailed view of how backup and recovery benefit your data protection habits, let's explore the primary advantages of the approach.
Enhanced data security
Data protection practices strive to evolve to match the rising cyber threats to computers and networks. And while massive hacking attempts typically target big companies, individual users can also fall victim to malicious actors.
For example, phishing is often used in social engineering campaigns and can strike tens of thousands of emails at once. As long as you use any email service platform, chances are you have received at least one phishing email at some point in time.
If you are aware of the threat such emails pose, you'd probably avoid and report them. If you aren't, however, you can quickly download ransomware onto your device and put your data at risk.
Data backups offer a phishing-proof defense against such scams. Even if cybercriminals get ahold of your data and hold it captive, you can restore all of it via secure backup to another device.
However scary ransomware can seem, data loss can also occur due to human error. If you accidentally delete a file, a document, or a folder and empty the Recycle Bin by habit, your file will be forever lost unless you have it copied in a backup.
So far, we've stated a couple of indirect security implementations for backup. After all, the backup itself doesn't stop cyberattacks but helps you recover after them. Nonetheless, modern backup and restore solutions offer antimalware and antivirus tools to keep lurking third parties at bay.
So, in addition to safely storing your files, you can count on top-tier defense against any form of known cyberattack.
Quick file access
Regardless of the reason, if a file goes missing or gets corrupted, you can swiftly restore it from a reliable backup.
If you use a dedicated backup solution, you'd be able to retrieve any specific file to a healthy state in a matter of seconds. Additionally, if you opt for cloud backup storage, you can retain the recovery speed and be able to restore files from any location, anytime. (as long as you have a stable internet connection)
Protection against natural disasters, power outages, and hardware failure
Sometimes, hacking attacks aren't the ones that deem your files inaccessible.
Power outages can occur at varying frequency at any point globally. Whether an overwhelming storm or a random blackout, an outage can render your PC's hard drive unusable.
In addition, hard drives can wear out with time, even if you take good care of them. If an HDD reaches its final step, it can scramble your data unreadable.
In both cases, having a backup on a separate media carrier negates the chance of losing your data.
As for natural disasters, local backup may not be enough to salvage your data during a flood or a fire. However, cloud backup allows users to keep their backups away from their physical location. This way, even if your local storage is somehow compromised, you can still recover all critical data from the cloud.
Reliable data replication
Most dedicated backup solutions offer a data replication feature. The option can create real-time replicas of specific data on your network and store them in a secure backup.
In essence, replication allows users to "rewind" their progress and proceed from the last replicated point in case of a disaster or malfunction. For businesses, replication is great due to being potentially the quickest way to recover your data, and as such, it doesn't cause any backlogs in your business processes.
Better data management
While data management mainly concerns companies, some individual users can also relate to the challenging search for specific files.
Often, it's easy to get used to automated backups; you have done your job with the setup, and the software takes care of the rest. However, if you don't audit your backups, you may find yourself in chaos after a year or two.
To counter messy storage, robust backup and restore solutions offer users an automatic backup and recovery strategy. Users and businesses can benefit from the automatically generated restore milestones and adequately recover data during a crisis.
Cost-efficiency
Speaking strictly of monetary costs, this point concerns businesses primarily. In a data breach event, most companies without a backup and recovery plan would need to use external assistance to build their data back up.
In addition to extended recovery costs, losing access to critical business data relates to downtime and reduced revenue. Moreover, granting system access to a third party often means your teams' productivity will drop.
As for individual users, stolen personal or financial information due to a hacking attack may evoke extra costs. In addition, losing cherished images and videos can't be described in monetary cost, but it sure isn't pleasant.
To sum up, a robust backup and recovery solution ensures businesses can get back on the horse as soon as possible; at the same time, it can assist users in protecting all personal and sensitive data.
Ensured business operations flow
Again, this point is focused more on businesses rather than individual users.
Initiating manual backups of a company's data is a tiresome and time-consuming process. Typically, company servers have trouble handling large amounts of data as manual backups consume significant storage space and bandwidth.
Moreover, having employees sort out backups means they won't be doing their daily jobs, relating to poorer performance. A dedicated backup solution enables an unhindered performance while calmly backing up data without bringing attention to itself.
Compliance standards maintenance
Securely storing company data is often necessary under various data privacy regulations, especially if the organization handles user data. If a company fails to present data records in front of a regulatory institution, it may suffer fines or criminal offenses.
Backing up company SQL servers in data centers is also often required to comply fully with legal audits. While just thinking of comprehensive backups is worrisome, a robust backup solution can do all the work for you. In addition, it can keep data center backups daily, weekly, monthly, and yearly to satisfy audits.
What is the main difference between a backup and a restore?
Backup and recovery can be viewed as transferring data from one location (physical or cloud) to another. They serve to secure your data and ensure you'd have an operational copy of it whenever you need it.
The main difference between the two is the arrow of movement concerning the data.
Backup relates to the process of saving and securely storing critical data from your primary devices to external storage so you’d be able to access it at a later time.
Restore, on the other hand, is the process of retrieving and restoring backed-up data to your primary devices to avoid downtime or simply to replace corrupted or lost data within your home network.
The combination of reliable backup and restore options ensures optimal business flow for companies and breezy day-to-day processes for individual users.
Why Having a Backup and Restore Plan is Important For Any Business
A wise man once said, “There are two kinds of computers — those that have failed and those that will.”
Everyone experiences problems with their computer (especially hard drives). According to a Backblaze study, more than five percent of hard drives fail every year, and one in five hard drives will not survive more than four years.
This is just for hardware issues. There are also software failures – virus attacks, ransomware, botched updates and reconfigurations. A virus can leave a backdoor into your system so that ransomware can encrypt your documents.
If any of these events result in lost data and your organization does not have a backup and restore strategy, you risk losing the critical files your work or even your life depends on!
Back Up Before Upgrading Windows
If your organization still uses Windows 8 on PCs, or Windows Server 2008/2012 on servers, you will be upgrading to the latest version at some point. An operating system upgrade is invasive and the only way to ensure you can restore your data is to create a complete backup.
How To Back Up Windows with Acronis Cyber Protect (formerly Acronis Cyber Backup)
Accessing the Console
- If you have installed the Acronis Cyber Protect (formerly Acronis Cyber Backup) Console in your environment on-premises, open the Acronis Cyber Protect (formerly Acronis Cyber Backup) web console on the system where you have it installed, or use the URL on any browser on any other system: https://[console machine name or IP address]:9877
- On the console machine, enter “Administrator” and the password if requested, or use the credentials of any other user who is the member of Acronis Centralized Admins.
- If you use Acronis Cyber Protect (formerly Acronis Cyber Backup) console in the Acronis Cloud, simply open https://backup.acronis.com/ and provide your Acronis Account email and password to log in.
Adding your System
- Click All machines > Add.
- Click Windows.
- Specify the name or IP address of the machine or browse your network.
- Enter the credentials of an account with administrative privileges on that machine.
- Click ADD.
Now you will see your machine in the list of all machines.
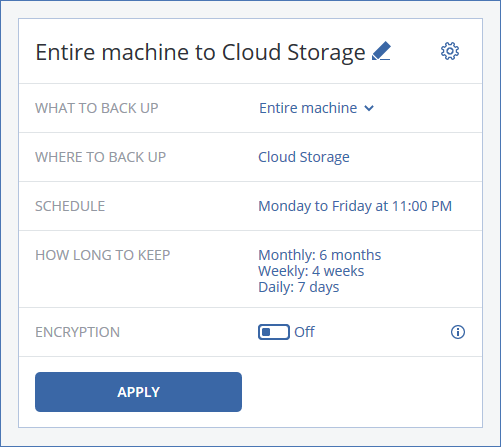
Schedule your Backup
- Select the desired machine in the list and click Backup.
- Modify the backup plan name to make it easier to understand logs and notifications in the future.

- By default, the entire machine (all disks) will be backed up. Click the arrow, and select what you want to back up: Disks/volumes – Backup of everything on selected disks or partitions. This option allows you to exclude USBs and HDDs, or the temporary locations you don’t want to back up. Alternatively, you could use this option to create different backup schedules for different drives. Files/folders – Backup of selected files and/or folders. This option is best to create a copy of your data. Note that this form of backup will not let you restore your OS or applications, so you could use this as a secondary backup – in addition to entire machine. System state – Backup of your Windows settings. This can help to restore the Windows configuration without overwriting your applications and data.
- Select a destination. Acronis Cyber Protect (formerly Acronis Cyber Backup) supports a multitude of storage options:
- Local Folders – Great for quick backup and recovery of the machine, as it does not require the backup to travel over the network or internet. However, this storage destination won’t protect you from HDD failure (if you store to the same drive), or from major disasters, such as fires or floods. This storage option is also 1:1, — that is, you need to manage each machine separately. It is great for single machines, but is more complicated to manage in a larger environment.

- Network folder – Lets you store backups in File Servers or NAS. You can back up your entire environment, and you can restore quickly over your local network. It also protects from local disk failures, but is not a good option for recovery in the event of a major disaster.

- Cloud Storage – Reliable backup to secure Acronis Data Centers all around the globe. By storing backups off-site, you ensure protection from any major disaster, and can restore your data and your business in nearly any situation. Note, that cloud storage performance depends on your internet connectivity and bandwidth utilization.
- Define a desired schedule. Acronis Cyber Protect (formerly Acronis Cyber Backup) has a broad selection of easy-to-configure scheduling options: The default backup schedule is daily Monday through Friday. You can drag a slider to change it to: Monthly – on select days (e.g., the 1st of the month) or a weekday of the month (e.g. the last Friday of the month) Weekly – on select weekdays Daily – every day or Monday-to-Friday Hourly – every so many hours (or even minutes) within a defined period If you are backing up to local or network folders, you can also define the backup scheme — the rules of combining full, incremental, and differential backups in your backup collection, called chain. Here is quick overview: Full Backup – Contains every piece of data you back up. These backups are the most reliable and independent, yet they are quite sizeable. The first backup ever created for the data is always a full backup. Incremental Backup – Contains only the difference from the last backup you created. Incremental backups are the fastest to create but require the entire chain to be present to be restored. Differential Backup – Contains the difference from the full backup you created. This backup is a bit larger than an incremental backup, but only requires the full backup for recovery. Choose one of the available schemes:

- Always incremental (single-file) – This innovative and unique backup storage technology that allows all incremental backups to be stored within the same backup file. You can store as many incremental revisions as you want and there is no consolidation to worry about!

- Always full – Very reliable complete copy every time, requiring the most storage capacity of all other schemes.

- Weekly full, daily incremental – traditional backup scheme, a favorite for many IT professionals. Can be easily substituted with Always Incremental.

- Custom – The most flexible to fit any requirement. You can set up multiple schedules for full, incremental, and differential backups.
- Define the Retention scheme. You would like to keep all backups, but your storage is limited. Acronis Cyber Protect (formerly Acronis Cyber Backup) deletes old backups using very intelligent cleanup schemes:

- (Default) By backup age – The clean-up scheme in the example above keeps your monthly backups for six months, weekly for four weeks, and daily for seven days. This form of “shredding” allows you to go back in time and have date granularity for the last week, keeping a maximum of 17 backup revisions on your storage. You can switch it to a single rule, defining a single cut-off date.

- By number of backups – This will retain a fixed number of backups regardless of your schedule. This is best if you have limited storage capacity.
- Keep backups indefinitely – just in case your storage is nearly unlimited, you can turn off the cleanup altogether.
- If you want to copy your backups to another location, enable Replication. It is advisable to use the 3-2-1 backup rule — store data in three locations, on two types of media, one being off-site. With Acronis Cyber Protect (formerly Acronis Cyber Backup), you can back up to your local drive or NAS and then replicate the copy of the backup to the Acronis Cloud.
- For additional security, enable Encryption. All your backups, including metadata, are encrypted with strong AES-256, AES-192 or AES-128 encryption with the password you define. Nobody (including yourself) can restore your backups if the correct password is not provided.
- If needed, set up additional backup options, described in the Acronis Cyber Backup Online Help.
- Click Apply. Your backup has been scheduled.
How To Restore your Windows with Acronis Cyber Backup
Once your backup runs, you will see it in list of Backups in the Acronis Cyber Backup console. To see recovery and restore options, either:
- Select a storage location, then the backup and you will see recovery options.
- You can select a machine in the list of devices, and click Recovery.
Recovering the Entire Machine
- If your target machine is operational, select Entire Machine, select all necessary options, and click Start Recovery.
- If your target machine is empty — bare metal — boot it with Acronis Bootable Media and proceed with the recovery.
- You can also restore to a new virtual machine (VM), or overwrite the existing VM.
You can find more details on full system recovery in the Acronis Cyber Backup Online Help.
Recovering Files and Folders
- Click Recovery and select Files/Folders.
- Browse and select the drive, folder, and/or file you want to recover.
- Click Recover to restore the file to the original machine or Download to download a file via your browser.
You can find more details on file and folder recovery in the Acronis Cyber Backup Online Help.
Running the Machine as a VM
If you have a virtual environment running VMware vSphere or Microsoft Hyper- V, you can use Acronis Instant Restore to run a copy of your backup as a virtual machine directly from the backup storage without any data movement! This process is extremely fast — your system can start in 15 seconds or less. Simply click Run as VM in the recovery view, provide options, and click Run Now.
You can run backups of your physical systems and virtual machines that are running Windows or Linux.
You can find more details on Acronis Instant Restore in the Acronis Cyber Backup Online Help.
Try Acronis Cyber Protect (formerly Acronis Cyber Backup)
Acronis Cyber Protect formerly Acronis Cyber Backup offers you complete, flexible, yet easy-to-use options to back up any of your Windows machines and restore the entire systems to the same or dissimilar hardware, restore files and folders, and run backups as VMs.
Acronis Cyber Protect (formerly Acronis Cyber Backup)
Whether you run a small-business or an international enterprise, with Acronis Cyber Protect (formerly Acronis Cyber Backup), you can protect all your Windows systems, whether they reside on-premises, in remote locations, or in private and public clouds.
Try Now!
About Acronis
Acronis is a Swiss company, founded in Singapore. Celebrating two decades of innovation, Acronis has more than 2,000 employees in 45 locations. Acronis Cyber Protect solution is available in 26 languages in over 150 countries and is used by 18,000 service providers to protect over 750,000 businesses.