A How To on using Windows chkdsk utility to address storage disk corruption. The Windows DISKPART utility is also discussed here in part.
Imaging you’ve just purchased Acronis True Image. You set out to create a backup image of your Windows Operating System disk. You set up the backup task and run it ... and then, trouble!
- After the task completes you discover that the size of the backup is bigger than the total amount of data on the disk. (Possible disk corruption causing Sector by Sector backup to be created)
- Your task fails to run, possibly just stopping completely or displaying an error message stating that the backup cannot complete due to corruption.
- You find that your system disk is not selectable or displays a red X next to it.
What is the cause of such behavior? These symptoms are typical when corruption exists on the selected Backup Source disk, either in the filesystem itself, or what is known as a “bad sector” (physical damage) on the disk. The same holds true for Source and Target disks during Recovery operations. How do you fix such corruption?
Windows provides a utility tool known as chkdsk that can correct most errors on a storage disk. The chkdsk utility must be run from an administrator command prompt to perform its work. In this How To article, we will learn what chkdsk does and how to use it to overcome the issues above, as well as others not listed in the intro here.
So what does chkdsk do exactly? Good question. The primary function of chkdsk is to scan the filesystem on a disk (NTFS, FAT32) and check the integrity of the filesystem including filesystem metadata, and fix any logical filesystem errors it finds. These errors might include corrupt entries in a volume’s master file table (MFT), bad security descriptors associated with files, or misaligned time stamp or file size information about individual files.
Chkdsk can also scan for bad sectors. Bad sectors come in two forms: soft bad sectors, that occur when data is written badly, and hard bad sectors that occur because of physical damage to the disk. Chkdsk attempts to fix these problems by repairing soft bad sectors and marking hard bad sectors so they won’t be used again.
How does a hard disk become corrupted? Another good question. Anytime Windows shuts down abnormally or has a system crash, it can cause corruption. Over time, you can expect that you will experience such corruption. Running chkdsk as part of a normal maintenance routine is good practice if you wish to do so.
Enough of the technical stuff, let’s see what we can do with the chkdsk utility.
First, let’s outline the tools various command line switches and their uses.
chkdsk [<Volume>[[<Path>]<FileName>]] [/f] [/v] [/r] [/x] [/i] [/c] [/l[:<Size>]] [/b]
Parameters
As you can see there are a lot of options allowed in the chkdsk tool which can provide some advanced operations.
Primarily for this discussion we will be looking at two of the most useful and commonly used options. They are:
- chkdsk X: /f
- chkdsk X: /r
Note: Where X: is the letter of the drive partition where chkdsk is to be run.
Let’s look at some screenshots for the above commands to become more familiar with them.
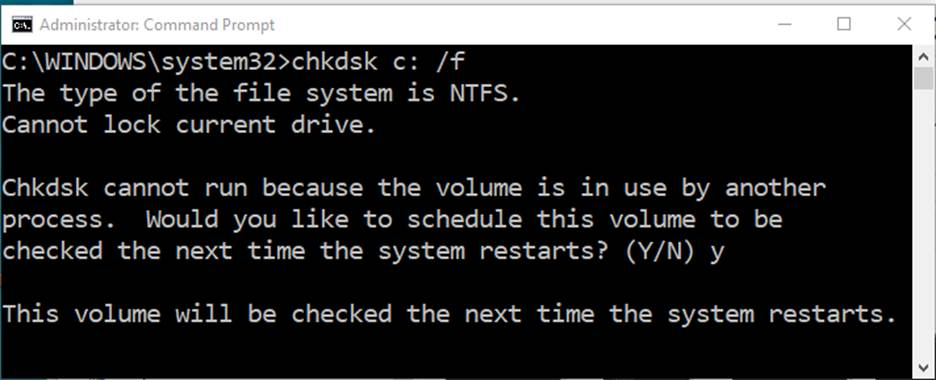
The above screenshot shows the result of chkdsk with /f option used on the C: partition. As you can see the command resulted in not being run because of the disk being used by another process. It offers to run on the next restart if desired, typing y allows for the scan to take place. This is common when running chkdsk while booted to Windows.
Another note here is that the /r option of chkdsk results in this same message as shown below:

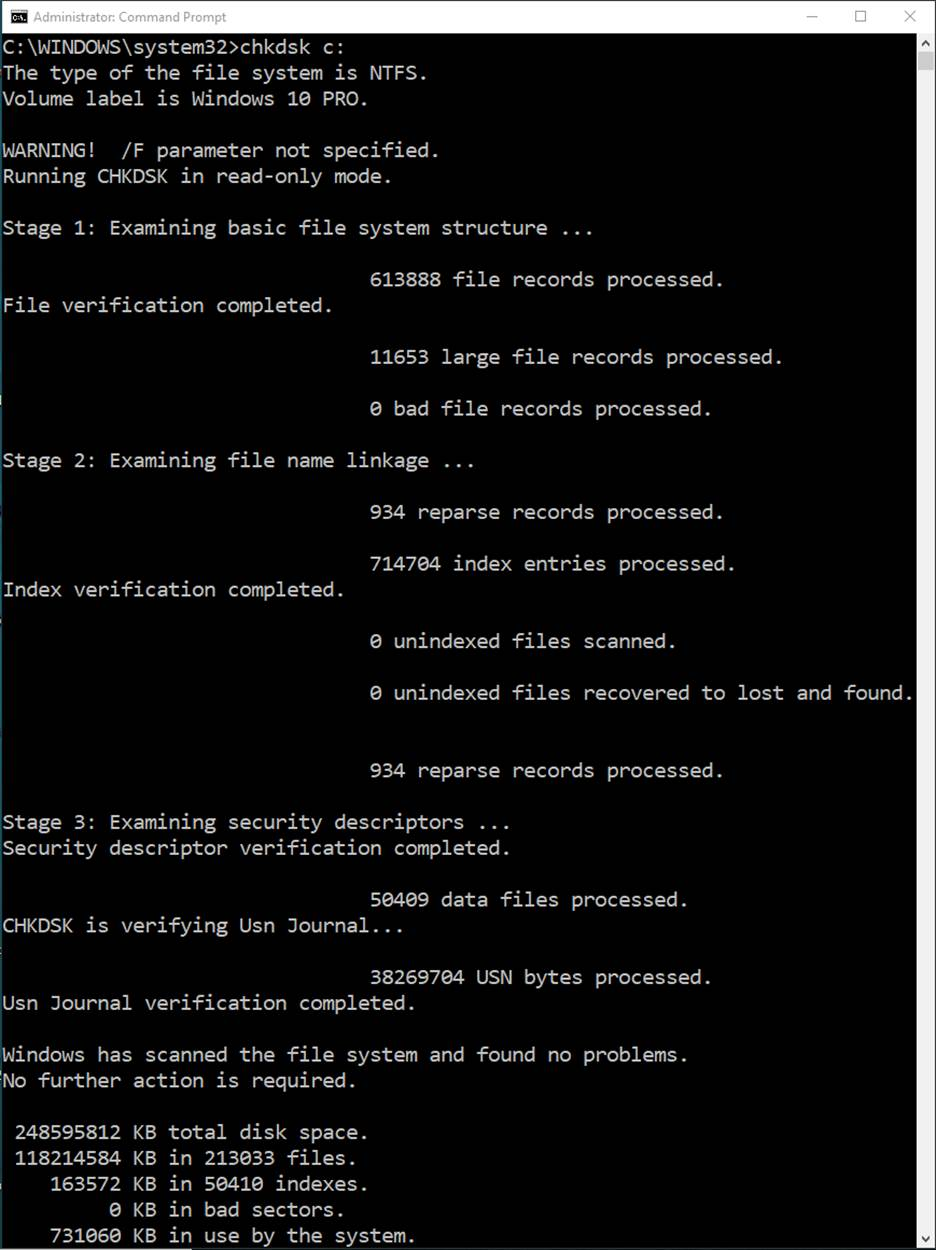
What happens if we run chkdsk on the C: partition without any options? Below is a look at one result.
When chkdsk is run without options, it runs in Read Only mode and reports on the overall health of the filesystem on the specified partition. This is a good scan to run on your disk partitions as a routine maintenance of your disks. If the scan check results in finding an issue with the filesystem, then running or scheduling a run of chkdsk /f will then attempt to fix the found error(s).
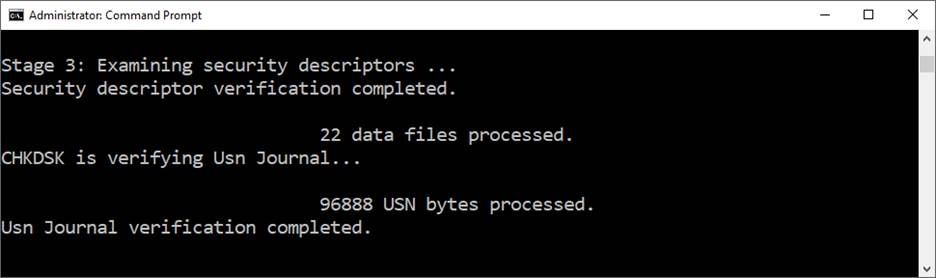
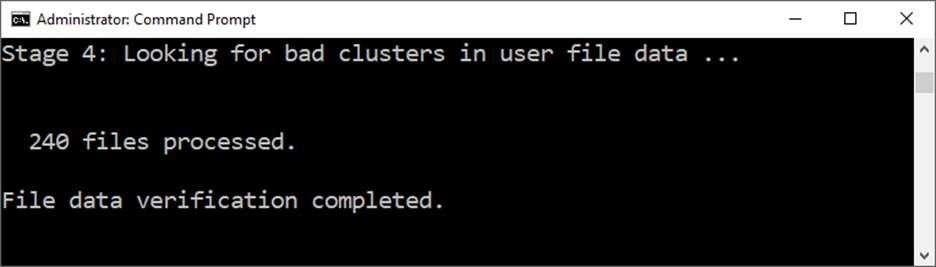
So what difference does using the /r option make in chkdsk? Chkdsk used with the /r option runs a “Stage 4:” scan of the partition and looks for bad clusters in user file data. Once that completes, the utility will display how many files were processed and the status of that scan.
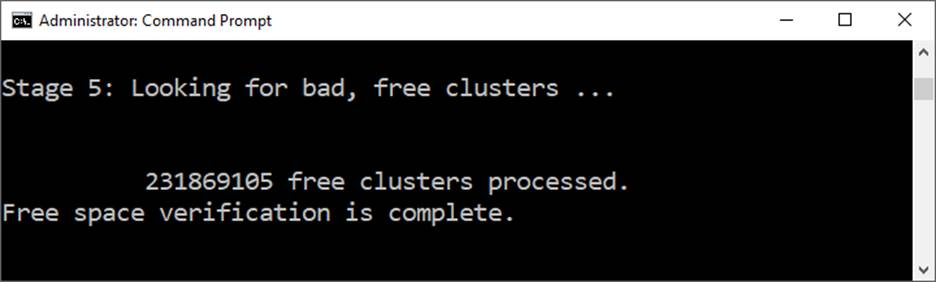
After the Stage 4 scan, the utility then runs a “Stage 5” scan of the partition and looks for bad free clusters on the disk. Once this scan completes, the utility displays how many free clusters were processed and the status of the scan.
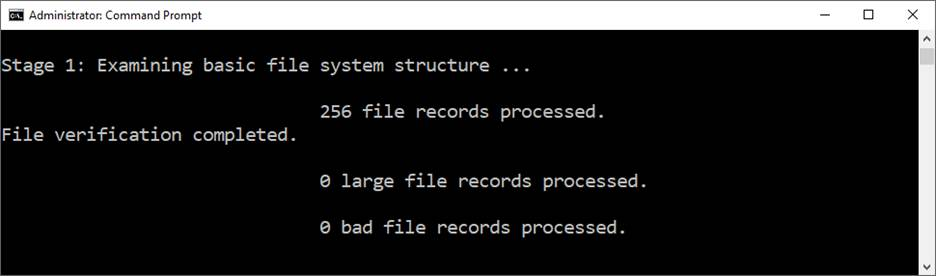
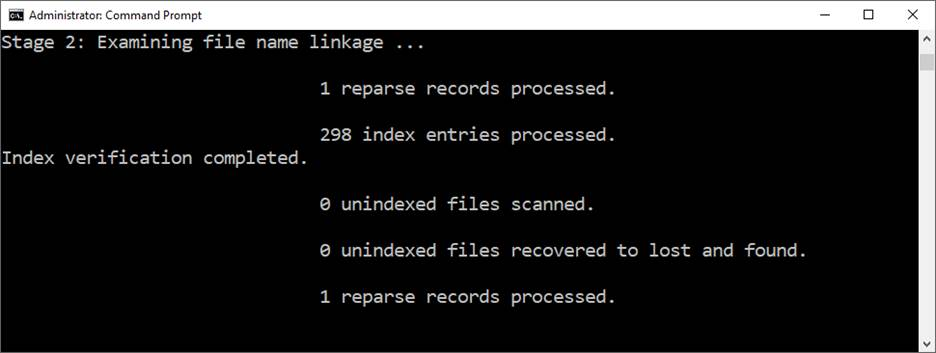
Below are screenshots of each Stage of the chkdsk /r scan once completed.
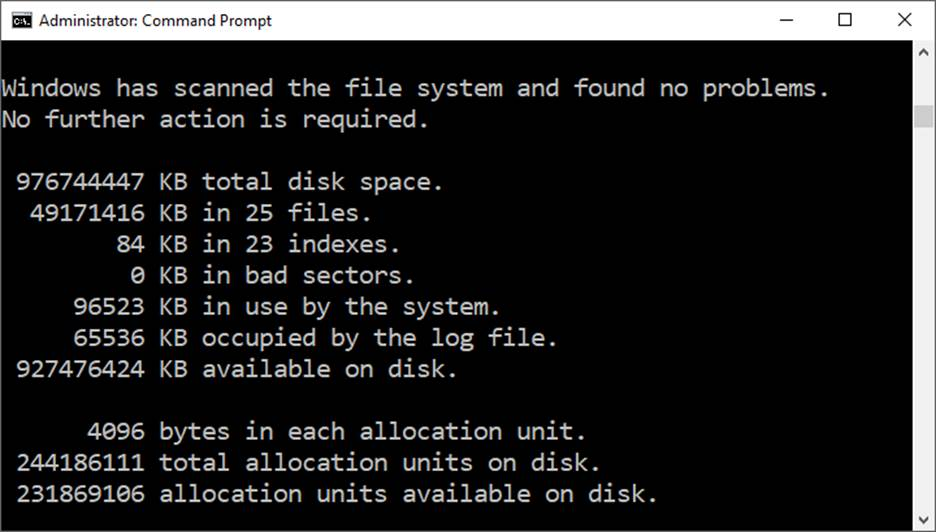
After chkdsk finishes with a scan, the utility displays a summary of what was found and a status of what if any actions were performed. Below is a summary result of a disk scan that found no errors.
Now that we have covered the primary usage of the chkdsk utility, it is time to delve into using the utility on a Windows System OS disk. We have already discovered that chkdsk will not run on a booted Windows System C: partition/volume unless/until a restart of the computer occurs. You may have noticed at this point that chkdsk works on individual partitions on a disk. A Windows System OS disk formatted as a GPT disk, as most modern Windows installs are, may have several partitions on a disk. The fact is that disk corruption may exist on any partition on a disk. Corruption may exist on more than one partition on a single disk as well. Additionally, Windows System disks will have partitions on a disk that are not assigned drive letters which makes using the chkdsk utility on them a more challenging task.
So how do you deal with the issues raised above? Good question! Let’s have a look at how to deal with these issues.
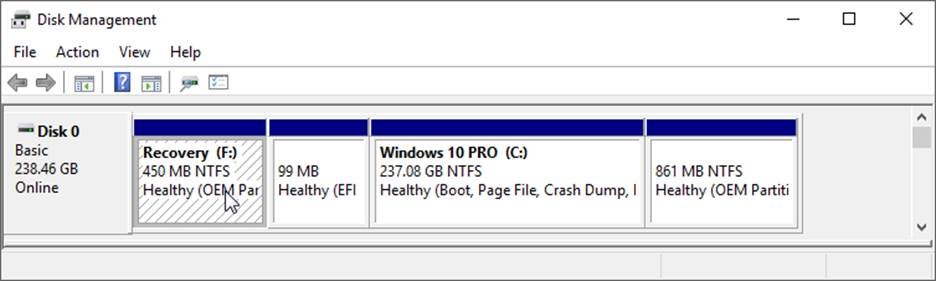
To begin, let’s have a look at a typical Windows 10 install on a GPT formatted disk by using Windows Disk Management.
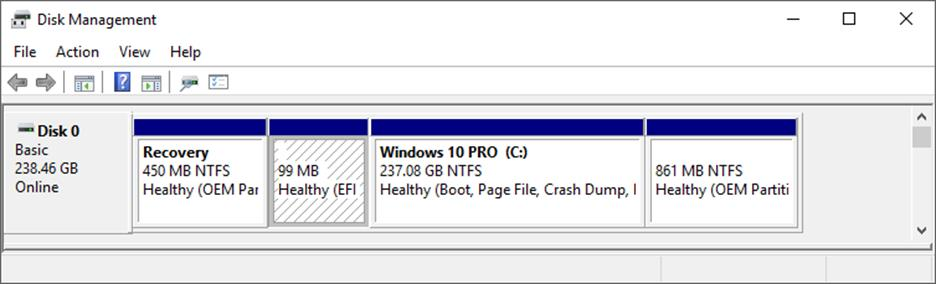
As you can see in the screenshot above, this disk has four partitions. They are a Recovery (450 MB), EFI (99 MB), Windows 10 PRO (237.08 GB), and OEM (861 MB). Take note that only one partition has a drive letter assigned, which is the Windows 10 partition having the letter (C:) assigned as you would expect. The other three partitions have no letter assignment. In order to use the chkdsk utility to look for and fix disk errors the utility must be run on each partition of the disk, one at a time. It is necessary then to temporarily assign drive letters to the partitions not having letter assignments to perform a chkdsk scan on them.
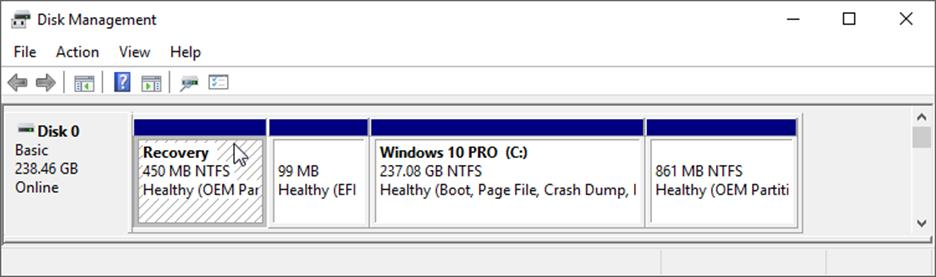
It is possible to use the Windows Disk Management tool to assign a drive letter to these partitions. To do so, place your mouse cursor inside the partition you wish to assign a letter to and left button click there. You will notice that the background of the partition takes on a hashed look as shown below.
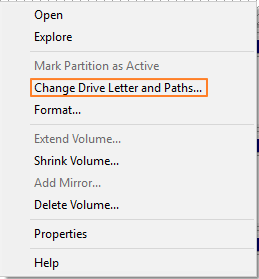
Once the partition is selected, leaving your mouse cursor inside the selected partition, click the right mouse button, a new menu will appear which will allow you assign a letter to the partition. Select Change Drive Letters and Paths as shown below.
Disk Management will automatically select the next in order available letter for this assignment as shown below. Click on OK to assign the letter.
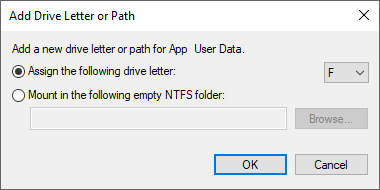
The screenshot here and below shows the partition has been assigned the letter F:, which now enables you to run a chkdsk scan on that partition.
You may find that Disk Management is unable to complete the assignment of a drive letter task. When you select a partition as outlined above and right button mouse click it you may simply see a small box with the word Help displayed. Another issue that occurs is that the option to Change drive letters and Paths is greyed and is therefore non-selectable. There can be a number of reasons for this. One of the most common reasons is that the format of the partition is not NTFS or FAT32. In this case, the only way to resolve the issue is to Delete the Volume and reformat it. This situation is usually the result of the disk itself being previously used in a MAC.
Another issue that may be in play is that the partition has a Read Only attribute set. Removing the Read Only attribute will solve that issue
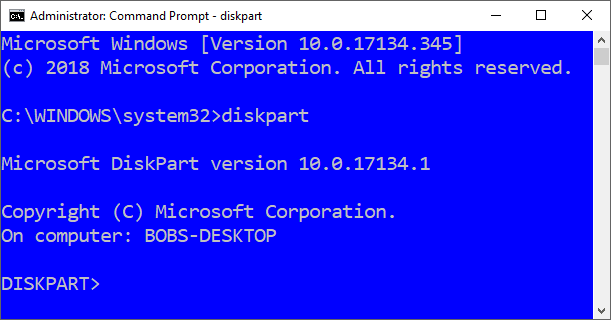
In other circumstances it will be necessary to use another Windows utility to make the letter assignment to the selected partition. The utility we will use to do this is the diskpart utility and must be run from an administrator command prompt. For a How To on command prompt usage click HERE.
Following are the steps necessary to assign drive letters to Windows System disk partitions that do not have assignments using the diskpart utility. For this example, we will be assigning the drive letter X: to the Recovery partition on our example disk.
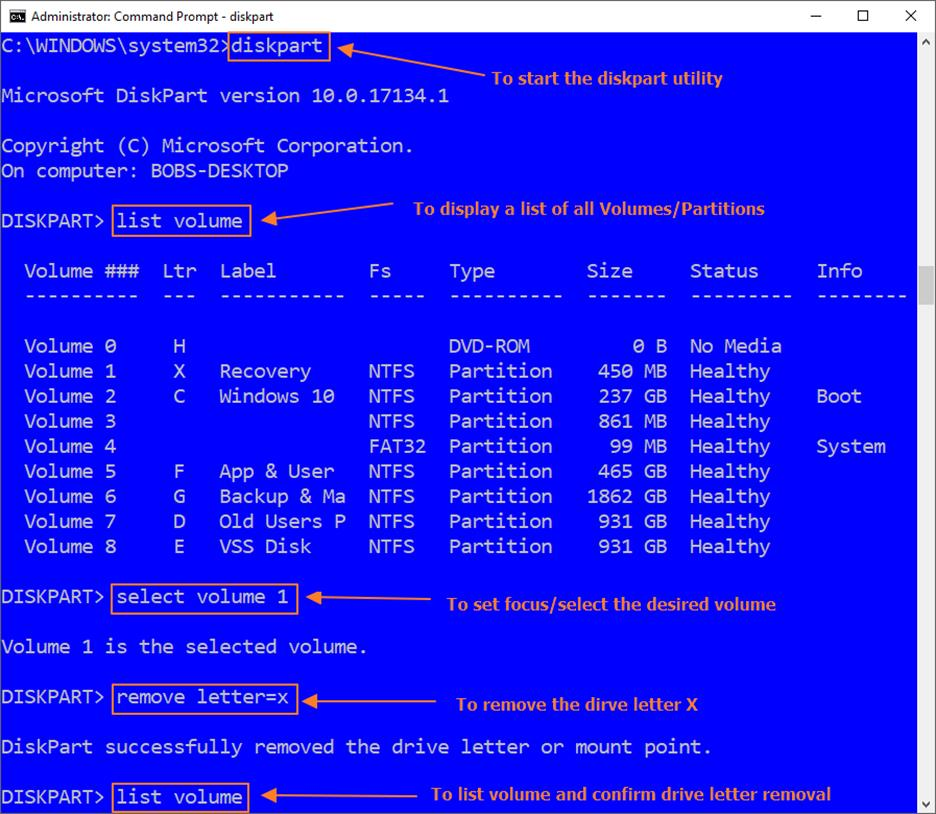
Open the Windows Command Prompt as Administrator and type diskpart to start the utility as shown below.
Notice the command line changes to read DISKPART.
With the utility now running type at the DISKPART prompt list volume as shown below.
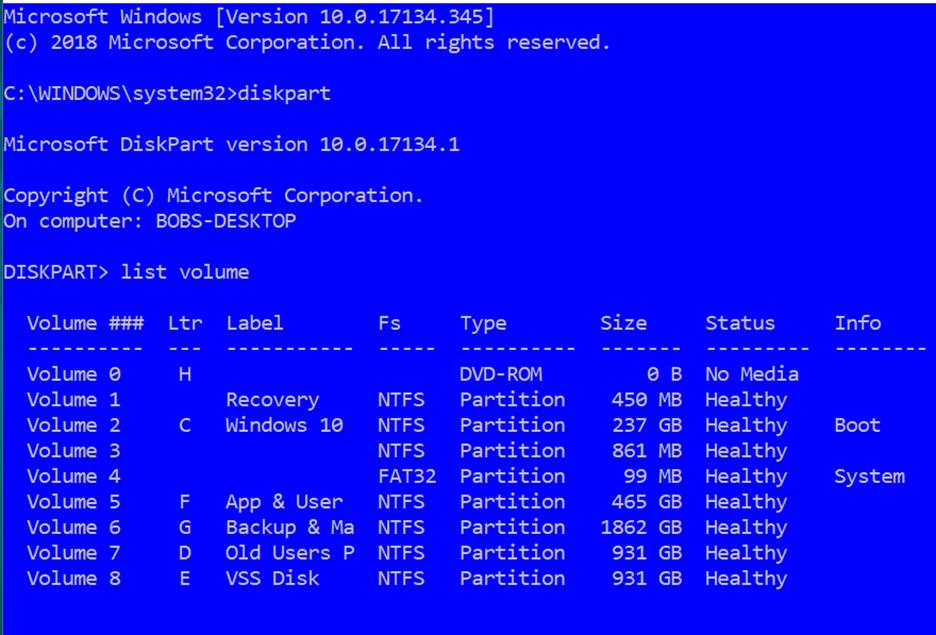
Notice that all volumes installed on the computer are displayed using this command including those on other disks. You should note here that we only need to assign letters to those partitions that do not have existing letter assignments so that chkdsk can be run on them. In the screenshot above these partitions/volumes are Volumes 1, 3, and 4.
In our example here, we are going to assign drive letter X: to Volume 1, the Recovery partition. To do that we first must place focus on Volume 1.
- At the DISKPART command prompt type select volume 1 to place focus on Volume 1.
- At the command prompt type assign letter=X to assign the letter X to the volume/partition.
- At the command prompt type list volume to display the volume list and confirm that letter X has been assigned to the desired volume/partition.
Note: The asterisk to the left of Volume 1 below. This indicates that Volume 1 is the “in focus”/selected object and commands issue will take effect on that object.
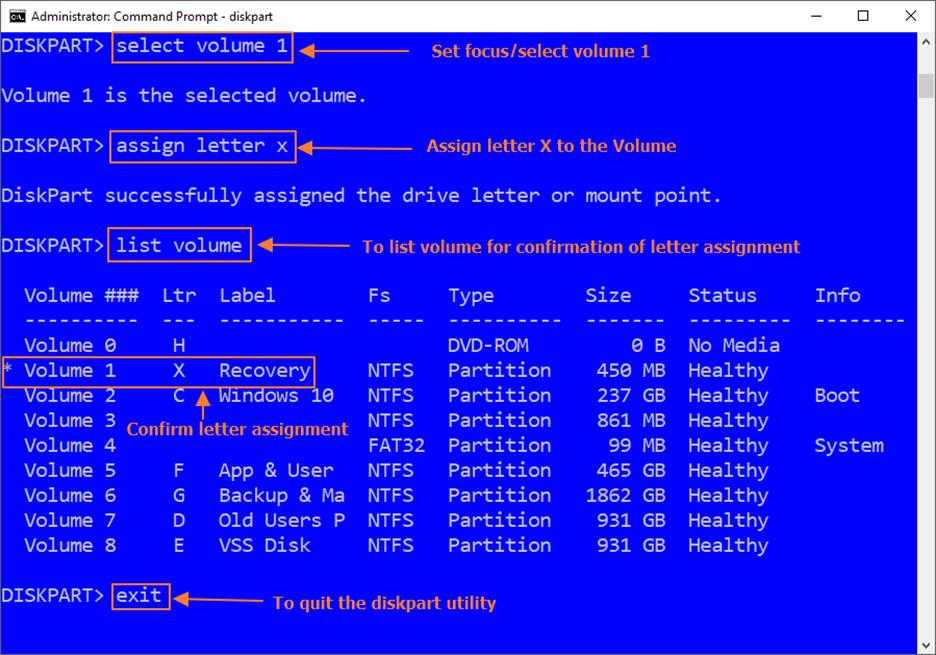
Note that diskpart displays a response confirming that Volume 1 is now the selected or “in focus” object. With Volume 1 now “in focus”, you can perform your task of assigning a letter to it. (NOTE: The = sign in the previous command is not bolded. This is to signify that the = argument is not necessary for the command to work even though you will find this as part of the command in many references).
After you have run the assign letter X command note that diskpart responds with a message stating the desired assignment was completed.
Of particular note: I should point out that when assigning a letter to a GPT formatted EFI partition, using the diskpart list volume command will not work. The reason for this is because the EFI partition is actually a part of the “System” partition. In order to assign a letter to that partition, you must substitute the list volume command for the list partition command instead. Please review the screenshot below for an overview of these substitutions.

Now, to run the chkdsk command, it is necessary to leave the diskpart utility. At the prompt type exit. This will end the utility returning your command prompt to read C:\WINDOWS\system32>. At this prompt you can now run the chkdsk utility scans desired. Have a look at the screenshot below for running the command chkdsk x:/f to illustrate.
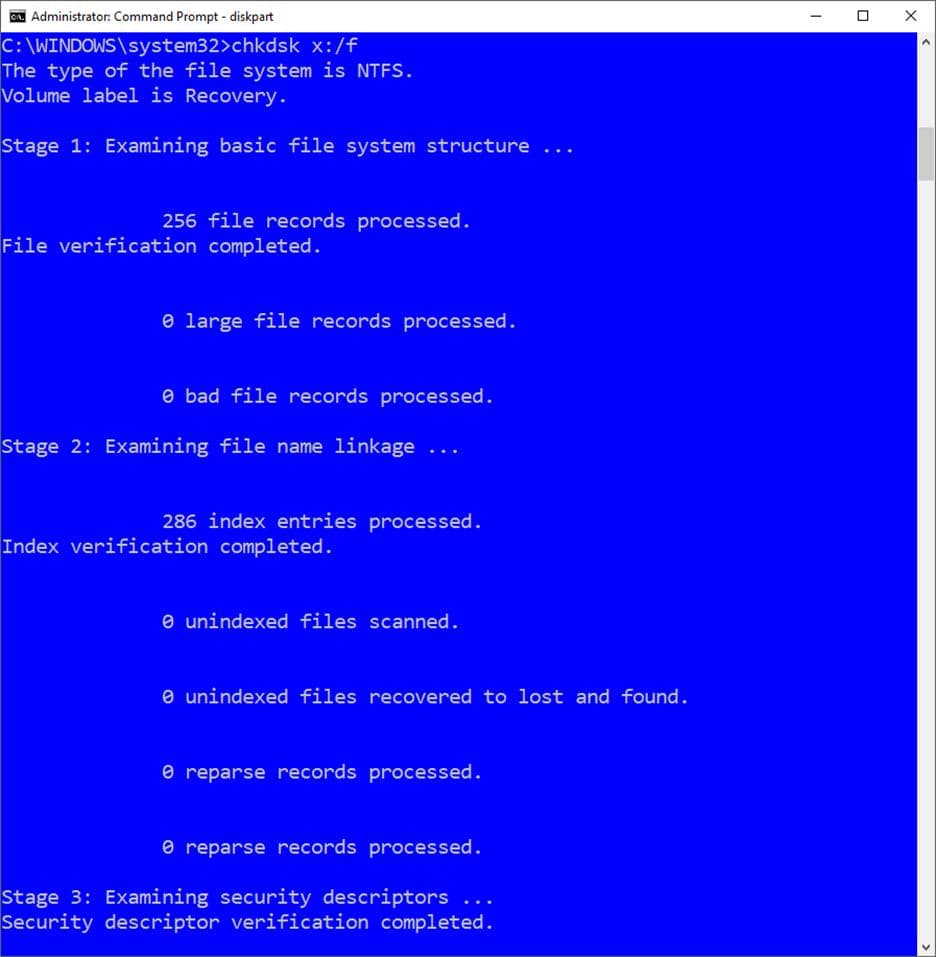
Note that three scan “Stages” of the /f option of the chkdsk command are run.
It is recommended when disk corruption is suspected that you forego use of the /f option of the chkdsk command and instead use the /r option. Using the /r option includes /f in the scan so you will be doing both using the /r option.
Once your chkdsk scan completes you can now use the diskpart utility again to remove the drive letter you assigned to the volume/partition so that all is back to normal. At the Windows command prompt type
- diskpart to start the utility.
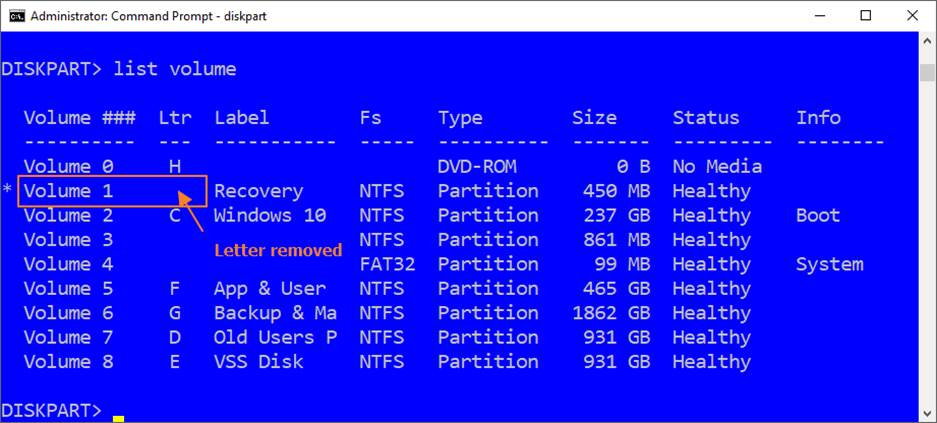
- At the DISKPART prompt type list volume to display all Volumes/Partitions.
- At the prompt type select volume 1 to select the desired partition.
- At the prompt type remove letter x to remove the previously assigned drive letter.
- At the prompt type list volume to display the volume list and confirm letter removal.
The screenshot below illustrates the above command sequences.
Note: Substitute list disk / list partition in the above example for EFI partitions.
The screenshot below shows confirmation of successful drive letter removal.
Note: The asterisk shown to the left of Volume 1 indicates the “in focus”/selected volume/partition.
You can follow these steps to assign drive letters to the other non-lettered partitions on disk so that chkdsk scans can be performed on them. Chances are that you will find errors on one or more of these partitions. Once the chkdsk scans and error corrections are applied you should then be able to backup or restore your disk.
This concludes our How To on Tackling Storage Disk Corruption using Windows’ built-in utility tools chkdsk and diskpart. With this instruction you should be able to deal with disk corruption effectively which in turn will allow backup and recovery of your system.
About Acronis
A Swiss company founded in Singapore in 2003, Acronis has 15 offices worldwide and employees in 60+ countries. Acronis Cyber Platform is available in 26 languages in 150 countries and is used by over 21,000 service providers to protect over 750,000 businesses.