
How can you recover deleted files on Windows 11?
Windows 11 promises both UX and performance improvements that align the operating system (OS) with modern apps and services, while leveraging the compute and memory power of next-generation processors. But no matter how shiny the new OS, users will still need to deal with routine issues such as recovering lost files. There are many reasons why files may be deleted or become unavailable:
- Human error, such as accidental deletion or overwriting of files.
- Software issues, such as an app crashing while data is being processed, a document editor not saving or updating files properly, or backup software not working properly.
- Hardware malfunctions, such as firmware corruption, read / write mechanical failure, or damaged hard drives. The causes of these malfunctions are diverse, from aging equipment to sudden power failures / surges, or mishandling, to name a few.
- Unpredictable natural disasters such as fires, floods and earthquakes that destroy equipment and, by extension, the data stored on it.
- Malware, ransomware and other cybersecurity exploits that can freeze, steal or damage data assets.
- Early versions of a Windows OS can be buggy, and sometimes files can be lost in upgrades to Windows 11.
In this article, we'll look at different methods for recovering lost files in Windows 11.
How to perform immediate recovery of accidentally deleted files in Windows 11?
It happens to us all — we realize in real time that we have accidentally deleted a file. But there's no need to panic. Windows 11 continues to support the basic features that make it easy to recover these lost files as long as we act immediately:
● Recycle Bin: As long as you didn't delete the files using the Shift+Delete shortcut, you should be able to find them in the Recycle Bin. Double click the Recycle Bin on the desktop, select the files to be recovered, and either drag and drop the files to the desired location or right click the file and select "Restore."

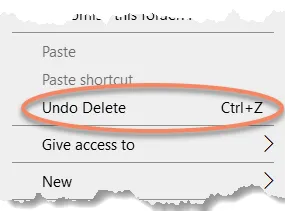
● Undo Delete: With the folder from which you accidentally deleted the file(s) in focus, press CTRL+Z, or right click anywhere in the folder and choose "Undo Delete." Be sure to use this method as soon as you become aware of the accidental deletion — and definitely before you restart the computer.
How to recover deleted files with Windows 11 File Recovery?
Windows File Recovery is a command-line utility for recovering deleted files from local disk drives, USB flash drives, or memory cards. It has two modes: "Regular" for recovering recently deleted files, and "Extensive" for trickier situations such as recovering files deleted a while ago or from disks that have been formatted or corrupted. Windows File Recovery supports two file systems: NTFS and FAT or exFAT.
Windows File Recovery works on Windows 11, but it doesn't come preinstalled. You can download it for free from the Microsoft Store and install it, but there are a number of drawbacks that limit the utility's usability:
- It's command line only and you have to learn its general and advanced syntax to set parameters, switches and filters. To recover a folder, a typical command line would be: winfr source-drive: destination-drive: [/mode] [/switches] Note that in Windows 11, you can run Windows File Recovery on Windows Terminal (press Windows Button +X and select Windows Terminal).
- It won't work if the lost or deleted files have been overwritten by new data. So, it's critical to run Windows File Recovery as soon as possible after discovering that files are missing.
- The Extensive mode can be quite time-consuming.
How to recover files on Windows 11 after an upgrade?
This section focuses specifically on five methods for recovering files after upgrading to Windows 11. These include:
- Dealing with account issues (you were signed in with a temporary profile or the admin account was disabled)
- Troubleshooting Windows Search to find files that were hidden or relocated
- Restoring files from native backup utilities
- Rolling back to the previous Windows version
Method 1: Dealing with a temporary profile
If files are missing after a Windows 11 upgrade, it might be because you have been signed in with a temporary profile (which Windows does automatically when it experiences difficulty logging into your usual profile).
To see if this is the problem, go to the Start menu, select Settings → Accounts and then Sync your settings. If you get the message "You are signed in with a temporary profile …" or the message "We can't sign into your account," then restart the machine and log in again to your usual profile. After the successful login, sync your settings as described above.
Note that once you sign out of the temporary profile, it will no longer be accessible. Therefore, as an extra precaution, before rebooting, you should back up the files in the temporary profile to an external storage device.
Method 2: Enable administrator account
During the course of the Windows 11 upgrade, the local administrator account may be disabled, in which case the files associated with the account will not be available.
- Select Local Users and Groups on the left side of the Computer Management pane.
- Now double-click Users (on the right side of the pane) and then double click Administrator to open the Properties interface.
- Make sure that the option Account is disabled is unchecked.
- Click Apply and OK, then sign in with the admin account. The lost documents should now be available.
Method 3: Troubleshooting Windows 11 Search
If you're having trouble finding files using Windows Search, you may need to initiate a rebuilding of the search index, as follows:
- Use the Search box on the Windows taskbar to locate and open the Indexing Options pane.
- Click the Advanced button.
- In the Troubleshooting sub-pane, click Rebuild to delete the current index and rebuild a new one from scratch.
If some files still seem to be missing, it could be that Windows defined certain file types as hidden during the upgrade. Here's what you can do, as shown in figure 1:
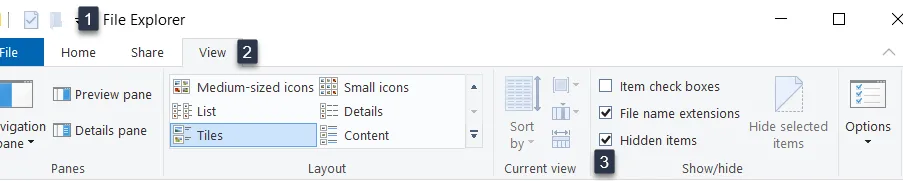
[Figure 1: Showing hidden items]
- Open the File Explorer pane [1] and select the View tab [2].
- In the Show / Hide area, make sure that Hidden items is checked [3].
- Search again for the missing files.
Method 4: Recover files after Windows 11 upgrade with native backup
If all of the methods described above don't uncover the missing files, it is quite possible that you will have to restore them from your native Windows 11 backup. Windows 11 continues to support the two native Windows backup features:
- File History, which automatically maintains incremental backups of files stored in frequently used folders. You can choose the external destination backup drive as well as customize the folders that will be included or excluded. However, please note that only the specified folders will be backed up. For end-to-end file backups, it's best to use a third-party backup software.
- Backup and Restore (Windows 7), which not only backs up data files to a user-designated local or external drive, it also creates a system image.
File History allows you to restore individual files, while Windows Backup and Restore supports only full restores. In either case, access the appropriate interface in the Control Panel and follow the instructions.
Note that if you are using OneDrive to back up and sync files, you can restore the missing files from there.
Method 5: Restoring to a previous version to recover your deleted files
Sometimes you'll have to restore to the previous Windows version, copy the files that were lost during the Windows 11 upgrade, then reinstall the upgrade.
It's worth noting that any files you created or apps you installed after upgrading to Windows 11 will be lost if you roll back to your previous version.
How do I find recently deleted files in Windows 11?
Recently deleted files reside in the Recycle Bin in Windows 11. As long as you haven't perma-deleted them or emptied the Recycle Bin by habit, you can open the Recycle Bin and browse through recently deleted files.
If you want to restore a file, right-click on it and select the "Restore" option. You can also drag and drop the file to the desktop or a folder to restore it.
How can I recover a deleted Word document in Windows 11?
Accidental deletion is a common mishap with Word documents. Even if they try their best, mis-clicks can send them to oblivion. This, of course, can be reverted by the humans responsible for the Word documents.
Aside from Recycle Bin restore and the "Undo Delete" option, you'll find the most efficient methods to recover deleted Word documents below. Let's explore them.
- Via File History
File History persists as a feature in Windows 11. You can use it to restore saved copies of Word documents from the File History backup drive.
File History outweighs Recycle Bin and "Undo Delete", as it can retrieve files that have even been permanently deleted (and are no longer residing in the Recycle Bin).
Here's how to use this approach:
- Open the "Start" menu → type in "Control Panel"
- Execute the "Control Panel" app
- Find "System and Security" → "File History"
- Click on "Restore personal files" (it's on the left sidebar)
- Browse through File History backup copies to find the one containing the deleted Word document → select the document (or documents) → click the green recovery button.
You can also access File History backup copies (as well as restore points) by right-clicking the folders where the original files were located. After right-clicking, select "Show more options → Restore previous versions." Then, browse through the versions and find the one containing the deleted Word document to recover it.
- Via CHKDSK (Command Prompt)
The good old Command Prompt is still here to aid you in recovering deleted files and even repairing corrupted documents.
To use CHKDSK, you can use two approaches — go via the Command Prompt or Properties.
CHKDSK via Command Prompt:
- Press the "Win" + "X" buttons -> select the "Windows Terminal" option
- Type chkdsk volume: /r (Here, replace "volume" with the letter corresponding to your storage device)
- Hit "Enter" on the keyboard and let CHKDSK scan and repair the specific storage device
CHKDSK via Properties:
- Launch "File Explorer"
- Select "This PC" from the locations list on the left sidebar
- Right-click on the storage device you wish to repair → select "Properties"
- Select the "Tools" tab
- Click on the "Check" button
- Via ATTRIB
Windows 11 comes with an extra recovery tool called "ATTRIB". You can use ATTRIB to change specific characteristics of computer files or directories (also called "attributes," hence ATTRIB).
This option doesn't literally recover perma-deleted files but rather "reveals" documents that have become obscured from view. (for example, by malware)
We include it because, sometimes, we may perceive a Word document as deleted when it is merely hidden from view by a user or a malicious program.
Here's how to use ATTRIB:
- Press “Win” + “X” → select the “Windows Terminal” option.
- Type attrib -h -r -s /s /d volume:\*.* (Here, replace “volume” with the letter corresponding to your storage device).
- Press "Enter" on the keyboard.
- Via an older Windows backup
Back in the day, Windows 7 (and Windows Vista) introduced the Backup and Restore feature. Despite its seniority, the option still holds its ground in Windows 11. With it, you can create a complete PC image and recover data from it.
If you somehow delete a Word document and want it back the old-school way, here's how to go about it:
- Launch the "Settings" app
- Find “System” → “Recovery”
- Click on "Restart now"
- Go for “Troubleshoot” → “Advanced options” → “See more recovery options” → “System Image Recovery”
- Choose the system image backup
Remember, you need to have at least one already created Windows Image backup to restore documents from it. As a bonus, the Backup and Restore (Windows 7) enables backups of all critical drives required for Windows to run optimally, so you can use it for more than simply recovering Word documents.
- Via third-party recovery software
Third-party recovery solutions can prove helpful in recovering Word documents in specific conditions.
If the storage drive for the original (deleted) file is not corrupted or compromised, you'd probably be able to restore the file. However, if the drive has suffered physical damage, causing some files to get erased, you may not recover them successfully, even with a robust solution.
- Via the File Recovery Tool
Windows File Recovery is Microsoft's native data recovery app. It’s available for download from the Microsoft Store and runs on Windows 10 (2004) and newer versions, including Windows 11.
You can use it to recover common file formats from local storage.
As Windows File Recovery doesn't have its own graphical interface, you'd need to control it via the Command Prompt.
To do that:
- Press “Win” + “X” → select “Windows Terminal”
- Type in winfr C: E: /regular /n \Users\<username>\Documents\ to restore the Documents folder on drive C to drive E.
You can also pick a different path for the Documents folder, as well as different source and destination drives.
- Via cloud backup from OneDrive
If you have been using Windows for a while, you're probably familiar with its native OneDrive cloud backup solution. The feature enables you to sync files between your computer and cloud storage.
To use it, you'd need to create an account and enable backups to OneDrive.
Once that's done, you can restore data from it as long as you have a stable internet connection. However, the OneDrive cloud's purpose is to mirror the contents of the OneDrive folder on your PC or laptop. It does so by syncing the data from your device with data on the cloud about every 10 minutes.
So, if you delete a file from your computer, with the file stored in the OneDrive folder, you'd have about 10 minutes (at best) to retrieve it from OneDrive before the next sync cycle.
To recover a deleted document from OneDrive:
- Visit https://onedrive.live.com/
- Log in to your account via your Microsoft email address and passcode
- Browse through the backed-up files and select which ones you need to retrieve → click the "Download" button
You can also use the OneDrive app included in Windows 11 to access cloud backup documents from the File History feature. This will also enable automatic backups of your data.
Keep in mind, if you rely on a computer without internet access, it's obsolete to set up OneDrive as it won't be able to back up any data.
- Via backup from a third-party backup solution
Dedicated backup solutions offer what we call "true backup".
Instead of syncing your data (like OneDrive), third-party backup solutions create copies of your files and folders, transfer them to secure cloud (or local) storage, and ensure their protection and availability for immediate recovery.
If you hold backups on a dedicated cloud, you can access them anytime (as long as you maintain a stable internet connection) and recover Word documents even if you have erased the document from your computer.
Moreover, you can back up data to external HDDs or other media carriers to ensure quick access even if you don't have an internet connection. You can encrypt the backups, so only you'd have access to the data on them, even if you lose them or somebody steals them.
A reliable backup is the most effective way to restore deleted Word documents.
If you have a copy of the Word file in storage, losing access to it could only occur if the backup is somehow compromised. Otherwise, you'd be able to recover data from it freely anytime you need.
Naturally, it's up to you to choose a file recovery approach – all of the discussed options can retrieve Word documents under the right circumstances; however, only true backup ensures your data's entirety, integrity, and availability.
What is the File History feature in Windows 11?
As we've mentioned, File History is Windows' in-built data recovery feature. With it, you can take a timeline snapshot of critical files on your computer, place it in storage, and use it to recover stored data when needed.
Below, we will explore how to set up and use the feature. Let's go.
How to set up File History in Windows 11?
First, you need to set up File History so it's enabled and operating correctly. To use File History, you'll also need an external hard drive dedicated to File History storage.
This is where the software will keep snapshots of your files securely. If you don't have external storage connected to your device, you won't be able to use File History.
Here's how to enable the feature in Windows 11:
- Connect the external storage to your computer
- Type"control panel" in the "Start" menu → choose the "Control Panel" app
- Here, change the view to "Large Icons" to find "File History" quicker
- If you still haven't connected an external storage device to your computer, you'll see a message — "No usable drive was found." If you have connected an external drive but still get this message, try reconnecting and refreshing the page (either via the "Refresh" button or the "F5" button)
- Click on the "Turn on" button
- File History is now enabled and will start an automatic backup
Using File History in Windows 11
You have enabled File History to back up data from your computer to external storage. However, there are a few other things you might want to configure.
- Choose folders for File History backups
File History backs up essential folders by default — documents, desktop, pictures and videos. Nonetheless, you can add any folder you wish to backup by File History. To do so, you'd need to add a specific folder to one of the default libraries.
Here's how:
- Right-click the folder you wish to add to File History backups → select "Show more options" to open the old Context menu
- From the menu, choose "Include in library" → select the directory you want to transfer the folders and files to
Any folder or file added to the library will be included in future File History backups.
- Exclude folders from File History backups
On the other hand, you might not want to include a particular folder to File History backup. You can exclude a folder by following the instructions below.
- Open "Start" and search for "file history"
- Click on the "File History" option from the "Best match" label on the top
- In the "File History" window, open the "Excluded folders" link (it's on the list on the left)
- Click the Add" button → choose which folders (or subfolders) to exclude from future File History backups
- After you've selected the excluded folders, click the "Save" button to confirm your choice (it's at the bottom of the screen)
- Manage backup timers
File History automates backups, which is convenient for many users. However, frequent backups may quickly fill up your external storage if you don't audit them. To ease the burden of constantly updating backups to optimize storage space, you can configure File History backups frequency.
To do so:
- Open "Start" and search for "file history"
- Click on the "File History" option from the "Best match" label on the top
- Once in the "File History" menu, click on "Advanced settings" (it's on the list on the right)
- Here, you can set the backup frequency; the options vary from 10 minutes to daily backups; you can also configure the retention span of backups on the external storage drive and delete old File History backup copies to optimize drive space
How to restore files with File History in Windows 11?
File History enables you to store data locally and recover it in cases of accidental deletion or data corruption. Since it's not a syncing feature but creates copies of your files, you can recover the data as it was included in your last File History backup.
That means some recent changes may not be present, but it also counters malware spreading over your entire backup.
To restore files from File History backups:
- Open “Start” → search for “file history” → launch the feature.
- In the "File History" window, click on the "Restore personal files" link (it's on the list on the left).
- The command will open a "File History" window with all of your available backups; you can scroll through files and folders via the controls at the bottom (given you have your storage drive connected to your computer).
- To restore a file or a folder, select them and click the "Restore" button (it's at the bottom of the screen).
- Once you restore a file or a folder, they're moved back to their original location on your PC or laptop, so you'd be able to access them normally.
Do I need File History turned on?
In the strictly etymological sense of the question, you don't necessarily need File History to always be turned on to operate your computer appropriately. File History is an optional feature for Windows users. It's not a critical operating system process, so you are free not to use it.
However, File History enables users to back up their files frequently and, thus, keep secure storage of their vital data outside of their primary machine (on an external storage drive).
If you want to safeguard your files against human error (accidental deletion), power surges, and cyberattacks, it's convenient to have File History turned on. It will automatically make copies of the default folders on your PC and keep them securely in storage. This way, if you delete or lose data, you'd be able to recover it from the backups.
Now, even if you've enabled File History, you don't need to keep it turned on at all times.
While having the feature running constantly, you won't need to bother with manual backups. Nonetheless, you can go for manual backups if you want to optimize storage space and don't mind doing it.
Manual File History backups
Automatic backups are the most convenient, but they can also burden your external HDD if you make frequent changes to File History default folders on your PC. If you choose to run manual backups, you won't need File History turned on at all times. In addition, you won't have your storage space fill up unexpectedly.
You can initiate manual backups from the File History window. There, you'd see a line labeled "Run now" (typically placed below your external storage drive specs in the middle of the screen).
On the other hand, you'd probably want to copy and back up critical documents as soon as you've made changes to them. So, File History's running state is all up to the user.
If you're confident you won't forget about manual backups, you can only turn File History on when initiating a backup. If you prefer to have the feature run automatic backups, it's best to leave it turned on at all times.
Lastly, you can choose not to use File History at all. Although it's convenient (and free), you can choose from different storage options. There's the public cloud (free, with limited space and lower data security), a cloud backup solution (paid, with enhanced security options), or a dedicated backup solution for both local and cloud backups (paid, with enhanced security and backup options).
What folders does File History back up?
As we've mentioned, File History comprises a predetermined set of folders eligible for automatic backup. Those are the user folders, libraries, the desktop, saved games, favorites from Internet Explorer, and searches.
User folders typically include Documents, Pictures, Desktop, and Videos. If you want to back up an item, it must reside in one of those mentioned above.
You can't add separate, customized folders to be included in a File History backup, but you can exclude one or more if you wish.
How long are File History backups retained by default?
File History cares a lot about your backups. If it's up to the feature, it will keep every backup forever by default. However, the default setting may quickly fill up your external storage if you edit, remove or add files frequently.
You can set the retention span for backups from the File History settings menu. Here, you can choose timeframes from one month to two years, "Until space is needed," or leave the default option "Forever" on.
Depending on your data creation speeds, you'd probably want to pick a value between one and six months to keep your storage optimized.
A lower retention span means backups will be removed quicker, so you need to be careful in picking the shortest period. However, if you initiate daily backups, you'd still have a month to recover deleted or lost data. If not, you may want to calculate the optimal backup-retention cycle for your data creation habits.
As for extended retention periods, six months of backup creation would mean comprehensive storage, but it would also translate to less available storage space. If you pick a higher retention period, it would be best to audit your backups from time to time to ease the load on your external drive.
How do I restore an app in Windows 11?
When discussing app restoration in Windows 11, it may refer to three primary cases.
If an app isn't operating correctly, you can repair and restore it via Windows settings.
If you wish to reinstall an app to potentially fix it (or for any other reason, really), you can do it via PowerShell in Windows 11.
Lastly, if you want to restore already installed apps from one Windows device to another, you could use the "Restore Apps" function for Windows 11.
Let's discuss all three one by one now.
How to restore an app via Windows 11 settings?
Windows settings allow users to repair specific apps, although it doesn't offer the "repair", "change", or "modify" options for all apps and programs on your PC.
However, the method can still be helpful, so let's explore how to proceed with it. Repair options via the "Settings" page:
- Select “Start” → “Settings” → “Apps” → “Apps & features”
- Click the "More" icon next to the app you wish to repair.
- Select "Advanced options" under the app's name (again, some apps won't have that option available).
- On the "Advanced options" page, select "Repair" (if available).
- Type "control panel" in the Search on your taskbar → select "Control Panel" from the results.
- Select “Programs” → “Programs and Features”
- Right click on the program you wish to repair → choose "Repair."
If "Repair" isn't available, select "Change" and follow the on-screen directions to complete the process.
How to reinstall an app via PowerShell in Windows 11?
Sometimes, you want to reinstall individual apps (even not supported by the previous method) to fix them (or for any other reason).
To use PowerShell in such a case, follow the steps below.
- Type "windows powershell" in the Windows search box → right-click on "PowerShell" → choose the "Run as administrator" option
- You'll see a PowerShell prompt → type Get-Appxpackage –Allusers and press "Enter"
- Scroll down to locate the entry of the specific app and copy its "PackageFullName" (after finding and selecting the app’s "PackageFullName," you'll need to use Ctrl + C to copy it; the right-click and copy command doesn't work here).
- Now, type and execute the following command:
Add-AppxPackage -register “C:\Program Files\WindowsApps\<PackageFullName>” –DisableDevelopmentMode
In the command above, you'd need to replace the label "PackageFullName" with the actual package name of the specific app you want to reinstall. Also, you'd need to replace "C" with the corresponding drive letter to where Windows 11 is installed.
How to restore apps via the "Restore Apps" feature for Windows 11?
Restoring previously installed apps to a new Windows installation is probably the most time-consuming task during the process. This is why Microsoft is working on developing a "Restore Apps" feature for Windows 11.
With it, you can quickly reinstall all previously installed apps from the Microsoft Store on a freshly installed PC.
You'd still need to install desktop applications manually, but "Restore Apps" will enable users to install all Microsoft Apps connected to their account by clicking a single button.
Although we haven't seen it in action, screenshots of the development process suggest a user-friendly command to command all your apps back when switching to Windows 11.
When you visit the "Library" in the Microsoft Store, you'll see a new option appear. It will show all previously associated apps with your Microsoft account. You'd be able to click on the "Restore all" button to restore the said apps on your new Windows 11 installation.
You could also pick individual apps and restore only those you wish to keep.
However, you won't be able to use this feature for desktop apps like Photoshop, Steam or MS Office.
Another thing to look for is Microsoft's addition to the "Restore Apps" feature. As it seems, users can search for an app via the "Search" function on the Windows taskbar and install it directly without accessing the Microsoft Store.
How do you reset app data?
Sometimes, new OS versions may be buggy and cause apps to malfunction. And even if you've upgraded to Windows 11 and all is well, an app may still crash or fail to open.
In such cases, you can try repairing the app via Settings or the other means we've discussed. However, if repairing doesn't bear fruit, you may need to reset the app's data.
Remember, resetting an app will erase all the app's data on your device (including sign-in credentials and preferences). It will also unpin the app from the taskbar, so you'd need to pin it manually after the reset.
The guides below will walk you through resetting Universal Windows Platform (UWP) apps.
If you're sure an app reset is necessary, here are the ways to do it.
Reset app data via Settings
To reset app data in Settings, follow the steps below.
1. Press "Win" + "I" to open "Settings"
2. Click on "Apps" (on the left) → click on "Apps & features" or on "Installed apps" (on the right)
3. Browse through the apps list and click on the three-dotted button next to the app you wish to reset → select "Advanced options"
4. Click on "Terminate" to ensure the app and all related processes aren't running
5. Click on "Reset" → click on "Reset" again to confirm
6. Settings will now reset the app to its default state
Reset app data via the Start menu
If the app you want to reset isn't listed in "Settings," you can try resetting it from the Start menu.
Here's how to do it:
- Open the Start menu
- Click on the "All apps" button
- Browse through apps and right-click (or press and hold) on the app you want to reset → click on "More" → click on "App settings"
- Click on "Terminate" to ensure the app and all related processes aren't running
- Click on "Reset" → click on "Reset" again to confirm
- Settings will now reset the app to its default state
Reset app data via PowerShell
For this step to work, you'd need to enable the Capability Access Manager Service (camsvc) to run the commands below.
To use PowerShell in such a case, follow the steps below.
- Type "windows powershell" in the Windows search box → right-click on "PowerShell" → choose the "Run as administrator" option
- Copy-paste the command below and click "Enter" to check all installed UWP apps for the current user
Get-AppxPackage | Select Name >"$env:userprofile\Desktop\Apps_List.txt"
(this will output a list to a text file on your desktop)
Or,
Get-AppxPackage | Select Name
(this will output a list inside PowerShell)
- Scroll through the list of UWP apps to find the name of the app you wish to reset
- Type the following command in PowerShell and click "Enter"
Get-AppxPackage *UWP app name* | Reset-AppxPackage
Here, substitute "UWP app name" in the command line with the app's actual name.
Reset listed app data via PowerShell
Again, you'd need camsvc running to go for this approach.
Once it's active, go for the steps below.
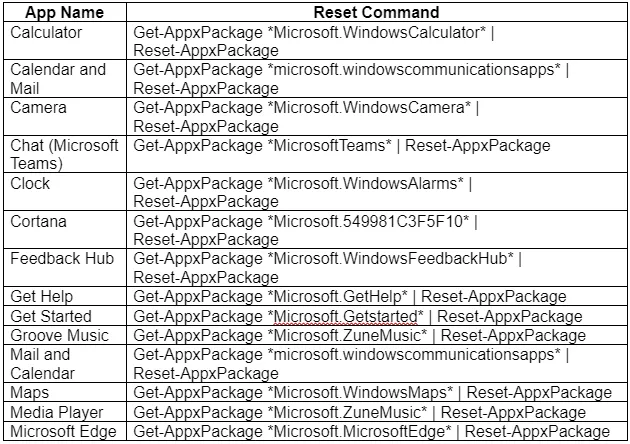
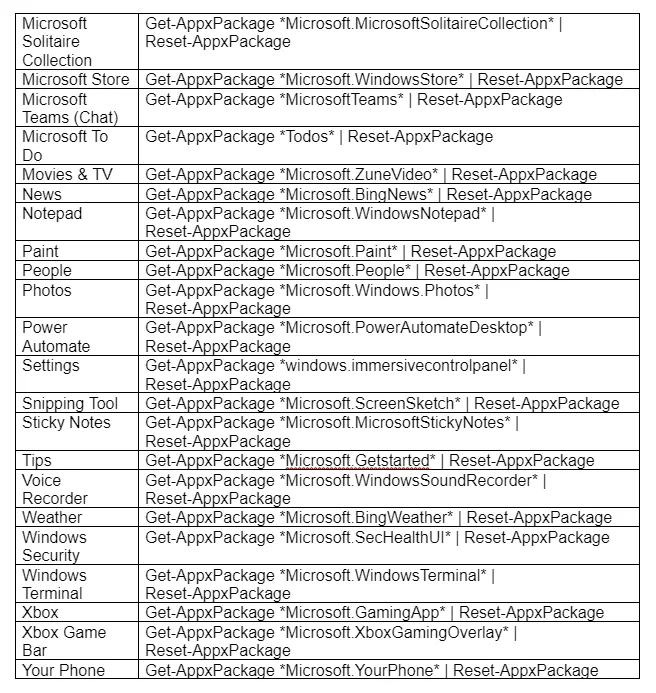
- Open "Windows Terminal" → select "Windows PowerShell"
- Copy-paste the corresponding command to the app you wish to reset → click "Enter" (we will include a list of the commands below)
Do you lose your files when upgrading to Windows 11?
As announced by Microsoft, Windows 11 became available for users on October 5, 2021.
It comes with a streamlined new design, new startup sound, some new features, visual upgrades and more. As with any newer OS version, it's designed with innovation in mind, but some users have already reported losing their files after upgrading to Windows 11.
Generally, there's no need to worry about losing files after updating to Windows 11. The reported cases can be explained by system bugs or human error; we expect the official Windows 11 version not to present any data loss issues.
Users won't lose their data when upgrading if they select the "Keep personal files and apps" option during Windows setup. If you fail to choose the option, there's a chance of losing personal data during the setup.
Even if you don't lose data, remember Windows removed some features from Windows 10, including News & Interests, Desktop Wallpaper, Math Input Panel, Quick Status, Tablet Mode, Touch Keyboard and Wallet.
In any case, you'll have plenty of time to decide whether to update to Windows 11 (at least one Windows 10 release will be supported until October 14, 2025).
Regardless of when you upgrade your OS, it's best to back up your files before you do. We're not saying you'll lose data during a Windows 11 update, but errors happen. For example, you may fail to tick the "Keep personal files and apps" option, or a power surge can strike during setup.
If you lose your data and don't have it backed up in storage, you must rebuild it. Or, if that's not possible, you'll lose it for good.
Windows 11 recovery solution: Acronis True Image
Acronis True Image is a unified solution for small offices (up to five computers) that delivers exceptional backup and recovery capabilities along with advanced cybersecurity protection. No matter what the cause of disruption — from hardware or software failure to a cyberattack — Acronis True Image ensures quick restores and recovery.
With Acronis True Image, you can create a full-disk image backup, but the solution also:
- Enables you to create local backups and back up to the cloud to make it easy to follow the industry-accepted 3-2-1 rule of backup.
- Works at a highly granular level, making it easy to backup and restore a single file or an entire file system
- Backs up your iPhone and Android devices
- Supports iOS to or from Android migration
- Creates direct cloud-to-cloud backups of your Microsoft 365 account, including the emails and attachments from your Outlook.com mailbox and all of the files in your OneDrive
- Offers machine-intelligence (MI)-based cybersecurity to block attacks in real time — before malware, ransomware, or cryptojackers can cause damage — and it keeps accidental infections and unwanted cyberattacks away from your valuable data while browsing online or video conferencing with your family and friends
Learn more about Acronis True Image or try it out for free.
About Acronis
A Swiss company founded in Singapore in 2003, Acronis has 15 offices worldwide and employees in 60+ countries. Acronis Cyber Platform is available in 26 languages in 150 countries and is used by over 21,000 service providers to protect over 750,000 businesses.